Are you ready to spice up your dinner routine? These Hot Honey Chicken Tenders are crispy, flavorful, and fun to make! Imagine tender chicken coated in a special blend of spices, then drizzled with a sweet and spicy glaze. In this article, I’ll share my favorite recipe, making cooking easy and enjoyable. Get your ingredients ready, and let’s dive into making this tasty treat that everyone will love!

Ingredients
Main Ingredients
– 1 lb chicken tenderloins
– 1 cup buttermilk
– 1 cup all-purpose flour
Seasoning Components
– 1 teaspoon garlic powder
– 1 teaspoon onion powder
– 1 teaspoon smoked paprika
Additional Elements
– 1 teaspoon cayenne pepper
– Salt and freshly cracked black pepper to taste
– Vegetable oil, for frying
– ½ cup honey
– 2 tablespoons your favorite hot sauce
– Fresh parsley for garnish
Gathering the right ingredients is key to making hot honey chicken tenders. You want fresh chicken tenderloins, buttermilk, and flour to start. Buttermilk gives the chicken a nice, tender bite. It also helps the coating stick well.
Next, seasonings add flavor. Garlic powder, onion powder, and smoked paprika give that rich taste. Cayenne pepper adds heat. Adjust the amount based on how spicy you want it. Don’t forget salt and black pepper; they enhance all the flavors.
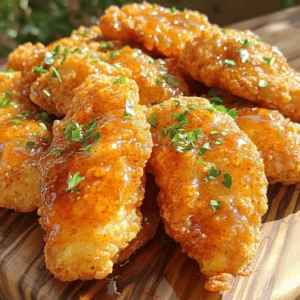
For frying, use vegetable oil. It should be hot for a crispy finish. The glaze is a mix of honey and hot sauce. This sweet and spicy combo makes the dish stand out. Finally, fresh parsley is for garnish. It adds color and freshness to the plate.
With these ingredients, you will have a tasty treat that everyone will love!
Step-by-Step Instructions
Marinating the Chicken
Marinate the chicken for at least 30 minutes. I prefer to soak it for up to 2 hours. The buttermilk soak is key. It makes the chicken tender and juicy. The acid in buttermilk breaks down proteins. This process adds great flavor too.
Preparing the Coating
In a medium bowl, mix the dry ingredients. Combine flour, garlic powder, onion powder, smoked paprika, cayenne pepper, salt, and pepper. Whisk these until they are well blended. For an even coating, use one hand for dredging. This keeps your other hand clean.
Cooking the Chicken
Heat the oil in a large skillet. Pour enough vegetable oil to cover the bottom by half an inch. Aim for a temperature of about 350°F (175°C). Look for shimmering oil, but avoid smoking. When frying, place the coated chicken gently in the oil. Cook for 4-5 minutes on each side. The chicken should turn golden brown and reach 165°F (74°C) inside. After frying, use a paper towel-lined plate to drain excess oil.
Tips & Tricks
Perfecting Your Tenders
To make your chicken tenders crispy, start with the right oil temperature. Heat your vegetable oil until it shimmers, around 350°F. If your oil is too cool, the chicken will soak up oil and become soggy. If it’s too hot, the outside will burn before the inside cooks.
Avoid common frying mistakes by not overcrowding the pan. Give each tender space. This ensures even cooking and crispiness. Flip the tenders only once for a nice golden color. Use a thermometer to check if they reach 165°F inside.
Adjusting Spice Levels
To adjust the heat, modify the cayenne pepper. If you want less spice, use half a teaspoon. For more heat, you can add a little more. Always taste your seasoned flour before coating the chicken.
Choosing the right hot sauce is key. A milder sauce works well for kids. For adults, a hotter sauce can give a nice kick. Mix the honey and hot sauce together, tasting as you go.
Serving Suggestions
For the best sides, think about coleslaw or fries. Both add a nice crunch next to the tender chicken. You could also serve with a fresh salad for balance.
To present your tenders for guests, line the platter with lettuce leaves. This adds color and keeps the tenders from getting soggy. Drizzle the spicy honey glaze over them right before serving. Add a small bowl of hot sauce on the side for those who like it spicy!

Variations
Different Coating Options
You can switch up the flour for a gluten-free version. Try almond flour or chickpea flour. They work well and add great flavor. For a unique taste, mix in different spices. Try adding Italian herbs or curry powder for a twist.
Oven-Baked Version
To bake instead of fry, preheat your oven to 425°F (220°C). Line a baking sheet with parchment paper. After coating the chicken, place them on the sheet. Lightly spray them with oil. Bake for 20-25 minutes, flipping halfway. This gives you a crispy finish without all the oil.
Healthier Alternatives
If you want a lighter dish, swap honey for agave or maple syrup. Both give a sweet touch but with less sugar. You can also cut down on oil. Use just enough to coat the chicken lightly. This way, you still get flavor without too much fat.
Storage Info
Storing Leftovers
To keep your hot honey chicken tenders fresh, store them in an airtight container. This helps maintain their flavor and moisture. You can put them in the fridge right after they cool down. They should last for about three to four days in the fridge.
Reheating Tips
When it comes to reheating, I prefer using an oven. It helps restore the crispiness. Preheat your oven to 375°F (190°C). Place the chicken tenders on a baking sheet lined with parchment paper. Heat for about 10-15 minutes or until they are hot and crispy. If you use a microwave, you may lose some crunch. To keep them crispy, use the microwave only for a short time and cover them with a paper towel.
Freezing Options
If you want to save some tenders for later, freezing is a great choice. First, let them cool completely. Then, place them in a single layer on a baking sheet. Freeze them until solid, then transfer to a freezer bag. This way, they won’t stick together. For quick meals, thaw them overnight in the fridge or use the microwave’s defrost setting. Enjoy your tasty tenders anytime!
FAQs
What is the best type of chicken for this recipe?
The best chicken for this recipe is chicken tenderloins. They are juicy and cook quickly. If you can’t find tenderloins, you can cut chicken breasts into strips. This way, you still get tender, tasty bites.
Can I make hot honey chicken tenders in advance?
Yes, you can make hot honey chicken tenders in advance. You can marinate the chicken and coat it ahead of time. Just wait to fry them until you’re ready to eat. This keeps them fresh and crispy.
What to serve with hot honey chicken tenders?
I love serving hot honey chicken tenders with coleslaw, fries, or a fresh salad. You can also pair them with dipping sauces like ranch or extra hot sauce. These sides balance the sweetness and spice of the tenders.
How do I make the glaze less spicy?
To make the glaze less spicy, simply reduce the hot sauce. Start with one tablespoon and taste it. You can always add more if you want extra heat. Mixing in more honey can also tone down the spice.
Can I use chicken breasts instead of tenders?
Yes, you can use chicken breasts instead of tenders. Cut them into strips to match the size of tenders. Just keep an eye on the cooking time. Chicken breasts may take a bit longer to cook through.You’ll find everything you need to make these delicious hot honey chicken tenders!
This blog post covered a delicious recipe for hot honey chicken tenders. You learned about the essential ingredients, from chicken tenderloins to seasoning tips. I also shared key steps for marinating, coating, and frying.
With these methods, you’ll create crispy, flavorful chicken that impresses anyone. Explore variations to suit your taste, whether frying or baking. Storing leftovers is easy, and reheating is simple too. Enjoy your tasty creation and share it with friends!