FREE DINNER EBOOK! Get your copy!
  • Cookie Policy
  • GDPR Policy
  • Disclaimer
  • Terms Of Use
  • Visit my other site: Fun Cookie Recipes
purelyyumrecipes
  • Home
  • Dinner
  • Desserts
  • Drinks
  • Appetizers
  • Contact
  • About
  • Privacy Policy
  • Home
  • Dinner
  • Desserts
  • Drinks
  • Appetizers
  • Contact
  • About
  • Privacy Policy
  • Cookie Policy
  • GDPR Policy
  • Disclaimer
  • Terms Of Use
Visit my other site: Fun Cookie Recipes

HOME / CATEGORIES /

Latest

- 2 cups fresh blueberries - 1 cup granulated sugar, divided - 1 tablespoon fresh lemon juice - 1 teaspoon pure vanilla extract Fresh blueberries are crucial for this cobbler. They bring a juicy burst of flavor. Choose ripe berries for the best taste. The sugar sweetens the mix and balances the tartness of the berries. Lemon juice adds a nice zing. It brightens the cobbler's flavor. Vanilla extract rounds out the taste, making it warm and inviting. - 1 cup all-purpose flour - 1 tablespoon baking powder - 1/2 teaspoon salt - 1 teaspoon ground cinnamon (optional) The flour forms the base of the batter. Baking powder helps it rise and makes it fluffy. Salt enhances the overall flavor. If you enjoy spices, add ground cinnamon. It gives a warm aroma and deeper flavor to the cobbler. - 1/3 cup milk - 1/3 cup unsalted butter, melted Milk adds moisture and helps bind the batter. Unsalted butter gives richness and flavor. Make sure to melt the butter before mixing. This step is key for a smooth batter. Together, these ingredients create a perfect topping for your delicious blueberries. - Preheat your oven to 375°F (190°C) and grease a 9-inch baking dish lightly. This helps prevent sticking. - In a medium bowl, mix 2 cups of fresh blueberries, 1/2 cup of sugar, 1 tablespoon of lemon juice, and 1 teaspoon of vanilla extract. Gently toss these ingredients with a spatula. This step ensures the blueberries are coated well. Pour the mixture into the greased baking dish. - In a large bowl, whisk together 1 cup of all-purpose flour, 1/2 cup of sugar, 1 tablespoon of baking powder, 1/2 teaspoon of salt, and 1 teaspoon of ground cinnamon if you like warmth in your cobbler. - Create a well in the center of the dry mix. Pour in 1/3 cup of milk and 1/3 cup of melted unsalted butter. Stir carefully until just combined. It’s okay if some lumps remain; this keeps the cobbler tender. - Spoon the batter over the blueberry mixture in the baking dish. Aim to cover it evenly; don’t stress if a few blueberries peek through. - Place the dish in the preheated oven. Bake for 35-40 minutes until the top turns golden brown. Test with a toothpick. It should come out clean. After baking, let the cobbler cool for about 10 minutes before serving. This allows the juices to settle nicely. To get the best texture, avoid overmixing the batter. When you stir, stop as soon as the flour is wet. Some lumps are okay. This keeps the cobbler soft and tender. For baking time, I recommend 35 to 40 minutes at 375°F. Check for a golden top and a clean toothpick. If it needs more time, bake a bit longer. Pair your warm cobbler with ice cream or whipped cream. The cold creaminess matches the warm, sweet fruit. For garnishing, add fresh blueberries or a sprinkle of powdered sugar. It makes your dish look even better! To store leftovers, keep the cobbler in an airtight container. It stays fresh in the fridge for up to three days. When you want to reheat, warm it in the oven at 350°F for about 15 minutes. This way, it stays delicious and tastes fresh again. {{image_4}} You can change up the fruit in your cobbler for fun. Try using different berries like raspberries or blackberries. They add unique flavors to your dish. You can also use seasonal fruit, like peaches in summer or apples in fall. Each fruit brings its own taste and charm, making your cobbler special. If you want a gluten-free version, you can swap the all-purpose flour for a gluten-free blend. Many options work well, so choose one you like. For those who prefer vegan meals, you can replace the milk with almond or oat milk. Use a plant-based butter instead of regular butter. These swaps keep the cobbler tasty and friendly for everyone. Adding spices can elevate your cobbler. Try nutmeg or cardamom for a warm, cozy taste. A little goes a long way, so start with a pinch. You can also add some citrus zest, like lemon or orange, to brighten the flavors. These small touches can make your classic blueberry cobbler stand out and impress your guests. Cobblers have roots in American history. Early settlers made them with fruits they found. They used simple doughs on top of fruit. This made cooking easy and quick. Blueberries are native to North America. They grew wild and were a staple for many Indigenous tribes. These berries found a cozy spot in American cooking. Recipes for cobblers changed over the years. Each region added its touch. In the South, you'll find sweet peach cobbler. In the Northeast, berry cobblers are more common. Blueberry cobbler became a favorite. Today, we mix fresh blueberries with sugar and spices. Some folks add oatmeal or nuts for a twist. Others use cake mix for a quick dessert. Blueberry cobbler holds a special place in culture. You see it at summer picnics and family reunions. It brings people together. Many celebrate the Fourth of July with a warm slice. It is a symbol of home cooking. The joy of sharing blueberry cobbler is timeless. It connects us to our past and each other. Yes, you can use frozen blueberries. However, they change the texture and flavor. Frozen blueberries release more juice when baked. This can make your cobbler a bit wetter. Fresh blueberries hold their shape better. They also provide a nice pop of flavor. If you use frozen, try to reduce the baking time. Check for doneness earlier. You can use several non-dairy options. Almond milk, soy milk, or oat milk work well. Each brings a different taste. Almond milk is nutty and light. Soy milk is creamy and rich. Oat milk has a sweet flavor. These substitutes keep the cobbler moist and tasty. Check your cobbler for a golden top. Insert a toothpick in the center. If it comes out clean, it’s done. Be careful not to poke too deep, or you might ruin the cobbler. The edges should be bubbly and slightly crisp. If the top is golden brown, it’s a good sign. Classic blueberry cobbler combines fresh ingredients, a simple batter, and rich history. You learned the steps to create a warm, sweet dessert that brings joy. Remember, variations and tips can enhance your cobbler for delight. Use different fruits or make it gluten-free to suit your taste. Don’t forget to serve it warm with ice cream. This recipe captures the essence of home and celebration, perfect for any gathering. Enjoy your baking, and let every bite remind you of the joy in simple pleasures.

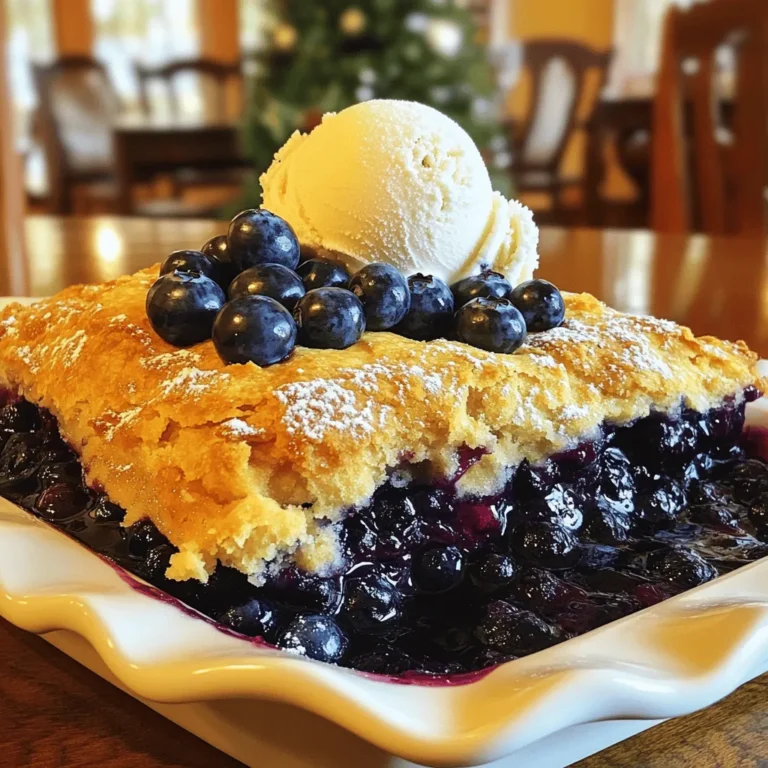
Classic Blueberry Cobbler Simple and Tasty Treat

To make a great lemon poppy seed pound cake, you need key items. Here’s what you need: - 1 ½ cups all-purpose flour - 1 teaspoon baking powder - ½ teaspoon baking soda - ½ teaspoon salt - ½ cup unsalted butter, softened - 1 cup granulated sugar - 2 large eggs - 2 tablespoons freshly grated lemon zest (about 2 medium lemons) - ¼ cup freshly squeezed lemon juice - ½ cup sour cream - 2 tablespoons poppy seeds - 1 teaspoon pure vanilla extract These ingredients work together to create a soft, moist cake with a bright lemon flavor. To take your cake to the next level, consider these fun add-ins: - Blueberries or raspberries for a fruity twist - Chopped nuts like walnuts or almonds for crunch - Coconut flakes for added sweetness These add-ins can bring new flavors and textures to your cake. Using quality ingredients can make a big difference. Here are my top picks for best results: - For flour, I recommend King Arthur Flour. - Use Land O’Lakes for butter; it’s rich and creamy. - For sugar, Domino is a trusted brand. - For vanilla extract, go for Nielsen-Massey for pure flavor. These brands help ensure your cake turns out amazing every time! First, preheat your oven to 350°F (175°C). This step is key for even baking. Get your 9x5-inch loaf pan ready. You can grease it with butter or use non-stick spray. Lightly dust the inside with flour. This helps the cake slide out easily later. Grab a medium bowl and whisk together the dry ingredients. You need 1 ½ cups of all-purpose flour, 1 teaspoon of baking powder, ½ teaspoon of baking soda, and ½ teaspoon of salt. Mix them well, then set this bowl aside for later. This mix makes your cake rise and taste great. In a large mixing bowl, use an electric mixer to cream together the butter and sugar. You need ½ cup of softened unsalted butter and 1 cup of granulated sugar. Beat them on medium speed for about 3-5 minutes. The mix should look light and fluffy when done. This step adds air and makes your cake soft. Now, add the eggs one at a time. Use 2 large eggs at room temperature. Mix well after each egg to keep the batter smooth. Next, stir in the freshly grated lemon zest and 1 teaspoon of pure vanilla extract. The zest adds a bright flavor that makes this cake special. Time to mix the wet and dry ingredients. Pour in ¼ cup of freshly squeezed lemon juice and ½ cup of sour cream, both at room temperature. Stir until everything is smooth. Now, take the bowl with the dry ingredients. Gradually fold it into the wet mixture. Use a spatula or wooden spoon for this. Be careful not to overmix, or the cake will become tough. Gently mix in 2 tablespoons of poppy seeds. This adds a nice crunch. Pour the batter into your prepared loaf pan. Smooth the top with a spatula for an even bake. Place it in the oven and bake for 50-60 minutes. Check if it’s done by inserting a toothpick into the center. It should come out clean or with just a few moist crumbs. Once baked, let the cake cool in the pan for about 10 minutes. Then, carefully transfer it to a wire rack to cool completely. This step allows the cake to set and makes it easier to slice. To get a soft and moist cake, use room temperature ingredients. This helps them mix better. Cream the butter and sugar until light and fluffy. This step adds air, which makes the cake rise. When mixing dry and wet ingredients, fold gently. Overmixing can lead to a tough cake. One mistake is skipping the room temperature step. Cold eggs or sour cream can cause uneven mixing. Another common error is not measuring flour correctly. Too much flour makes the cake dense. Lastly, avoid opening the oven door too soon. This can make the cake sink in the middle. Always preheat your oven to 350°F (175°C) before baking. This ensures even cooking. Use a toothpick to check for doneness. Insert it in the center; it should come out clean. After baking, let the cake cool in the pan for 10 minutes. This helps it set and makes it easier to remove. Then, transfer it to a wire rack to cool completely. This keeps the bottom from getting soggy. {{image_4}} You can make this cake gluten-free. Use a gluten-free all-purpose flour blend. The rest of the ingredients stay the same. Your cake will still be moist and tasty. Check the flour blend for texture and taste. Want to change the flavor? You can add lavender or almond. For lavender, use about 1 teaspoon of culinary lavender. For almond, add 1 teaspoon of almond extract. Both will give your cake a new twist. If you prefer muffins, use the same batter. Fill muffin tins about two-thirds full. Bake for 18-20 minutes. Check with a toothpick for doneness. Enjoy these bright, zesty treats for breakfast or a snack. To keep your lemon poppy seed pound cake fresh, you need to store it well. First, let the cake cool completely after baking. Once cool, wrap it tightly in plastic wrap. This helps to keep moisture in and prevents it from drying out. Place the wrapped cake in an airtight container or a resealable bag. You can store it at room temperature for up to three days. If you live in a humid area, keep it in the fridge to prevent spoilage. If you want to save some cake for later, freezing is a great option. After wrapping your cooled cake in plastic wrap, add a layer of aluminum foil for extra protection. Label the package with the date and type of cake. You can freeze it for up to three months. To thaw, simply move it to the fridge overnight or leave it at room temperature for a few hours. Enjoy the same fresh taste when you’re ready to eat it! Sometimes, leftover cake can lose its charm. To bring back the moistness, you can try a few tricks. If the cake feels dry, add a simple syrup made from equal parts sugar and water. Brush this syrup on top of each slice. For a warm treat, you can microwave a slice for about 10-15 seconds. This adds warmth and helps revive the flavor. Serve with a dusting of powdered sugar for an extra touch! Yes, you can use lemon extract. Use about one teaspoon of extract for every tablespoon of lemon juice. However, fresh lemon juice adds a bright taste that extract can't fully match. The zest from the lemon also gives a nice flavor. So, if you can, stick with fresh lemon juice for the best taste. To check if your cake is done, insert a toothpick into the center. If it comes out clean or with a few moist crumbs, the cake is ready. If there is wet batter, give it a few more minutes. The cake should also spring back when lightly touched. You can use plain Greek yogurt or buttermilk as a substitute for sour cream. They both add moisture and tang to the cake. If you use Greek yogurt, make sure it's plain and unsweetened for the best results. To prevent sticking, grease the pan with butter or non-stick spray. Then, lightly dust it with flour. You can also use parchment paper to line the bottom. This makes it easy to remove the cake after baking. The cake stays fresh for about 3 to 4 days at room temperature. Store it in an airtight container to keep it moist. If you want it to last longer, you can freeze slices for up to three months. Just wrap them well in plastic wrap and foil. In this post, we explored the key ingredients for lemon poppy seed pound cake, step-by-step instructions, and helpful tips. I emphasized ways to enhance flavor and avoid common mistakes. Additionally, we discussed variations like gluten-free options and muffins. For storage, I shared best practices to keep your cake fresh. Remember, baking is fun and rewarding. With these tips, you can create a delightful cake. Enjoy sharing it with friends and family. Your baking journey starts now!

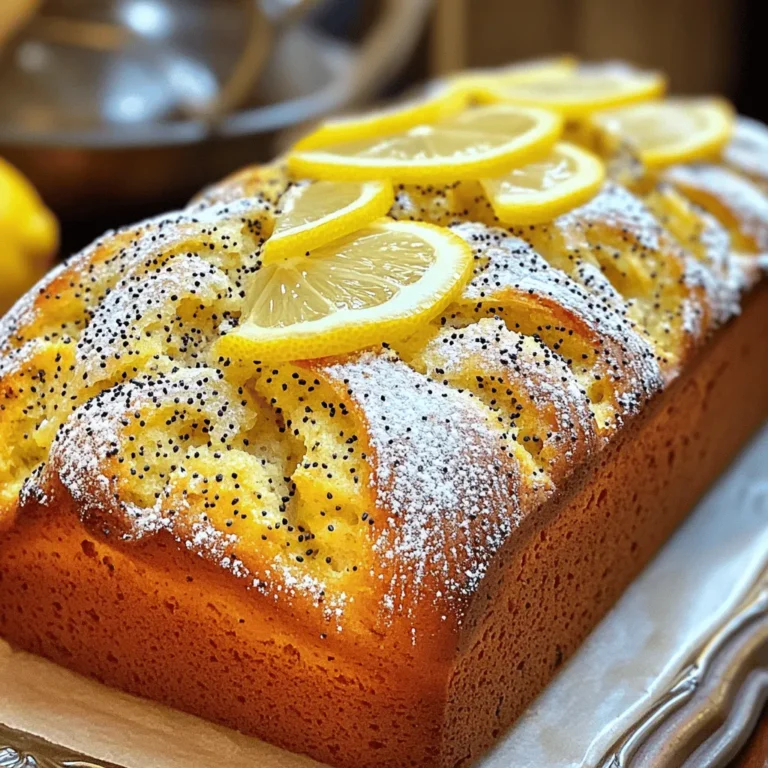
Lemon Poppy Seed Pound Cake Irresistible Recipe Guide

- 1 lb white fish fillets (like tilapia or cod) - 1 cup panko breadcrumbs - 8 small corn tortillas - 1 teaspoon smoked paprika - 1 teaspoon garlic powder - 1 teaspoon ground cumin - 1 teaspoon chili powder - Salt and freshly ground black pepper - 1 cup finely shredded cabbage - 1 ripe avocado, sliced - 1/2 cup sour cream or Greek yogurt - 2 tablespoons fresh lime juice - Fresh cilantro leaves Gathering the right ingredients is key to making tasty air fryer fish tacos. Start with fresh fish fillets. I prefer tilapia or cod for their mild flavor and nice texture. The panko breadcrumbs give the fish a great crunch. You will need only one cup, which is perfect for coating. For the seasoning, I mix smoked paprika, garlic powder, ground cumin, and chili powder. These spices add depth and warmth to the fish. A sprinkle of salt and black pepper finishes the mix. Next, you will need small corn tortillas. These hold everything together nicely. For toppings, I love using finely shredded cabbage for crunch, ripe avocado slices for creaminess, and a bit of sour cream or Greek yogurt for tang. Fresh lime juice brightens the whole dish. Finally, I garnish with fresh cilantro leaves for a burst of flavor. Each ingredient plays a role in making these fish tacos a crunchy and flavorful delight. Start by patting the fish fillets dry. Use paper towels to soak up moisture. This step helps the coating stick well. Next, cut the fillets into strips. Aim for 1-2 inch wide pieces. This size cooks evenly and gives a good bite. In a shallow dish, mix the panko breadcrumbs with spices. Add smoked paprika, garlic powder, ground cumin, and chili powder. Don't forget salt and pepper to taste. Drizzle extra virgin olive oil over the mix. Use a fork to combine until it looks like damp sand. Now, take a fish strip and dip it into the breadcrumb mix. Press gently to coat evenly. Shake off any extra crumbs. Repeat this for all the fish strips. You want them all coated well for that crunchy texture. Preheat your air fryer to 400°F (200°C) for about 5 minutes. This step is key for crispy fish. Once hot, place the coated fish strips in a single layer in the air fryer basket. Cook them for 8-10 minutes. Flip halfway through to ensure even cooking. The fish should be golden brown and crispy when done. While the fish cooks, warm the corn tortillas. Wrap them in a damp paper towel and microwave for 30 seconds. This makes them soft and easy to fold. You can also heat them in a skillet for about 30 seconds on each side. To assemble, take a warm tortilla and add a handful of shredded cabbage. Place a few crispy fish strips on top. Add some avocado slices next. Now, for the sauce! Mix sour cream or Greek yogurt with fresh lime juice in a small bowl. Drizzle this tangy sauce over your tacos. Finally, sprinkle fresh cilantro on top and serve with lime wedges. Enjoy every flavorful bite! To get that perfect crispy texture, start by drying the fish. Pat the fillets with paper towels. This step helps remove excess moisture. When the fish is dry, it will fry better. For coating, use panko breadcrumbs. Mix them with spices like smoked paprika, garlic powder, and chili powder. Drizzle olive oil on the mixture. It should feel like damp sand. This ensures it sticks well to the fish. You can prepare some ingredients ahead of time. Cut the fish into strips and season them. Store them in the fridge until you are ready to cook. You can also prep the toppings. Slice the avocado and shred the cabbage early. To keep the tacos fresh, warm the tortillas just before serving. This makes them soft and easy to fold. Pair your fish tacos with sides like rice, beans, or a fresh salad. A cold drink like limeade or beer goes well with them. For presentation, arrange tacos on a colorful platter. Garnish with lime wedges and cilantro. This makes your dish look bright and inviting. Enjoy your crunchy and flavorful fish tacos! {{image_4}} You can switch up the fish in these tacos. Salmon, mahi-mahi, or shrimp work great. Each fish adds its own taste and texture. Salmon offers a rich flavor, while mahi-mahi is mild and flaky. Shrimp brings a sweet and juicy bite. You can use whatever fish you love most. Just keep the cooking time in mind, as each type may vary. You can choose different tortillas for your tacos. Corn tortillas are classic and add a nice flavor. Flour tortillas are soft and can hold more filling. If you want to cut carbs, look for low-carb tortillas. They still taste good and work well with the fish. Pick the one that suits your diet and taste. Toppings make tacos fun and flavorful. Consider adding spicy slaw, which gives a nice crunch and kick. Mango salsa adds sweetness and freshness, perfect with fish. Pico de gallo is another tasty option, packed with fresh tomatoes and herbs. Mix and match toppings to find your favorite combo. Each adds a unique twist to your crunchy fish tacos. To keep your fish tacos fresh, store leftovers in an airtight container. Place the tacos in the fridge within two hours of cooking. Use parchment paper to separate layers if you stack them. This helps keep them from getting soggy. Tacos can stay fresh for up to three days. Reheat your fish tacos in the air fryer for the best results. Set the air fryer to 350°F (175°C) and heat for about 5 minutes. This method keeps the fish crispy. You can also use a skillet on medium heat. Heat each side for about 2-3 minutes. This helps to warm up the tortillas without making them tough. To freeze fish tacos, keep fish and tortillas separate. Wrap the fish strips in plastic wrap and place them in a freezer bag. For tortillas, stack them with parchment paper in between. Seal in a freezer bag as well. When ready to eat, thaw in the fridge overnight. Reheat the fish in the air fryer and warm the tortillas before serving. Yes, you can use frozen fish fillets. Thaw them first for best results. To thaw, place the fish in the fridge overnight. If you're in a hurry, run cold water over the sealed fish for about 10-15 minutes. Avoid using hot water, as it can cook the fish. Once thawed, pat the fish dry with paper towels. This will help the coating stick better. If you don't have panko, you can use regular breadcrumbs. Crushed cornflakes or tortilla chips also work. For a gluten-free option, try almond flour or crushed nuts. Each substitute will give a different texture. Just keep in mind that panko adds extra crunch. To stop the fish from sticking, oil is key. Lightly spray the air fryer basket with cooking spray. You can also brush a little oil on the fish. This helps create a non-stick surface. Make sure not to overcrowd the basket. Leave space between fish strips for even cooking. Yes, you can easily add heat! Mix some cayenne pepper into the breadcrumb mixture. You can also add sliced jalapeños as toppings. For more flavor, drizzle hot sauce over the assembled tacos. Adjust the spice level to fit your taste. Enjoy the extra kick! You learned how to make tasty fish tacos from scratch. We covered key ingredients and how to cook them perfectly. You can explore different fish and toppings to suit your taste. Remember to store leftovers well and enjoy them later. These tacos are fresh and fun to make. Try out the tips to impress friends at your next meal. Now it’s time to delight in your homemade fish tacos!

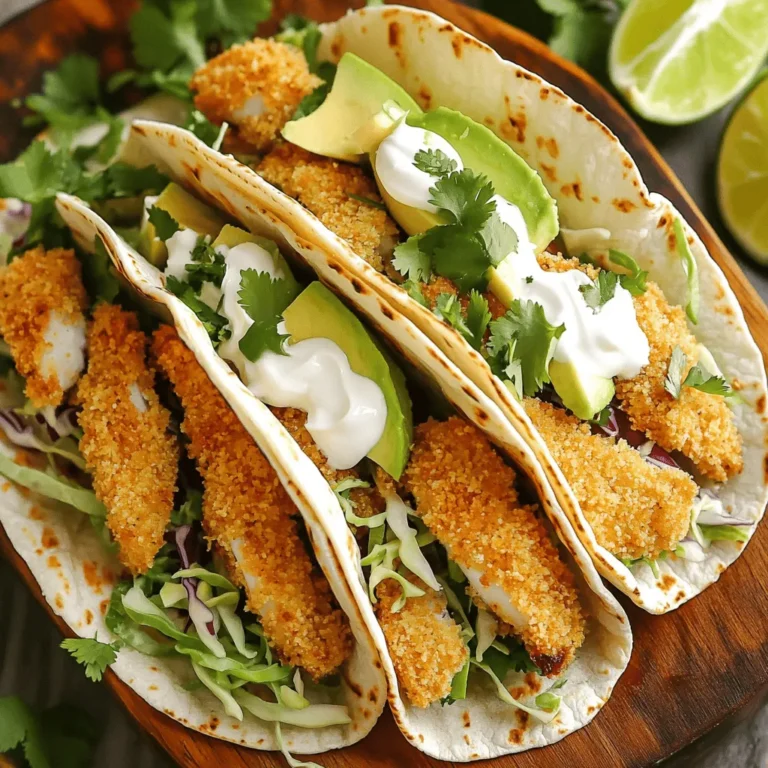
Air Fryer Fish Tacos Crunchy and Flavorful Delight

For this cobbler, you need three kinds of fresh berries: - 1 cup strawberries, hulled and cut in half - 1 cup blueberries - 1 cup raspberries These berries add color and flavor to the dish. They also create a lovely mix of sweet and tart tastes. To sweeten and flavor the cobbler, you will need: - 1/2 cup granulated sugar (divided) - 1 tablespoon cornstarch - 1 teaspoon freshly squeezed lemon juice - 1 teaspoon pure vanilla extract - 1/2 teaspoon ground cinnamon The sugar helps to balance the tartness of the berries. Cornstarch thickens the filling, while lemon juice adds brightness. For the batter, gather these dry ingredients: - 1 cup all-purpose flour - 1 teaspoon baking powder - 1/2 teaspoon baking soda - 1/4 teaspoon salt And these wet ingredients: - 1/4 cup unsalted butter, melted - 3/4 cup buttermilk The flour creates the base for the cobbler. Baking powder and baking soda help it rise, while the buttermilk keeps it moist. Start by preheating your oven to 350°F (175°C). This setting helps the cobbler cook evenly. While the oven warms up, lightly grease an 8x8 inch baking dish. Use butter or non-stick spray to prevent sticking. This step saves you from a messy cleanup later. Next, gather your fresh berries. You need 1 cup each of strawberries, blueberries, and raspberries. For the strawberries, hull and cut them in half. In a medium bowl, combine all the berries. Add 1/4 cup of sugar, 1 tablespoon of cornstarch, and 1 teaspoon of lemon juice. Toss the mixture gently. Let it sit for about 10 minutes. This waiting time allows the berries to release their juices. In a large bowl, whisk together 1 cup of all-purpose flour, 1 teaspoon of baking powder, 1/2 teaspoon of baking soda, 1/4 teaspoon of salt, and 1/2 teaspoon of ground cinnamon. In another bowl, mix the remaining 1/4 cup of sugar with 1/4 cup of melted butter, 3/4 cup of buttermilk, and 1 teaspoon of vanilla extract. Stir until smooth. Gradually combine the wet and dry mixtures. Be careful not to overmix; some lumps are okay. Now, pour the berry mixture into the greased dish. Spread the berries evenly. Pour the cobbler batter over the berries, covering them well. Bake in the preheated oven for 35-40 minutes. The top should turn golden brown. To check if it's done, insert a toothpick. If it comes out clean, your cobbler is ready. Once baked, let it cool for about 10 minutes before serving. To get a great cobbler texture, you need to mix just right. When you combine the wet and dry ingredients, stir gently. A few lumps are fine. If you overmix, the cobbler can turn tough. You want a soft and tender top that contrasts with the juicy berries below. This balance is key to a perfect cobbler. A runny filling can spoil your cobbler. To fix this, use cornstarch. It helps thicken the berry juices. Combine it with sugar and let the berries sit for ten minutes. This step allows them to release some juice, which thickens as it bakes. Use just the right amount of sugar too. Too much sugar can create extra liquid. Serving your cobbler can be fun! A warm slice of cobbler is best with vanilla ice cream. The cold ice cream melts slightly, creating a creamy mix. You can also add fresh berries on top for color. A sprinkle of mint leaves adds a nice touch too. This makes your dessert look and taste great! {{image_4}} You can switch up the berries in this recipe. Try blackberries, cherries, or even peaches. Each fruit gives a unique flavor. Blackberries add a tangy twist, while cherries bring sweetness. You can mix and match according to your taste. Just keep the same total amount of fruit. This way, your cobbler stays balanced and delicious. If you need a gluten-free option, use almond flour or a gluten-free blend. Almond flour gives a nutty taste. Make sure to adjust the liquid since almond flour absorbs moisture differently. A gluten-free blend is a great choice, too. Just read the package for the right amount. This keeps your cobbler light and fluffy without gluten. To make this cobbler vegan, swap out butter and buttermilk. Use coconut oil or vegan butter in place of butter. For buttermilk, mix almond milk with a bit of vinegar. Let it sit for a few minutes to sour. This gives you the creamy texture you need. Your cobbler will still taste great, and everyone can enjoy it! To store leftover cobbler, let it cool completely. Then, cover the dish with plastic wrap or aluminum foil. You can also transfer it to an airtight container. Store it in the fridge for up to three days. This keeps the cobbler fresh and tasty. When you are ready to enjoy the cobbler again, preheat your oven to 350°F (175°C). Place the cobbler in an oven-safe dish. Heat it for about 15-20 minutes or until warm. You can also use the microwave. Heat in short bursts of 30 seconds, checking to avoid overheating. You can freeze cobbler for later. First, let it cool completely. Cut it into serving sizes for easy thawing. Wrap each piece in plastic wrap, then place them in a freezer bag. Make sure to squeeze out extra air before sealing. It can last up to three months in the freezer. When ready to eat, thaw it in the fridge overnight and reheat as mentioned. Yes, you can use frozen berries. They are convenient and save time. Just make sure to thaw and drain them first. This helps avoid too much liquid in your cobbler. Using frozen berries may change the texture slightly, but the taste will still be delicious. You can tell the cobbler is done when the top is golden brown. Insert a toothpick into the center. If it comes out clean, your cobbler is ready. The fruit should also be bubbling slightly around the edges. Triple Berry Cobbler goes great with ice cream. Vanilla is a classic choice. Whipped cream also works well. You can serve it with a drizzle of caramel sauce for added sweetness. Fresh mint adds a nice touch too. Yes, you can prepare the berry mixture in advance. Store it in the fridge for up to a day. You can also make the batter ahead, but bake it fresh for the best taste. Just combine them and bake when you are ready to enjoy. You learned how to make a delicious triple berry cobbler using fresh berries and simple steps. We covered the ingredients, from sweeteners to dry and wet mixes. I shared tips to get that perfect texture and avoid runny filling. You also discovered variations and storage methods to enjoy later. Now, it’s your turn to create this tasty dish. With the right ingredients and techniques, your cobbler will be a hit! Enjoy the process and share it with others.

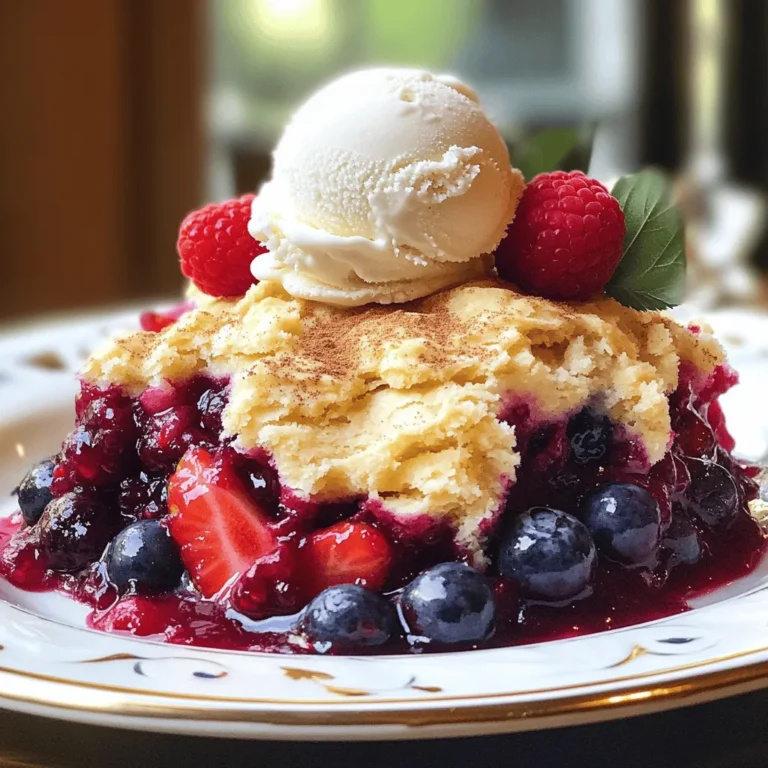
Triple Berry Cobbler Simple and Delicious Dessert Recipe

To make honey garlic roasted carrots, gather these key ingredients: - 1 pound baby carrots (or 4 regular carrots, peeled and cut into 1-inch sticks) - 3 tablespoons honey - 2 tablespoons extra virgin olive oil - 4 cloves garlic, finely minced - 1 teaspoon fresh thyme leaves (or ½ teaspoon dried thyme) - Salt and freshly ground black pepper to taste - 1 tablespoon sesame seeds (optional, for garnish) You can easily swap some ingredients if needed. Here are some ideas: - Carrots: Use other root veggies like parsnips or sweet potatoes. - Honey: Maple syrup or agave nectar work well as substitutes. - Olive oil: Any neutral oil, like canola or grapeseed oil, is fine. - Thyme: You can use rosemary or oregano for a different flavor. - Sesame seeds: Try chopped nuts for a crunchier garnish. Choosing good carrots is key for this dish. Here are my best tips: - Look for bright orange carrots. They should feel firm and crisp. - Avoid carrots with soft spots or blemishes. Freshness is important for flavor. - Baby carrots are sweet and tender. If using regular carrots, pick medium-sized ones for the best taste. - If possible, buy organic carrots. They often have better flavor and fewer chemicals. With these ingredients and tips, you're set to create a delicious dish. Enjoy the rich flavors of honey and garlic with the natural sweetness of carrots! First, gather your ingredients. You need: - 1 pound baby carrots (or 4 regular carrots, peeled and cut into 1-inch sticks) - 3 tablespoons honey - 2 tablespoons extra virgin olive oil - 4 cloves garlic, finely minced - 1 teaspoon fresh thyme leaves (or ½ teaspoon dried thyme) - Salt and freshly ground black pepper to taste - 1 tablespoon sesame seeds (optional, for garnish) Next, preheat your oven to 425°F (220°C). This high heat helps the carrots roast nicely. Line a baking sheet with parchment paper. This saves time on cleanup and helps the carrots not stick. In a large bowl, mix the honey, olive oil, minced garlic, fresh thyme, salt, and pepper. Whisk until everything blends smoothly. The honey gives a sweet touch, while garlic adds a nice kick. Add the carrots to the bowl. Toss them gently to coat each piece with the honey garlic mix. Make sure they are all well covered for the best flavor. Spread the coated carrots evenly on the baking sheet. It’s key to leave space between them. This allows hot air to circulate and roast the carrots evenly. Place the baking sheet in your preheated oven. Roast the carrots for about 25 to 30 minutes. Halfway through, stir the carrots gently. This helps them caramelize and get that lovely golden color. When the time is up, take the carrots out of the oven. Let them cool for a few minutes. If you like, sprinkle sesame seeds on top for some added crunch and flavor. For a beautiful presentation, arrange the roasted carrots on a nice platter. Drizzle any leftover honey garlic sauce from the baking sheet over them. This adds extra flavor and makes them look appealing. To finish, add fresh thyme leaves or chopped parsley for a touch of color. These carrots can be a great side dish for any meal. Enjoy your delicious honey garlic roasted carrots! To get great results, space is key. Place the carrots on the baking sheet without crowding. This helps them roast evenly. When carrots sit too close, they steam instead of roast. For best results, use a large baking sheet. If you have more carrots, use two sheets. You can boost the flavor of the carrots in simple ways. Try adding a pinch of cayenne for heat. A splash of balsamic vinegar can add depth. If you love herbs, consider rosemary or oregano. These flavors mix well with honey and garlic. Experiment to find your favorite combo. Caramelization gives carrots a sweet, rich flavor. To achieve this, roast at a high heat of 425°F (220°C). It's important to stir the carrots halfway through. This helps all sides brown nicely. If you want extra caramelization, roast a bit longer. Just keep an eye on them to avoid burning. {{image_4}} You can switch up the carrots with other veggies. Try using baby potatoes, parsnips, or Brussels sprouts. Each vegetable brings its own flavor and texture. For example, Brussels sprouts add a nice crunch and a hint of bitterness that pairs well with the sweet honey. Just cut them into similar sizes for even cooking. If you want to change the sweetness, consider using maple syrup or agave nectar. Both options work well and add their own unique flavor. Maple syrup gives a warm, rich taste. Agave nectar is milder and light. You can also use brown sugar for a caramel touch. Adjust the amount based on your taste. To spice things up, add some heat. Red pepper flakes or cayenne pepper can give your dish a kick. Start with a small amount, then taste. You can also add ground ginger for a warm zing. If you prefer a milder flavor, skip the spices or use a pinch of black pepper. To store leftover honey garlic roasted carrots, let them cool. Place them in an airtight container. Keep them in the fridge for up to four days. Using a container helps to keep the carrots fresh and prevent them from drying out. To reheat, preheat your oven to 350°F (175°C). Spread the carrots on a baking sheet. Heat them for about 10 to 15 minutes. This method keeps the carrots crunchy and tasty. You can also microwave them for 1 to 2 minutes. Use a microwave-safe dish and cover it to keep moisture in. You can freeze honey garlic roasted carrots. Allow them to cool completely. Then, place them in a freezer-safe bag or container. Remove as much air as possible to avoid freezer burn. They can last up to three months in the freezer. When ready to eat, thaw them in the fridge overnight before reheating. Yes, you can make this dish vegan. Simply replace honey with maple syrup. Maple syrup gives a sweet taste similar to honey. You can also try agave nectar as a substitute. Both options work well and keep the flavor delightful. Honey garlic roasted carrots go great with many dishes. They are tasty with grilled chicken or fish. You can serve them alongside quinoa or rice for a healthy meal. They also complement roasted meats like pork and beef. Their sweet and savory flavor adds a nice touch to any plate. To check if the carrots are done, look for a golden color. They should be soft but not mushy. You can poke them with a fork to test the texture. If they slide off easily, they are ready. Roasting takes about 25 to 30 minutes, but keep an eye on them for perfect results. This blog post showed how to make honey garlic roasted carrots. I covered the needed ingredients, important tips, and step-by-step instructions. We also explored tasty variations, how to store leftovers, and key FAQs. Remember that choosing fresh carrots and seasoning well makes a big difference. Roasting gives the carrots a sweet and savory taste that pairs well with many dishes. Enjoy making this dish and share it with friends for a delicious treat!

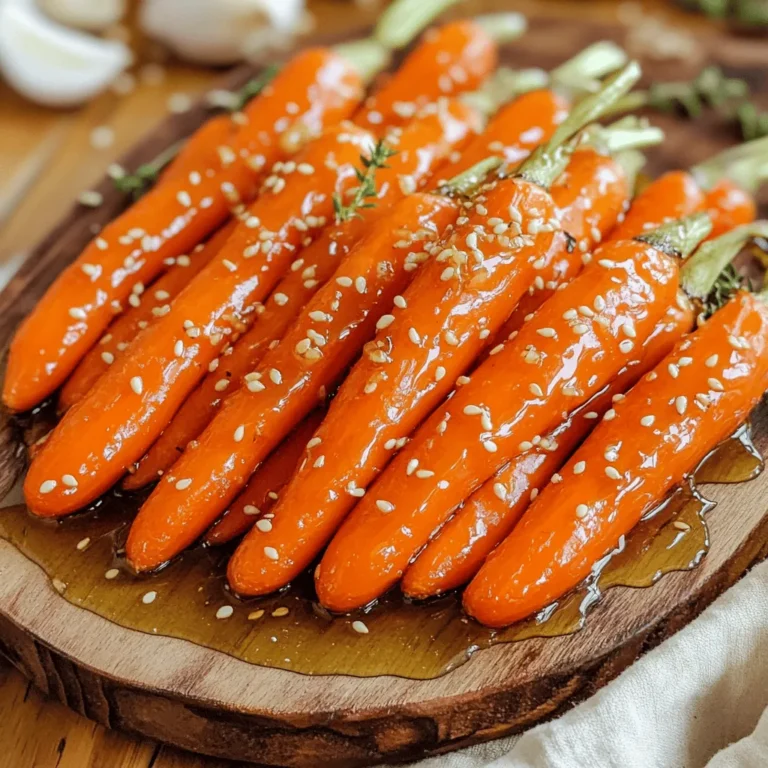
Honey Garlic Roasted Carrots Delightful and Easy Dish

To make Spicy Korean Beef Bowls, you need: - 1 lb (450g) ground beef - 2 tablespoons soy sauce - 1 tablespoon gochujang (Korean chili paste) - 1 tablespoon sesame oil - 3 cloves garlic, finely minced - 1 teaspoon fresh ginger, grated - 1 tablespoon brown sugar - 1 cup broccoli florets - 1 cup cooked jasmine rice - 2 green onions, finely chopped - 1 tablespoon sesame seeds - Salt and pepper to taste These ingredients create a yummy, spicy dish full of flavor. The ground beef gives a nice texture. Gochujang adds heat and depth. Garlic and ginger bring freshness. You can add extra items to make your bowls even better: - Sliced bell peppers for crunch - Carrots for sweetness - Spinach for added greens - Cucumber slices for a cool touch These add-ins can change the dish's taste and look. Feel free to mix and match according to what you like. If you have dietary needs, here are some swaps: - Use ground turkey or chicken instead of beef for a lighter option. - If you're gluten-free, check that your soy sauce is gluten-free. - Replace sesame oil with olive oil if you avoid sesame. These substitutions keep the dish tasty while fitting your diet. Always adjust the flavors as needed. Start by heating sesame oil in a large skillet. Use medium-high heat. Once the oil shimmers, add minced garlic and grated ginger. Sauté them for about one minute. Stir often and watch for burning. You want a nice aroma, not burnt bits. Next, add the ground beef to the skillet. Use a spatula to break it up. Cook it until it turns brown, which takes about five to seven minutes. If there's too much fat, drain it carefully. After that, pour in soy sauce, gochujang, and brown sugar. Add a pinch of salt and pepper as well. Stir everything well and let it cook for another two to three minutes. This helps the flavors mix together nicely. In the last two minutes, toss in the broccoli florets. Stir them into the beef mixture. Cook just until they are bright green and tender-crisp. You want to keep their color and crunch. To serve, take a bowl and add cooked jasmine rice. Top it with the spicy beef and broccoli mix. Finish with chopped green onions and sesame seeds for a nice touch. Enjoy your meal! To get the spice just right, start with a small amount of gochujang. This Korean chili paste adds heat and flavor. You can always add more if you like it spicier. Mix in a teaspoon at first. Taste the beef mixture and adjust as needed. Remember, the heat builds over time, so be patient. You can boost the taste with simple tricks. Add a splash of rice vinegar for tang. A drizzle of honey can balance the heat, giving a sweet touch. You might also try adding sesame oil at the end. This gives a rich flavor and aroma to your dish. Fresh herbs like cilantro or parsley can add brightness too. To keep your beef tender, don’t cook it too long. Brown it on medium-high heat for about 5-7 minutes. Break it apart gently with a spatula. Remove excess fat if there’s too much. This keeps your dish light and fresh. Cooked broccoli should be bright green and crunchy. This adds texture that pairs well with the beef. {{image_4}} If you want a meat-free option, you can use tofu or tempeh. Press the tofu to remove extra water. Cube it and cook it just like the beef. For a vegan version, swap the beef with lentils or chickpeas. These provide protein and are easy to cook. You can also use mushrooms for a hearty texture. Shiitake or portobello mushrooms work best. You can switch the ground beef for other meats. Ground turkey is a lighter choice. You can also use ground chicken for a milder flavor. For a different taste, try beef strips or pork. Just remember to adjust the cooking time based on the protein. Each option brings its own unique flavor to the dish. Feel free to add more veggies to your bowls. Carrots and bell peppers bring color and crunch. You can also use snap peas or zucchini for extra nutrition. Try adding spinach or kale for more greens. Just toss them in when you add the broccoli. This way, they will stay bright and fresh. To store your Spicy Korean Beef Bowls, first let them cool. Use airtight containers. Keep the beef and rice separate if possible. This helps keep everything fresh. Leftovers will last in the fridge for about 3-4 days. When you are ready to eat, reheat the beef mixture first. I recommend using a skillet for best results. Heat it on medium until warm. You can add a splash of water to keep it moist. For rice, use the microwave for quick reheating. Add a little water to prevent it from drying out. If you want to freeze the dish, let it cool completely. Place it in freezer-safe containers. The beef mixture freezes well for up to 3 months. When ready, thaw it overnight in the fridge. Reheat as mentioned above to enjoy a quick meal later. Yes, you can use ground turkey. It makes a lighter dish. The flavor will be different, but still tasty. Ground turkey absorbs flavors well. Cook it in the same way as beef. Gochujang is moderately spicy. It has a sweet and savory flavor, too. The heat can vary by brand. If you are sensitive to spice, use less. You can always add more later! You can serve the bowls with several sides. Some great options include: - Steamed vegetables - Kimchi - Pickled cucumbers - A simple salad These sides balance the meal well and add freshness. To make this dish gluten-free, use gluten-free soy sauce. There are many brands available. Check labels to find one that suits you. Other ingredients are naturally gluten-free, so no worries there! You learned about the key ingredients, step-by-step cooking, and helpful tips for Spicy Korean Beef Bowls. We also explored fun variations and smart storage methods. This dish is flexible and easy to make. Whether you're new to cooking or an expert, you can create a tasty meal. Remember, you can adjust spice and ingredients to fit your taste. Enjoy your cooking journey and happy eating!

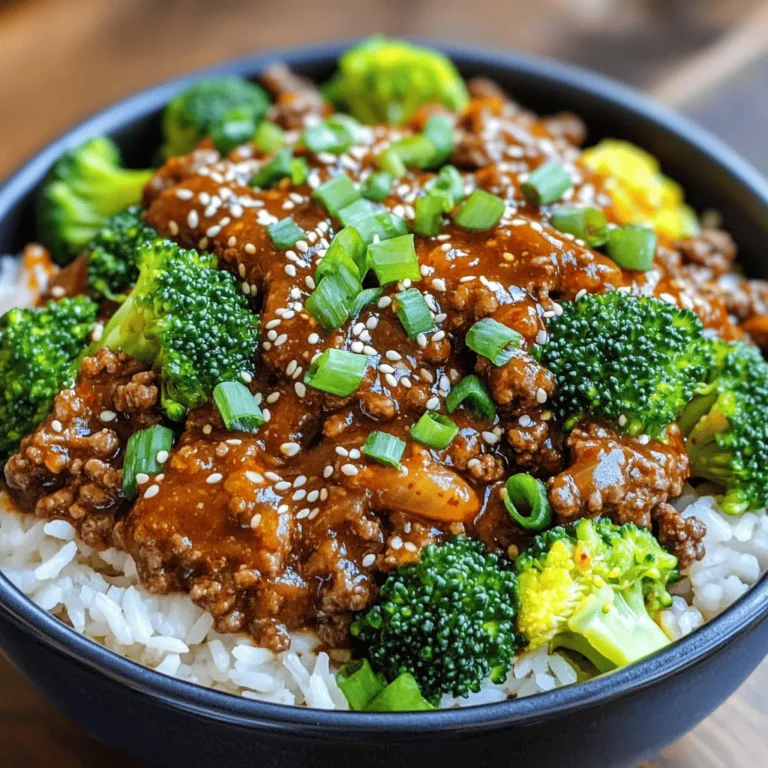
Spicy Korean Beef Bowls Simple and Flavorful Meal

To make honey mustard roasted carrots, gather these key items: - 1 lb baby carrots (or regular carrots, peeled and cut) - 3 tablespoons honey - 2 tablespoons Dijon mustard - 2 tablespoons olive oil - 1 teaspoon garlic powder - 1 teaspoon fresh thyme leaves (or 1/2 teaspoon dried thyme) - Salt and black pepper, to taste - Fresh parsley, chopped (optional for garnish) You can easily adjust some ingredients. If you don’t have baby carrots, regular carrots work well. Just peel and cut them into sticks. For a vegan twist, swap honey for maple syrup. If you lack Dijon mustard, regular mustard can do the trick. Use dried thyme if you don't have fresh. Adjust salt and pepper based on your taste. When picking carrots, look for firm ones with vibrant color. The skin should be smooth and free of blemishes. Avoid carrots that feel soft or have dark spots. If you can, choose organic carrots for better flavor and fewer chemicals. Fresh carrots will taste sweeter and roast better. Start by preheating your oven to 425°F (220°C). This step ensures your carrots roast evenly. Next, take a baking sheet and line it with parchment paper. The paper helps with easy cleanup later. It also keeps the carrots from sticking to the pan. You want them to roast nicely, not get stuck. In a medium bowl, mix together 3 tablespoons of honey, 2 tablespoons of Dijon mustard, and 2 tablespoons of olive oil. Add 1 teaspoon of garlic powder and 1 teaspoon of fresh thyme leaves. If you use dried thyme, just use half of that. Now, add a pinch of salt and pepper. Whisk all these ingredients together until they form a smooth mix. This honey mustard marinade will give the carrots a sweet and tangy flavor. Next, take 1 pound of baby carrots and place them in the bowl with the marinade. Toss them gently so each carrot gets a good coat of that tasty mix. After that, spread the coated carrots out on the baking sheet. Make sure they are in a single layer. Leave some space between them. This space helps them roast and caramelize better. Now, pop the baking sheet in your preheated oven. Roast those carrots for about 25 to 30 minutes. Halfway through, flip the carrots using a spatula. This ensures even roasting. They are done when they are tender and have a nice caramelized look. Once you take them out, let the carrots cool for a minute. If you want, sprinkle some fresh chopped parsley on top for a colorful touch. To get that nice, golden-brown color on your carrots, spacing is key. Place the carrots on the baking sheet so they don’t touch. This allows hot air to circulate around each piece. The heat helps create a sweet, crispy crust. If you crowd them, they will steam instead of roast. Aim for even sizes for uniform cooking. Baby carrots work great, but if you use regular ones, cut them into similar sizes. While thyme adds a nice touch, feel free to explore other herbs. Fresh rosemary or dill can give a bright taste. You can also use parsley for a fresh finish. Mix and match to find your favorite combination. A sprinkle of fresh herbs after cooking brightens the dish and adds color. Experimenting with flavors makes cooking fun and unique. Cooking time can change based on carrot size. Baby carrots need about 25-30 minutes in the oven. If you choose larger carrots, cut them into sticks or rounds. Check for doneness by piercing them with a fork. If they are soft and tender, they are ready. If not, return them to the oven for a few more minutes. Keep an eye on them to avoid burning. {{image_4}} You can mix things up by adding other veggies. Try using parsnips, sweet potatoes, or bell peppers. Their flavors blend well with the honey mustard. Cut these veggies into similar sizes as the carrots. This helps them cook evenly. Toss them all in the same honey mustard marinade. Spread them out on the baking sheet together. They will roast beautifully, creating a colorful dish. If you want a vegan version, you can swap honey for maple syrup or agave nectar. Both options add sweetness without using animal products. The taste will be slightly different but just as yummy. Use the same amount as the honey called for in the recipe. This makes it easy to keep the same balance of flavors. Your roasted carrots will still shine with this simple change. If you like a little heat, add chili flakes to your marinade. Just a pinch can elevate your dish. Mix in about 1/4 teaspoon of chili flakes when you whisk the marinade. This adds a nice kick without overpowering the sweetness. Adjust the amount based on your heat preference. Spice can bring a new layer of flavor to your honey mustard roasted carrots. Give it a try for a fun twist! You can store honey mustard roasted carrots in the fridge. Place them in an airtight container. They stay fresh for up to four days. Make sure they cool down before sealing the container. This helps prevent moisture buildup and sogginess. Reheating leftovers is simple. You can use an oven or a microwave. For the oven, preheat it to 350°F (175°C). Spread the carrots on a baking sheet. Heat for about 10-15 minutes. This keeps them crisp. If using a microwave, place the carrots in a bowl. Heat in 30-second intervals until warm. Freezing is an option, but texture may change. Allow the carrots to cool completely first. Place them in a freezer-safe bag or container. Remove as much air as possible. They can last up to three months in the freezer. When ready to eat, thaw in the fridge overnight. Reheat in the oven for the best taste. Yes, you can use regular carrots. Just peel them and cut them into sticks. This helps them roast evenly. Regular carrots may take a bit longer to cook, so check for tenderness. They should be soft and slightly caramelized when done. This recipe is already gluten-free if you use Dijon mustard that does not contain gluten. Most Dijon mustards are safe. Always check the label to be sure. You can also use honey and olive oil as they are gluten-free. Enjoy the flavors without worry! Honey mustard roasted carrots go great with many dishes. They pair well with grilled chicken or fish. You can serve them alongside roasted potatoes or a fresh salad. They also complement any holiday meal nicely. Get creative to find your favorite combination! This blog covers everything you need for honey mustard roasted carrots. We examined essential ingredients, made helpful substitutions, and offered tips for fresh carrots. I provided step-by-step instructions for roasting and shared tips for perfect caramelization. I also discussed delicious variations and how to store leftovers. In summary, these carrots are simple, tasty, and versatile. With a few tweaks, they can fit any meal. Enjoy your cooking adventure with these flavorful roasted carrots!

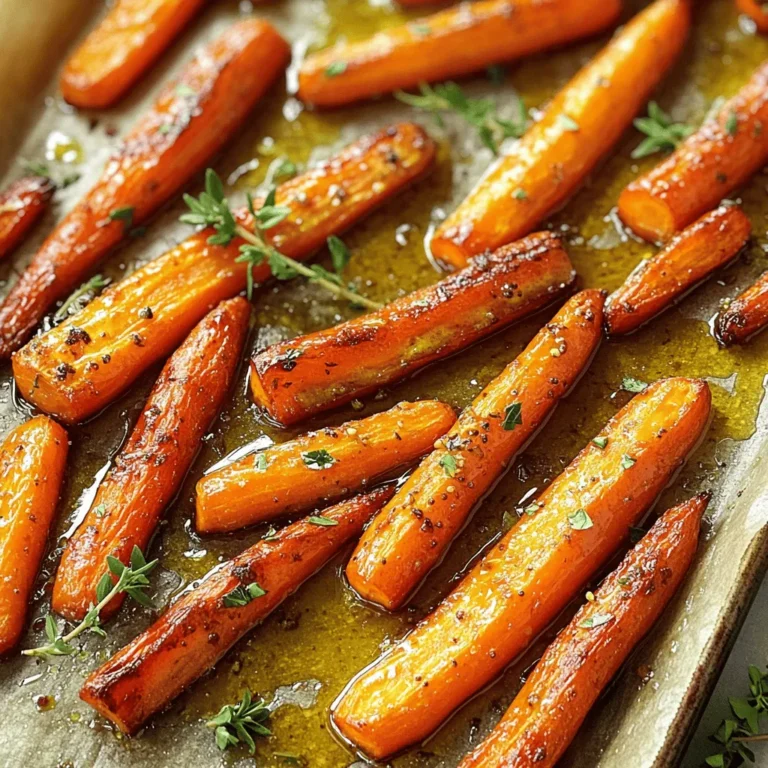
Honey Mustard Roasted Carrots Flavorful Side Dish

- 1 lb boneless chicken breast, thinly sliced - 2 tablespoons honey - 3 cloves garlic, finely minced - 1 tablespoon soy sauce - 1 red bell pepper, sliced - 1 cup broccoli florets - 1 medium carrot, julienned - ½ cup snap peas - 2 green onions, thinly sliced - Sesame seeds for garnish - 1 tablespoon cornstarch - 1 tablespoon vegetable oil - Salt and black pepper to taste For this Honey Garlic Chicken Stir Fry, I love how simple and fresh all the ingredients are. The chicken breast brings protein, while honey adds a sweet touch. Garlic gives it a nice punch. The soy sauce adds depth and umami. I use vibrant veggies like red bell pepper and broccoli. They add color and crunch. The carrot and snap peas keep it crisp and bright. Green onions are perfect for a fresh finish, and sesame seeds bring a lovely texture. Don’t forget the cornstarch! It helps thicken the sauce and gives the chicken that nice glaze. A splash of vegetable oil helps everything cook evenly in the pan. Adding salt and black pepper enhances all these flavors. Gathering these ingredients makes cooking fun and easy. Each one plays a role in creating a delicious meal that is sure to impress. To start, take 1 pound of thinly sliced chicken breast. In a medium bowl, mix the chicken with 2 tablespoons of honey, 3 cloves of minced garlic, 1 tablespoon of soy sauce, and 1 tablespoon of cornstarch. This mix will coat the chicken well. Let it marinate for at least 15 minutes. This step helps the chicken absorb all the yummy flavors. Next, grab a large skillet or wok. Pour in 1 tablespoon of vegetable oil. Heat it over medium-high heat. Wait until the oil shimmers but does not smoke. This means it's hot enough for cooking. Once the skillet is ready, add the marinated chicken. Spread it out in a single layer. Avoid overcrowding the pan. Sauté the chicken for 5 to 7 minutes. Keep it moving in the pan until it is lightly browned and fully cooked. Check that no pink remains. After cooking, transfer the chicken to a plate and set it aside. In the same skillet, toss in the sliced red bell pepper, 1 cup of broccoli florets, the julienned carrot, and ½ cup of snap peas. Stir-fry these veggies for about 3 to 5 minutes. You want them to be tender yet still slightly crisp. Stir them often to cook evenly. Now, return the cooked chicken to the skillet with the veggies. Toss everything together well. Let it cook for an additional 2 minutes. This helps all the flavors blend. Add salt and black pepper to taste. Adjust it based on how you like it. Before serving, sprinkle the stir fry with sliced green onions and sesame seeds. This adds a nice crunch and makes the dish look pretty. Serve it hot and enjoy your delicious meal! For stir frying, use a large skillet or a wok. A wok gives you more space to cook. High heat is key for quick cooking. It helps the food brown nicely while keeping it tender. Marinate the chicken for at least 15 minutes. This step builds flavor and makes the chicken tender. You can also add a splash of rice vinegar or chili flakes to the mix for extra taste. Serve your stir fry with rice or noodles. They soak up the sauce and balance the meal. To plate, use shallow bowls and drizzle some sauce on top. Top with green onions and sesame seeds for a nice look. Enjoy! {{image_4}} You can switch the chicken for beef, shrimp, or tofu. Each choice gives a new twist. If you use beef, slice it thinly for quick cooking. Shrimp cooks fast, so add it last. For tofu, press it first to remove water, then cube and sauté. Adjust cooking times: beef may take a bit longer, while shrimp cooks in just a few minutes. Changing the vegetables can change the whole dish. Try adding bell peppers, zucchini, or snap peas. Broccoli loves company, so add spinach or green beans for variety. Use seasonal veggies to bring fresh flavors. In summer, cherry tomatoes and corn shine. In winter, root veggies like carrots and parsnips add heartiness. You can tweak the sauce for a new taste. For a sweeter sauce, add more honey or a splash of orange juice. For a savory kick, mix in oyster sauce or hoisin sauce. Want heat? Add red pepper flakes or sriracha. These small changes can create a new vibe for your stir fry. To store leftover Honey Garlic Chicken Stir Fry, let it cool first. Place it in an airtight container. This helps keep the flavors fresh. You can use glass or plastic containers. Make sure the lid fits tightly to avoid moisture loss. Store it in the fridge for up to three days. Yes, you can freeze Honey Garlic Chicken Stir Fry. To do this, let it cool completely. Then, place it in a freezer-safe bag or container. Squeeze out as much air as possible. This prevents freezer burn. When ready to eat, thaw it in the fridge overnight. Reheat in a skillet over medium heat until hot. In the fridge, the stir fry lasts for about three days. After that, the quality may decline. Signs of spoilage include a sour smell or off-color. If the chicken feels slimy, it's best to throw it away. Always trust your senses when checking food freshness. You can serve Honey Garlic Chicken Stir Fry with several tasty side dishes. Here are some great options: - Steamed jasmine rice or brown rice - Fried rice with vegetables - Noodles, like udon or rice noodles - A fresh green salad with a light dressing - Egg rolls or spring rolls for a crunchy treat These sides balance the sweet and savory flavors of the stir fry. Yes, you can prepare this dish beforehand. Here are some tips for meal prep: - Marinate the chicken and store it in the fridge for up to 24 hours. - Chop the vegetables a day ahead and keep them in an airtight container. - Cook the stir fry and keep it in the fridge for up to three days. - Reheat it in a skillet or microwave before serving. Planning ahead makes busy nights so much easier! You can easily adapt this recipe for a gluten-free diet. Consider these ingredient swaps: - Use tamari instead of soy sauce. - Check that your cornstarch is gluten-free. - Pair with gluten-free noodles or rice. These changes keep the dish delicious without gluten. Yes, this stir fry works great for meal prep! Here’s how to store it: - Let it cool completely before storing. - Use airtight containers for the fridge or freezer. - It lasts up to three days in the fridge and up to three months in the freezer. Reheat in a skillet or microwave until hot. Absolutely! Adding more vegetables boosts flavor and nutrition. Here are some options: - Baby corn for a sweet crunch - Zucchini, sliced thin - Mushrooms for an earthy flavor - Snap peas or green beans for a crisp bite Just chop them and add them during the stir-fry step. Enjoy customizing your dish! This blog post provided a clear guide to making Honey Garlic Chicken Stir Fry. We explored the main ingredients, step-by-step instructions, and useful tips. You learned how to customize the dish with different proteins and veggies, as well as proper storage methods. Now, get creative in your kitchen! Try out new ingredients or variations. Enjoy the tasty results and share your creations with friends and family. Happy cooking!

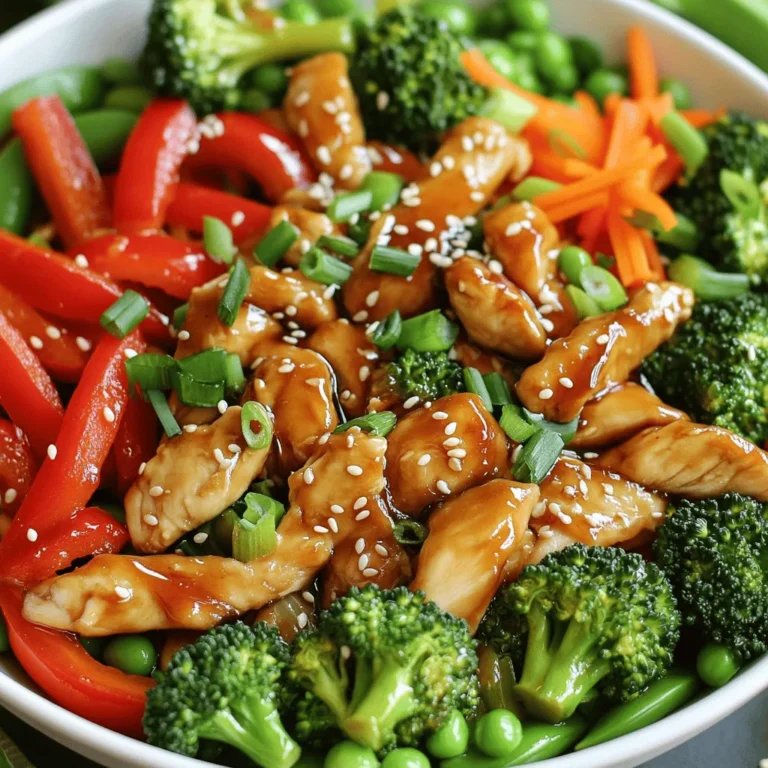
Honey Garlic Chicken Stir Fry Flavorful and Easy Meal

- 2 cups rolled oats - 1 cup mixed nuts (almonds, pecans, or cashews), chopped - 1/2 cup peanut butter (preferably crunchy for texture) - 1/3 cup honey or maple syrup (maple syrup for a vegan option) - 1/4 cup coconut oil, melted The main ingredients give this granola its hearty texture and flavor. Rolled oats form the base, providing fiber and energy. Chopped mixed nuts add crunch and healthy fats. I love using crunchy peanut butter for a nice bite. Sweeteners like honey or maple syrup add a touch of sweetness while coconut oil helps bind everything together. - 1/2 cup chocolate chips (optional for a sweet touch) - 1/2 cup dried fruits (such as cranberries, apricots, or raisins) These add-ins can take your granola to the next level. Chocolate chips bring a fun sweetness, while dried fruits add chewy texture and flavor. Mix and match according to your tastes! - Calories per serving: About 200 - Protein content: Around 6 grams - Fiber content: About 4 grams This granola is not only tasty but also nutritious. Each serving packs a good amount of protein and fiber, making it a great snack. You can feel good about enjoying this crunchy treat! - Preheat your oven to 350°F (175°C). This step makes sure your granola bakes evenly. - Line a baking sheet with parchment paper. This helps with easy cleanup and prevents sticking. - In a large bowl, combine 2 cups of rolled oats and 1 cup of chopped mixed nuts. Stir well to mix. - In another bowl, whisk together 1/2 cup of crunchy peanut butter, 1/3 cup of honey or maple syrup, 1/4 cup of melted coconut oil, 1/2 teaspoon of vanilla extract, 1/2 teaspoon of ground cinnamon, and 1/4 teaspoon of fine sea salt. Make sure it’s smooth and well blended. - Pour the peanut butter mixture over the oat and nut mix and stir until every piece is coated. - Transfer the mixture to the lined baking sheet. Spread it out and press it down firmly. This helps form clusters. - Bake for 25-30 minutes. Stir halfway through to ensure even browning. Look for a golden brown color and a nice aroma. - Let the granola cool completely on the baking sheet. Cooling is key for that crunchy texture. - Once cool, break the granola into clusters with your hands. If you like, add 1/2 cup of chocolate chips and 1/2 cup of dried fruits for extra flavor. To get that perfect crunch, pay close attention to baking time. Bake the granola for 25 to 30 minutes. Halfway through, stir it for even browning. Remove it from the oven when it turns golden brown. This color means it’s ready! Pressing the mixture is key too. After spreading it on the baking sheet, press it down firmly. This helps create clusters. Clusters are great for snacking! If you want a vegan version, swap honey for maple syrup. They both add sweetness but in different ways. You can also choose nut-free options. Use seeds like pumpkin or sunflower instead of nuts. This keeps the recipe tasty for everyone! Store your granola in an airtight container. Glass jars work well because they keep it fresh. A zip-top bag is another good option. The granola stays crunchy for about two weeks. If you want to keep it longer, freeze it for up to three months. Just remember to let it cool completely before storing! {{image_4}} You can make your granola even better by adding spices. Try mixing in nutmeg or ginger for warmth. These spices give a nice twist to the flavor. You can also use flavored peanut butter. Chocolate, cinnamon, or honey flavors can add depth. Each option gives you a unique taste. Switch up the nuts in your granola. You can use almonds, pecans, or cashews. Each nut brings its own crunch and flavor. Seasonal dried fruits are also a great addition. Try cranberries, apricots, or raisins for a sweet bite. These changes keep your granola exciting and fresh. You can decide if you want clusters or crumble. For clusters, press the mixture down firmly before baking. This helps them stick together. For a crumble, mix less or press down lightly. You can use granola in many ways. It's great on yogurt or in cookies. Feel free to experiment with textures! You can enjoy crunchy peanut butter granola in many ways. A great option is to pair it with yogurt. Just spoon some yogurt into a bowl and top it with granola. This mix gives you a tasty breakfast or snack. The creamy yogurt balances the crunchiness of the granola. You can add fresh fruits for a burst of flavor. Another way to enjoy it is as an energizing snack. Grab a handful of granola when you need a boost. It gives you energy without the sugar crash. The mix of nuts and oats keeps you full longer. I love taking it on hikes or long walks. Crunchy peanut butter granola works well in meals too. You can use it as a topping for smoothie bowls. Just sprinkle some on top for extra crunch and flavor. It adds a nice texture and a nutty taste. You can even mix it into your smoothie for added nutrients. Adding granola to oatmeal or salads is another fun way to enjoy it. Just stir in some granola to your warm oatmeal. It makes your breakfast even better. For salads, sprinkle a handful on top. The crunch pairs well with fresh greens and dressing. You can also make creative recipes using crunchy peanut butter granola. One idea is to make granola bars. Just combine the granola with some melted chocolate and form bars. They are great for on-the-go snacks. Granola parfaits are another tasty treat. Layer granola with yogurt and fruits in a glass. This looks great and tastes amazing. You can change the fruits and yogurt flavors to keep it exciting. These recipes let you enjoy granola in new and fun ways. Yes, you can make this granola ahead of time. In fact, it stores well. If kept in an airtight container, the granola lasts for about two weeks. For best taste, use it within the first week. To reheat, simply spread it on a baking sheet and warm it in a 350°F oven for about 5-10 minutes. This helps restore its crunch. To reduce the sweetness in your granola, cut back on the honey or maple syrup. Start with half the amount and taste as you mix. You can also add spices like nutmeg or ginger for flavor without added sugar. Another option is to use unsweetened nut butter. This adds richness without much sweetness. Yes, this recipe is gluten-free if you choose gluten-free oats. Always check the label to ensure they are certified gluten-free. If you add any mix-ins, make sure they are also gluten-free. This way, you can enjoy a safe and tasty snack. Yes, you can freeze your granola. To freeze, place it in a freezer-safe bag or container. Make sure to remove excess air to prevent freezer burn. It keeps well for up to three months. To thaw, just leave it at room temperature for a few hours before enjoying. You’ve learned how to make Crunchy Peanut Butter Granola that is both tasty and easy. We covered key ingredients like oats, nuts, and sweeteners. I shared step-by-step instructions to get the perfect bake. You also discovered tips to achieve that ideal crunch. Try mixing in new flavors or serving it in unique ways. This granola is perfect for breakfast or a snack. Enjoy the process and experiment with different ingredients. Making granola at home saves money and tastes great. Now, take action and make your own batch!

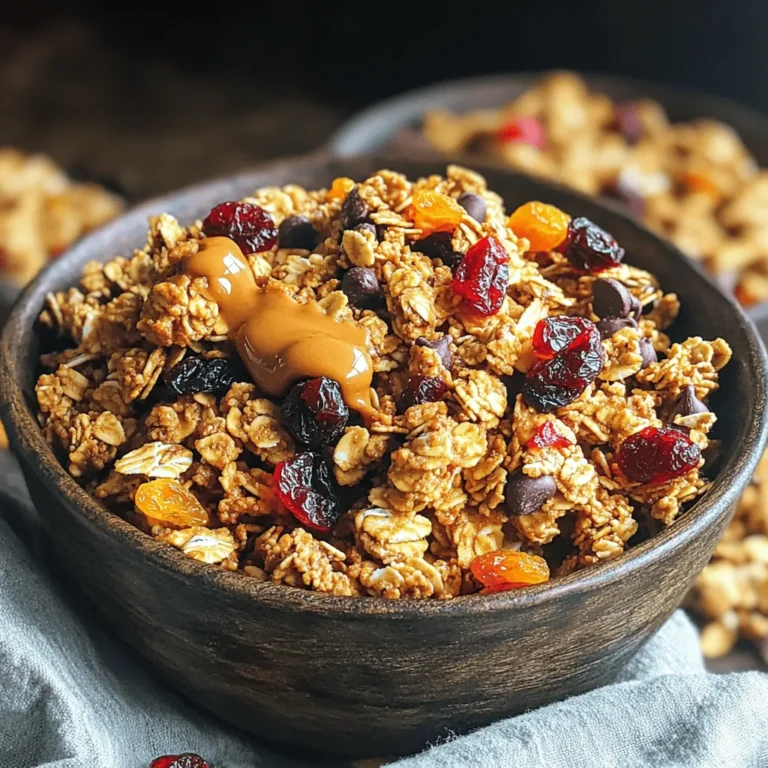
Crunchy Peanut Butter Granola Perfect for Snacking

- 1 lb boneless, skinless chicken thighs or breasts, cut into bite-sized pieces - 1 cup long-grain rice - 1 medium onion, finely chopped - 3 cloves garlic, minced - 2 cups chicken broth - 1 cup heavy cream - 1 cup frozen peas - 1 teaspoon dried thyme - 1 teaspoon smoked paprika - 1 tablespoon olive oil - Salt and freshly ground black pepper, to taste - Fresh parsley, chopped for garnish You can swap chicken thighs for breasts or vice versa. Both work well in this dish. If you want a lighter option, use half-and-half instead of heavy cream. For a vegetarian twist, replace chicken broth with vegetable broth and use chickpeas instead of chicken. Brown rice can also be used, but it requires longer cooking time. Garnish your dish with fresh parsley for color. You can also add grated Parmigiano-Reggiano cheese for extra flavor. A squeeze of lemon juice brightens the dish. If you like spice, try a sprinkle of red pepper flakes. These simple additions make your meal even more delightful! To start, gather all your ingredients. You will need: - 1 lb boneless, skinless chicken thighs or breasts, cut into bite-sized pieces - 1 cup long-grain rice - 1 medium onion, finely chopped - 3 cloves garlic, minced - 2 cups chicken broth - 1 cup heavy cream - 1 cup frozen peas - 1 teaspoon dried thyme - 1 teaspoon smoked paprika - 1 tablespoon olive oil - Salt and black pepper, to taste - Fresh parsley, chopped for garnish Chop your onion and mince your garlic. Cut chicken into pieces. Having everything ready makes cooking easier. Heat a large pot over medium heat. Add the olive oil. Once it is hot, add the onion. Sauté until the onion is clear, about 3-4 minutes. Then, add the garlic and cook for 1 more minute. Next, season the chicken with salt, pepper, thyme, and paprika. Add the chicken to the pot. Cook for 5-7 minutes, stirring until it is brown on all sides. Now, add the rice to the pot. Stir it in for 1-2 minutes. This helps the rice get a nice flavor. Pour in the chicken broth and mix well. Bring it to a boil, then lower the heat. Cover the pot and let it simmer for 15-20 minutes. After the rice is tender, stir in the heavy cream and frozen peas. Cook for 5 minutes on low heat. Taste your dish. Adjust the seasoning if needed. Finally, remove the pot from heat. Let it sit, covered, for 5 minutes. This helps the flavors mix well. To check if the chicken is done, cut a piece in half. It should not be pink inside. The rice should be soft and fluffy. If it is still hard, cook it a little longer. If the mix is too dry, add a bit more broth or cream. Using these tips ensures your creamy chicken and rice turns out perfect every time! To get a creamy texture, use heavy cream. It adds richness that makes this dish special. Stir in the cream at the end of cooking. This keeps it smooth and prevents curdling. Always let the pot sit covered for five minutes after cooking. This step helps all the flavors blend perfectly. One common mistake is overcooking the chicken. This can make it dry. Cook the chicken until just browned, then add the rice and broth. Another mistake is not letting the rice absorb enough liquid. Keep the lid on while it simmers. This keeps the steam in and helps the rice cook well. Seasoning is key to a great dish. Use salt and black pepper generously. Smoked paprika adds a nice depth of flavor. Dried thyme brings a hint of earthiness. Feel free to taste as you go. Adjust the seasoning to fit your taste. Adding fresh parsley before serving gives a nice pop of color and freshness. {{image_4}} To make this dish lighter, swap heavy cream for low-fat yogurt or coconut milk. You can also use brown rice for more fiber and nutrients. Reduce the amount of chicken broth to lower sodium. Adding more veggies, like spinach or bell peppers, boosts vitamins without many calories. For a vegetarian twist, replace chicken with mushrooms or tofu. You can use vegetable broth instead of chicken broth for flavor. Add extra peas or other vegetables, such as carrots and zucchini, to enhance the dish. This keeps the creamy texture while making it plant-based. Experiment with spices to change the flavor. Add curry powder for a spicy kick or lemon zest for brightness. You can also try fresh herbs like basil or cilantro to add a fresh taste. For a smoky flavor, include chipotle peppers or smoked salt. Each change brings a new twist to this comforting meal. After enjoying your One-Pot Creamy Chicken & Rice, let it cool first. Use an airtight container to keep the leftovers fresh. Store them in the fridge for up to three days. If you want to keep it longer, consider freezing it. To reheat your creamy chicken and rice, use the stove for best results. Place it in a pot over low heat. Add a splash of chicken broth or water to help loosen it up. Stir occasionally until it’s hot and creamy again. You can also use the microwave. Heat it in short bursts, stirring in between to heat evenly. If you choose to freeze this dish, let it cool completely first. Use freezer-safe containers or bags. The meal can last in the freezer for up to three months. When ready to eat, thaw it overnight in the fridge. Reheat as mentioned above for the best taste and texture. Yes, you can use brown rice. Brown rice takes longer to cook. You need to adjust the liquid as well. Use about 2 ½ cups of chicken broth. Cook it for about 35-40 minutes instead of 15-20 minutes. This change gives a nuttier taste. To make this dish dairy-free, swap heavy cream with coconut milk. Use full-fat coconut milk for creaminess. You can also use a dairy-free cream substitute. Almond or oat cream works well, too. This keeps the dish rich and tasty without dairy. Great sides include a simple green salad. A light cucumber salad adds freshness. Garlic bread goes well, too, for a hearty meal. Roasted vegetables can round out the flavors nicely. Each of these sides adds a tasty contrast to the creamy dish. In this blog post, we explored the key ingredients for One-Pot Creamy Chicken & Rice. We covered ingredient substitutions and some tasty garnishes. The step-by-step guide made cooking easy, while tips helped you avoid common mistakes. You learned about variations, storage, and reheating methods to keep your meal fresh. Cooking does not have to be hard. With the right steps, you can enjoy a delicious, creamy dish. Remember, cooking is fun and a chance to be creative. Enjoy your tasty meal!

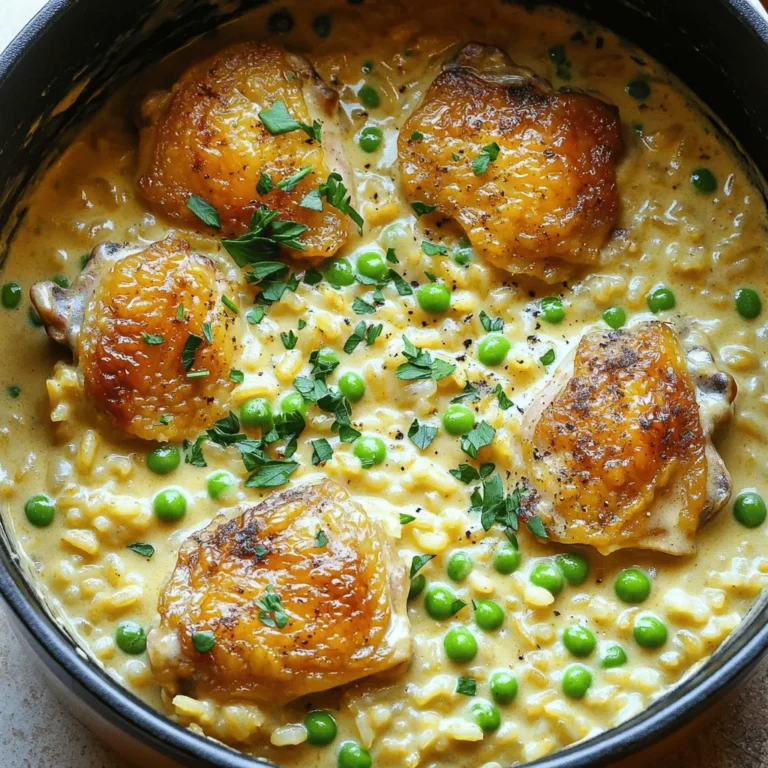
One-Pot Creamy Chicken & Rice Simple Comfort Meal

PREV 1 … 9 10 11 … 20 NEXT
purelyyumrecipes

explore

DessertsDinnerAppetizersDrinks

Our Policies

  • Cookie Policy
  • Copyright Policy
  • Disclaimer
  • GDPR Policy
  • Terms Of Use
Back to Top
  • About
  • Contact Us
  • Privacy Policy
© 2025 purelyyumrecipes