FREE DINNER EBOOK! Get your copy!
  • Cookie Policy
  • GDPR Policy
  • Disclaimer
  • Terms Of Use
  • Visit my other site: Fun Cookie Recipes
purelyyumrecipes
  • Home
  • Dinner
  • Desserts
  • Drinks
  • Appetizers
  • Contact
  • About
  • Privacy Policy
  • Home
  • Dinner
  • Desserts
  • Drinks
  • Appetizers
  • Contact
  • About
  • Privacy Policy
  • Cookie Policy
  • GDPR Policy
  • Disclaimer
  • Terms Of Use
Visit my other site: Fun Cookie Recipes

HOME / CATEGORIES /

Latest

- 1 head of cauliflower, cut into bite-sized florets - 2 cups cooked chicken, shredded - 1/2 cup buffalo sauce - 1 cup plain Greek yogurt - 1 cup shredded cheddar cheese - 1/2 cup crumbled blue cheese (optional) - Seasonings: garlic powder, onion powder, paprika, salt, and pepper - 1/4 cup sliced green onions for garnish This dish starts with fresh cauliflower. I love using it because it adds a nice crunch. You can cut it into bite-sized pieces. This step is key for even cooking. Next, we need cooked chicken. Shredded chicken works best. You can use leftover chicken or buy rotisserie chicken. It saves time and tastes great. Buffalo sauce gives this casserole its kick. Adjust the amount based on your spice level. If you like it hot, add more. Plain Greek yogurt replaces sour cream. It makes the dish creamy. It’s a healthy twist and adds protein. Cheddar cheese is a must for that melty goodness. You can also sprinkle on some blue cheese if you want a stronger flavor. Seasonings like garlic powder, onion powder, and paprika give depth. Don’t forget salt and pepper to taste. Lastly, garnish with green onions. They add color and a fresh taste. This mix of ingredients creates a rich and savory casserole. Each bite will be packed with flavor. {{ingredient_image_2}} - Start by preheating your oven to 375°F (190°C). This step is key for even cooking. - Next, steam the cauliflower florets. Place them in a steamer basket over boiling water. Steam them for about 5-7 minutes. They should be tender but still firm. Once done, drain and let them cool. - In a large bowl, mix the cooked chicken and buffalo sauce. Add the Greek yogurt, garlic powder, onion powder, paprika, salt, and pepper. Stir well until the chicken is coated in the sauce. - Gently fold in the steamed cauliflower florets into the chicken mixture. Make sure to keep the cauliflower intact. - Now, transfer the entire mixture into a greased 9x13-inch casserole dish. Spread it evenly for uniform cooking. - Top the casserole with shredded cheddar cheese. If you like blue cheese, sprinkle that on too. - Place the casserole in the preheated oven. Bake for 20-25 minutes. Look for melted cheese that is bubbly and golden brown. - After baking, take the casserole out of the oven. Let it cool for a few minutes. Before serving, sprinkle sliced green onions on top for added color and flavor. - Adjusting the spice level in buffalo sauce You can make the dish milder or spicier. If you want it hot, add more buffalo sauce. If you prefer it mild, use less. Taste as you go to find your sweet spot. - Using rotisserie chicken for convenience Using rotisserie chicken saves you time. Just shred it and mix it in. This way, you skip the cooking step and get great flavor right away. - Choosing the right cheese combinations Cheddar cheese adds a nice sharp taste. Blue cheese gives bold flavor. You can mix them for a delicious combo. Don’t be afraid to experiment with your favorites! - Serving suggestions with side dishes Serve the casserole hot and fresh. Pair it with crunchy celery sticks or a light salad. This adds a nice crunch and makes your meal feel balanced. - Garnishing with green onions Sprinkle sliced green onions on top before serving. They add a fresh touch and a pop of color. This simple step makes your dish look more appealing. - Using pre-cooked chicken You can save time by using pre-cooked chicken. Just make sure it's shredded well. This way, you cut down on prep time and still enjoy great taste. - Steaming cauliflower efficiently Use a steamer basket over boiling water. Steam the cauliflower for 5-7 minutes. This keeps it tender but firm, ready to mix into your casserole without getting mushy. Pro Tips Choose Your Chicken Wisely: Using rotisserie chicken is a great time-saver, but make sure to choose a flavorful variety to enhance the overall taste of your casserole. Mind the Spice Level: Adjust the amount of buffalo sauce based on your spice tolerance. You can always start with less and add more if needed! Perfectly Cooked Cauliflower: Avoid overcooking the cauliflower while steaming; it should be tender but still hold its shape for the best texture in your casserole. Cheese Variations: Experiment with different cheeses like pepper jack for an extra kick or mozzarella for a milder flavor, depending on your preference. {{image_4}} You can easily swap the cauliflower with broccoli. Broccoli gives a nice crunch and taste. It also cooks well in this dish. Using different types of cheese can change the flavor. Try Monterey Jack or pepper jack for a spicy kick. A blend of cheeses can also add depth. For gluten-free options, ensure your buffalo sauce is gluten-free. Most brands are, but always check labels. You can also make this dish dairy-free. Use a dairy-free yogurt and cheese. These swaps keep the flavors while fitting dietary needs. Want to add more veggies? Spinach and bell peppers work great. They add color and nutrients. You can also add herbs or spices for extra flavor. Try oregano or thyme to enhance the taste. A pinch of cayenne can also up the spice level. To keep your buffalo chicken cauliflower casserole fresh, store it in a sealed container. Make sure it cools to room temperature first. Place it in the fridge for up to four days. For longer storage, you can freeze it. Wrap the casserole tightly in plastic wrap, then place it in a freezer-safe container. It can last in the freezer for up to three months. When it's time to eat your leftovers, you want them warm and tasty. The best way to reheat is in the oven. Preheat your oven to 350°F (175°C). Place the casserole in an oven-safe dish, cover it with foil, and heat for about 20-25 minutes. This keeps the texture nice. You can also use a microwave, but the oven works better for keeping the cheese gooey. In the fridge, your casserole lasts about four days. If you freeze it, the shelf life extends to about three months. Just remember to label your containers with the date. That way, you know when to enjoy it! Yes, you can use frozen cauliflower for this recipe. It saves time and is convenient. Just make sure to thaw the cauliflower before using it in the casserole. You can steam it briefly to ensure it is tender. This way, it will blend well with the other ingredients. The spice level depends on the buffalo sauce you choose. If you like it hot, use a spicy sauce. For a milder flavor, opt for a mild buffalo sauce. You can always adjust the amount of sauce to suit your taste. This makes it great for everyone at the table. Yes, you can prepare this casserole ahead of time. Mix all the ingredients and store them in the fridge. Just remember to bake it when you're ready. This makes it perfect for busy weeknights or meal prep. I love serving this casserole with crunchy celery sticks or a light salad. They provide a nice contrast to the rich flavors of the dish. You can also add some ranch dressing for dipping. It enhances the meal and adds a delicious touch. Absolutely! This casserole is great for meal prep. It keeps well in the fridge and is easy to reheat. You can portion it out into containers for quick meals. Just store it in the fridge for up to four days. It’s a tasty and healthy option for any day of the week. This blog post covers a tasty buffalo chicken cauliflower casserole. We explored key ingredients, easy steps to prepare it, and tips to enhance flavors. I shared variations for different diets and highlighted storage methods. This dish is simple, quick, and great for any meal. You can also customize it to fit your taste. Enjoy making this casserole and share it with friends and family. It’s a fun and delicious way to mix flavors and nutrients!

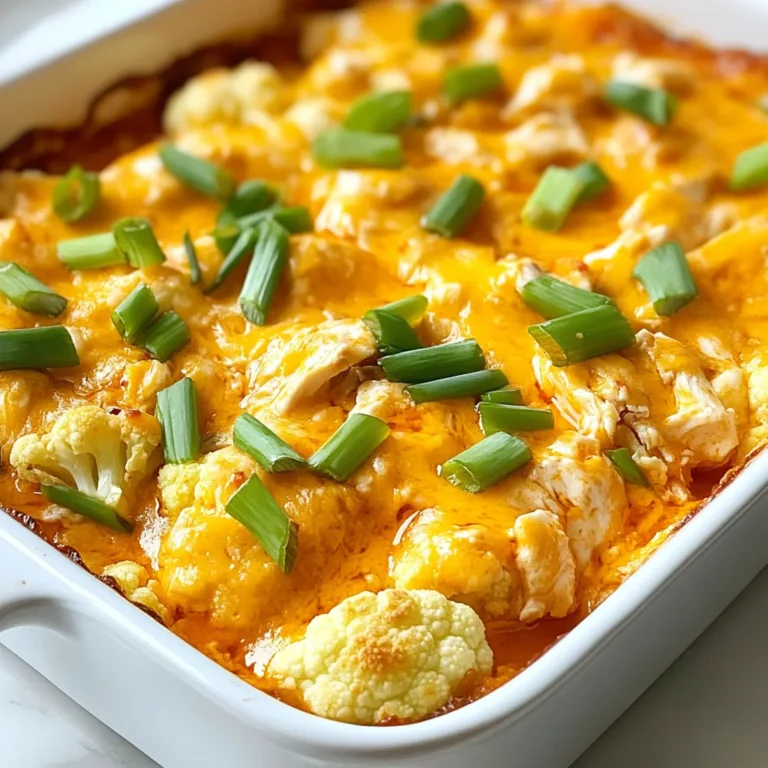
Buffalo Chicken Cauliflower Casserole Simple Recipe

- 1 pound penne pasta - 2 tablespoons extra virgin olive oil - 1 pound boneless, skinless chicken breasts, cut into 1-inch cubes - 3 cloves garlic, minced - 1 (28-ounce) can of crushed tomatoes - 1 cup heavy cream - 1 teaspoon Italian seasoning blend - 1 cup fresh basil leaves, roughly chopped - Salt and freshly cracked black pepper to taste - ½ cup grated Parmesan cheese - Red pepper flakes (optional, for a spicy kick) Chicken Penne Alla Vodka is a simple dish, yet each ingredient adds depth. The penne pasta provides a hearty base. The chicken adds protein and richness. Garlic gives a warm aroma. Crushed tomatoes create a vibrant sauce. Heavy cream makes it creamy and smooth. Each herb and spice elevates the flavor. - Red pepper flakes (for heat) - Fresh parsley (for garnish) - Additional cheese (like mozzarella) You can add red pepper flakes for a spicy kick. Fresh parsley can brighten the dish. Extra cheese on top creates a gooey finish. These options let you customize the dish to your taste. - Olive oil - Salt - Black pepper - Dried Italian herbs These pantry staples are key for flavor. Olive oil brings richness. Salt and pepper enhance every bite. Dried Italian herbs add an aromatic touch. Having these on hand makes cooking easier. They will help you create a delicious Chicken Penne Alla Vodka anytime! {{ingredient_image_2}} To start, get a large pot and fill it with salted water. Bring it to a rolling boil. Once boiling, add 1 pound of penne pasta. Cook it according to the package instructions until it is al dente. This usually takes about 8-10 minutes. When it's done, drain the pasta. Save a cup of the pasta water for later. Set the penne aside in a bowl. Now, grab a large skillet and heat up 2 tablespoons of extra virgin olive oil over medium heat. Once the oil is hot, add 1 pound of cubed chicken breast. Season it with salt and pepper. Cook the chicken for about 5-7 minutes. It should turn golden brown and be fully cooked. When done, take the chicken out of the skillet and place it on a plate. In the same skillet, toss in 3 cloves of minced garlic. Sauté it for about 30 seconds. You want the garlic to be fragrant but not burnt. Next, add a 28-ounce can of crushed tomatoes. Stir it well and raise the heat a bit. Let it simmer gently for around 5 minutes. This helps the flavors blend nicely. Now, add 1 teaspoon of Italian seasoning blend for extra flavor. Lower the heat and slowly stir in 1 cup of heavy cream. Keep mixing until it’s smooth. Let the sauce simmer for another 2-3 minutes. This helps it thicken slightly. Now, return the cooked chicken to the skillet. Add the chopped basil and the cooked penne pasta. Gently toss everything together. If the sauce is too thick, add a splash of the reserved pasta water. Lastly, stir in ½ cup of grated Parmesan cheese until it melts. Adjust the taste with salt, pepper, or red pepper flakes if you want some heat. Let it sit for a minute before serving. To get the best pasta, use salted water. This adds flavor. Cook the penne until it is al dente. This means it should be firm to the bite. After cooking, save a cup of pasta water. You may need it later. - Use about 1 tablespoon of salt per quart of water. - Stir the pasta occasionally to avoid sticking. Creaminess is key for a great sauce. Start with heavy cream after cooking the tomatoes. Stir it slowly into the sauce. This helps it blend well. Let it simmer for a few minutes. This thickens the sauce and makes it rich. - For extra creaminess, use freshly grated Parmesan cheese. - Keep the heat low to avoid burning the cream. Flavor can make or break your dish. Play with spices to enhance taste. Add Italian seasoning for a classic touch. If you like heat, sprinkle in some red pepper flakes. Fresh basil adds a bright flavor. Always taste as you go. - Use freshly cracked black pepper for better flavor. - Consider adding a splash of vodka for authenticity. Pro Tips Perfect Pasta: Always cook your pasta al dente to ensure it holds up well when combined with the sauce, offering the best texture. Fresh Basil Finish: Add the fresh basil at the end of cooking to preserve its vibrant flavor and aroma in the dish. Adjust the Creaminess: If you prefer a lighter sauce, substitute half of the heavy cream with chicken broth for a deliciously creamy yet lighter version. Heat Control: When adding cream to the sauce, ensure the heat is low to prevent it from curdling and to achieve a smooth consistency. {{image_4}} To add a bright touch, mix in fresh spinach. Spinach wilts down quickly, blending well with the creamy sauce. Just toss a few cups in with the chicken before adding the sauce. This adds color and nutrients, making your dish even better. If you want a meatless dish, skip the chicken. Just cook the penne and follow the sauce steps. You can add mushrooms or zucchini for extra flavor and texture. This version keeps all the creamy goodness while being plant-based. For a vegan take, swap heavy cream with coconut cream. Use nutritional yeast instead of cheese for a cheesy flavor. You can also try cashew cream for a rich texture. These swaps keep the dish creamy and tasty without dairy. To keep your Chicken Penne Alla Vodka fresh, store it in an airtight container. Make sure it cools down before sealing. Leftovers can last for up to three days in the fridge. Label the container with the date for easy tracking. When ready to enjoy your leftovers, reheat gently. Use a skillet over low heat for best results. Add a splash of water or cream to keep it moist. Stir often to heat evenly. You can also use the microwave but check every 30 seconds to avoid drying it out. If you want to store it longer, freezing is a great option. Place the cooled dish in a freezer-safe container. Separate portions for easier defrosting. You can freeze it for up to three months. To reheat, thaw overnight in the fridge and then use the skillet method for the best taste. It takes about 30 minutes to make Chicken Penne Alla Vodka. You will spend 15 minutes preparing your ingredients and 15 minutes cooking. This quick time makes it perfect for busy nights. Yes, you can use other types of pasta. Bowtie, rigatoni, or even spaghetti work well. Just remember to cook them according to their package instructions for the best results. Heavy cream gives the dish its rich, creamy texture. However, you can use half-and-half or a non-dairy option if you prefer. Just keep in mind that this might change the flavor slightly. A light red wine pairs well with this dish. A Pinot Noir or Merlot works great. If you prefer white wine, try a Chardonnay. The wine will enhance the flavors of the meal. To add heat, use red pepper flakes. Start with a small amount and taste as you go. You can also add diced jalapeños or a splash of hot sauce to kick up the spice level. In this post, we covered how to make Chicken Penne Alla Vodka. We learned about key ingredients, cooking steps, and tips for perfect texture and flavor. I also shared variations for different diets and storage advice. Overall, this dish is simple yet rich in taste. It’s a crowd-pleaser and easy to adapt. Experiment with flavors and make it your own! Enjoy each delicious bite.

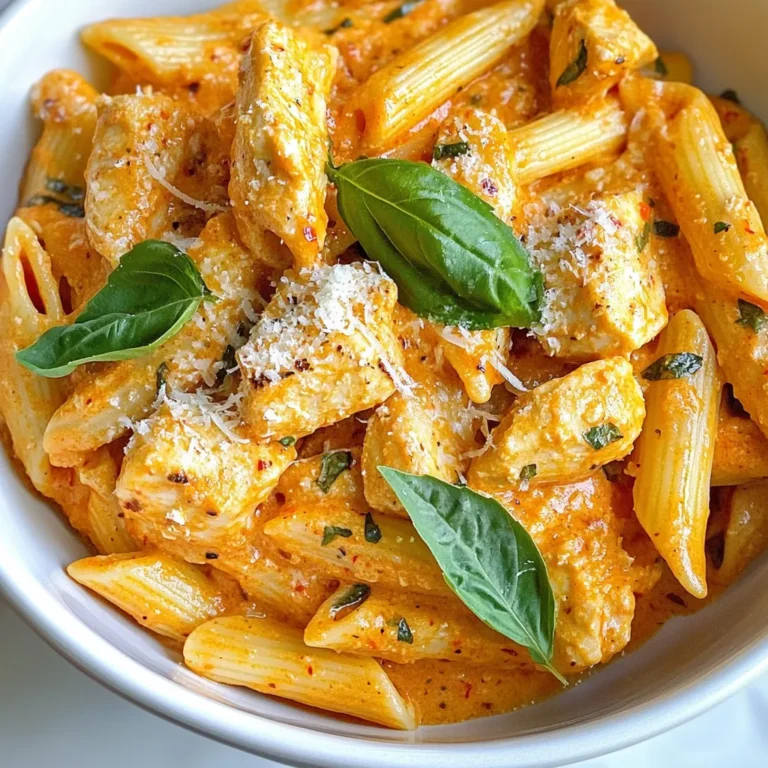
Chicken Penne Alla Vodka Flavorful and Easy Recipe

To make Caramel Pecan Apple Pie Bars, gather these ingredients: - 2 cups all-purpose flour - 1/2 cup packed light brown sugar - 1/4 teaspoon fine salt - 1/2 cup unsalted butter, melted and slightly cooled - 1 teaspoon pure vanilla extract - 2 cups peeled and diced apples (about 2 medium apples) - 1 tablespoon fresh lemon juice - 1 teaspoon ground cinnamon - 1/4 cup granulated sugar - 1/2 cup finely chopped pecans - 1/2 cup caramel sauce (store-bought or homemade) You can swap some ingredients if needed. For flour, use gluten-free flour for a gluten-free option. Instead of light brown sugar, dark brown sugar works well too. If you want a dairy-free treat, use coconut oil in place of butter. For caramel sauce, you can use a homemade version or a store-bought one to save time. To make these bars, you will need: - A 9x9-inch baking dish - Parchment paper - Large mixing bowl - Whisk or spoon - Wire rack for cooling - Knife for cutting the bars {{ingredient_image_2}} First, preheat your oven to 350°F (175°C). This step is crucial for even baking. Then, grab a 9x9-inch baking dish. Line it with parchment paper, leaving some paper hanging over the edges. This helps you lift the bars out later. In a large bowl, whisk together 2 cups of all-purpose flour, 1/2 cup of packed light brown sugar, and 1/4 teaspoon of fine salt. Mix well until combined. Slowly pour in 1/2 cup of melted unsalted butter and 1 teaspoon of pure vanilla extract. Stir until you see coarse crumbs. Press this mixture firmly into the bottom of your lined dish. This forms a solid crust. In another bowl, add 2 cups of peeled and diced apples. Use about 2 medium apples for this. Pour in 1 tablespoon of fresh lemon juice. This keeps the apples from turning brown. Now, sprinkle 1 teaspoon of ground cinnamon and 1/4 cup of granulated sugar over the apples. Toss gently until all apples are coated. Spread the apple filling evenly over the crust. Make sure it covers the whole surface. Next, sprinkle 1/2 cup of finely chopped pecans on top. Finally, drizzle 1/2 cup of caramel sauce generously over everything. This adds a sweet and rich flavor. Carefully place the dish in your preheated oven. Bake for 30-35 minutes. The bars are done when the apples are soft and the crust edges are lightly golden. Keep an eye on them to avoid burning. Once baked, take the dish out of the oven. Let it cool in the pan for about 10 minutes. Use the overhanging parchment paper to lift the bars out. Place them on a wire rack to cool completely. Once cooled, slice into squares or bars. For a special treat, drizzle more caramel sauce over the bars before serving. Enjoy your delicious creation! To get a great crust, work the dough gently. Mix the flour, brown sugar, and salt first. After that, add melted butter and vanilla. Stir until it looks like crumbs. Press it firmly into the baking dish. This helps it hold together well. Choose firm apples for baking. I like using Granny Smith or Honeycrisp. They add a nice tartness to balance the sweet caramel. Make sure to peel and dice them small. This helps them cook evenly and blend well with the filling. To keep your leftover bars fresh, place them in an airtight container. Store them at room temperature for up to three days. You can also refrigerate them for a week. If you want to save them longer, freeze them. Just wrap each bar tightly in plastic wrap before freezing. Pro Tips Use Tart Apples: For the best flavor, opt for tart apple varieties like Granny Smith, as they balance the sweetness of the caramel beautifully. Chill the Dough: After pressing the crust into the pan, chilling it for 15-20 minutes before baking helps it hold its shape better during baking. Customize the Nuts: If you're not a fan of pecans, walnuts or almonds make great substitutes that still provide a wonderful crunch. Make Ahead: These bars can be made a day in advance. Just store them in an airtight container in the fridge and serve chilled or at room temperature. {{image_4}} If you want a twist, try using other nuts. Walnuts or almonds work well in this recipe. They add a different taste and texture. Chopped walnuts give a rich flavor. Sliced almonds add a nice crunch. Feel free to mix nuts for more fun! Switch up the fruit for new flavors. Pears or peaches are great choices. They pair nicely with the caramel and pecans. You can also use mixed berries for a fresh taste. Just remember to adjust the sugar based on the fruit's sweetness. To make a gluten-free version, use almond flour or gluten-free baking mix. The crust may be a bit different, but it will still taste amazing. Combine the gluten-free flour with the same amount of sugar and salt. Follow the same steps to create your crust. Enjoy the same deliciousness without the gluten! Store your Caramel Pecan Apple Pie Bars in an airtight container. This keeps them fresh longer. Place parchment paper between layers to avoid sticking. Keep the container in the fridge for up to a week. The cool air helps maintain the bars' texture and flavor. To freeze these delicious bars, let them cool completely first. Cut the bars and wrap each piece in plastic wrap. Then, place them in a freezer-safe bag or container. They can last in the freezer for up to three months. When you're ready to enjoy, just thaw them in the fridge overnight. For a warm treat, preheat your oven to 350°F (175°C). Place the bars on a baking sheet. Heat them for about 10 minutes. You can also use the microwave. Heat each bar for about 15-20 seconds. This makes the caramel gooey and the flavors pop again. Enjoy your bars warm for the best taste! Yes, you can make these bars ahead of time. I suggest baking them a day or two before you want to serve them. Store them in an airtight container at room temperature. This keeps them fresh and soft. If you wish, you can also refrigerate them for a longer shelf life. Check your bars at 30 minutes. The apples should feel soft. The edges of the crust will look lightly golden. If they need more time, check every few minutes until they reach the right color and texture. If you don’t have caramel sauce, try using butterscotch sauce. You can even make a quick homemade caramel using sugar and butter. Another option is to use honey or maple syrup for a different flavor, but it won't taste the same. Yes, you can make these bars vegan! Use plant-based butter instead of regular butter. For the caramel, look for vegan caramel sauces or make your own using coconut milk and sugar. Use a non-dairy milk in place of the butter for an even richer taste. To cut the bars neatly, first let them cool completely. Use a sharp knife for clean cuts. Dip the knife in hot water, then wipe it dry before cutting. This helps with a smooth finish. Enjoy your beautifully cut bars! We explored how to make tasty Caramel Pecan Apple Pie Bars. You learned about key ingredients, handy substitutions, and needed equipment. I provided step-by-step instructions to make the crust and apple filling. I also shared tips to get that perfect crust and selected the best apples. Lastly, we discussed variations and storage methods. Now, you can bake delicious bars that impress friends and family. Enjoy the process and have fun experimenting!

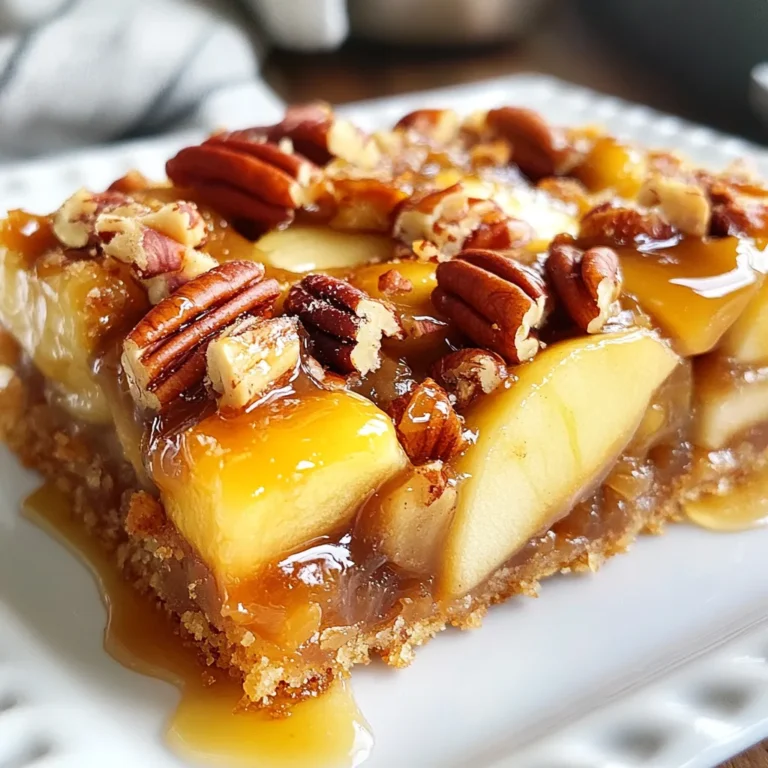
Caramel Pecan Apple Pie Bars Irresistible Dessert Delight

- Salmon and Binding Agents - 1 can (14 oz) wild-caught salmon, drained and flaked - 1/2 cup breadcrumbs (whole wheat preferred for added texture) - 1 large egg, lightly beaten - Fresh Herbs and Aromatics - 1/4 cup fresh dill, finely chopped - 1/4 cup green onions, finely chopped - 1 clove garlic, minced - Seasoning Ingredients - 2 tablespoons fresh lemon juice - Zest of 1 lemon - Salt and freshly ground black pepper to taste - Cooking Essentials - Olive oil for frying Gather these ingredients before you start. The wild-caught salmon gives a rich flavor. Whole wheat breadcrumbs add crunch. Fresh herbs like dill and green onions bring brightness. The lemon juice and zest add zesty notes. Use salt and pepper to enhance flavors. Olive oil helps crisp up the patties when frying. You can adjust the herbs based on your taste. Enjoy mixing these ingredients to create a tasty meal. {{ingredient_image_2}} Start by opening the can of wild-caught salmon. Drain it well to remove excess liquid. Use a fork to flake the salmon into smaller pieces. This helps the patties hold together. Place the flaked salmon in a large mixing bowl. Add the breadcrumbs, chopped dill, green onions, and minced garlic to the bowl. Mix these ingredients gently. You want them evenly distributed. In another bowl, whisk the beaten egg with lemon juice and zest. Add a pinch of salt and freshly cracked black pepper. This mix gives the patties flavor. Combine the egg mixture with the salmon mixture. Stir carefully until everything holds together. Now, scoop the mixture with your hands. Shape it into patties that are 2-3 inches wide. Place the formed patties on a plate. This recipe will make about 6-8 patties. Heat a medium skillet over medium heat. Add a good drizzle of olive oil to coat the bottom. When the oil is shimmering, gently lay the salmon patties in the skillet. Cook for about 4-5 minutes on each side. Turn them carefully to keep their shape. They should be golden brown and crispy when done. Transfer the cooked patties to a paper towel-lined plate. This helps absorb any extra oil. Serve the patties warm with a salad or lemon wedges. To get the perfect crispiness for your lemon dill salmon patties, follow these tips: - Use whole wheat breadcrumbs. They add texture and crunch. - Make sure your skillet is hot before adding oil. This helps to sear the patties. - Do not overcrowd the pan. Cook in batches to keep the heat steady. - Let the patties rest on a paper towel after cooking. This absorbs extra oil and keeps them crisp. You can boost the flavor of your salmon patties easily. Try these ideas: - Add a pinch of cayenne pepper for some heat. - Mix in capers for a briny touch. - Use fresh herbs like parsley or chives alongside dill for extra flavor. - Squeeze more lemon juice before serving to brighten the taste. While frying is delicious, you can try other methods too: - Baking: Preheat your oven to 400°F. Place patties on a lined baking sheet and drizzle with olive oil. Bake for about 20 minutes, flipping halfway through. - Grilling: Form the patties well and use a grill basket. This prevents them from falling apart. Grill for about 4-5 minutes per side. - Air Frying: Preheat your air fryer to 375°F. Cook the patties for about 10-12 minutes, flipping halfway for even cooking. These tips will help you make delicious lemon dill salmon patties every time! Pro Tips Chill the Mixture: For firmer patties, chill the salmon mixture in the refrigerator for about 30 minutes before shaping. This helps them hold together better while cooking. Breadcrumb Alternatives: If you want to make the patties gluten-free, substitute the breadcrumbs with almond flour or crushed gluten-free crackers. Cook in Batches: Avoid overcrowding the skillet, which can cause the patties to steam rather than fry. Cook in batches for a perfectly crispy texture. Flavor Variations: Experiment with different herbs and spices such as parsley, thyme, or even a pinch of cayenne for a kick to customize the flavor to your liking. {{image_4}} You can change the recipe with different ingredients. If you want a lighter taste, use fresh salmon. Just cook it, flake it, and follow the same steps. If you're avoiding gluten, try almond flour instead of breadcrumbs. For a spicy kick, add chopped jalapeños or a dash of cayenne. You can also swap dill for parsley or cilantro if you prefer other flavors. These salmon patties are great on their own, but you can serve them in many ways. Place them on a fresh bun to make a tasty salmon burger. You can also serve them on a bed of mixed greens for a healthy salad. Pair them with a side of roasted veggies or crispy fries for a complete meal. Dips and sauces can make your patties even better. A classic tartar sauce adds a nice flavor. You can also try a yogurt-based sauce with lemon and herbs. For a zesty twist, mix sour cream with lemon juice and dill. If you like heat, a spicy aioli is a great choice. These dips will lift the taste of your lemon dill salmon patties. You can keep leftover lemon dill salmon patties in the fridge. Store them in an airtight container. They stay fresh for up to three days. Before you eat them again, check for any off smells or changes in texture. If you want to save some for later, freezing is a great choice. Place the cooked patties in a single layer on a baking sheet. Freeze them until solid, about 1-2 hours. Then, transfer them to a freezer bag or container. They can last up to three months in the freezer. Just remember to label your container with the date. To reheat, you can use the oven or a skillet. For the oven, preheat it to 350°F (175°C). Place the patties on a baking sheet and warm for about 10-15 minutes. If using a skillet, heat a little olive oil over medium heat. Cook the patties for about 3-5 minutes on each side. This will help keep them crispy outside and warm inside. Yes, you can use fresh salmon. Just cook it first. Bake or steam the salmon until it flakes easily. Then, flake it and follow the same recipe steps. Fresh salmon gives a nice taste. You have options! Use crushed crackers, oats, or cornmeal. These will still hold the patties together. Each choice adds a unique flavor and texture. Experiment to find your favorite. You can keep cooked salmon patties in the fridge for up to three days. Store them in an airtight container. If you need longer storage, freeze them for up to three months. Yes, baking is an option. Preheat your oven to 400°F (200°C). Place the patties on a lined baking sheet. Bake for about 15-20 minutes, flipping halfway through. This method reduces oil and keeps them healthier. Many sides go well with these patties. Consider fresh green salads, roasted veggies, or quinoa. You could also serve them with rice or a light pasta dish. Add a tangy sauce for extra flavor! This blog post showed you how to make tasty salmon patties. We covered the key ingredients, from salmon and herbs to seasoning. You learned step-by-step how to prepare, combine, and cook the patties. Tips for crispiness and flavor helped enhance your dish. We explored variations with ingredients and serving suggestions. Finally, we discussed storage and reheating techniques for your leftovers. Keep experimenting! This recipe can be your new favorite. Enjoy the tasty rewards of your cooking!

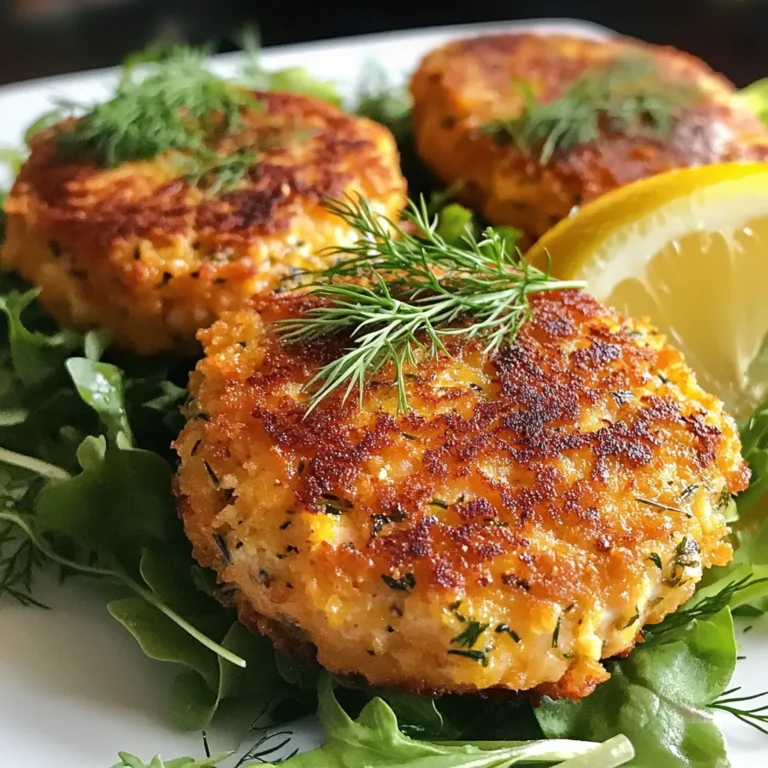
Lemon Dill Salmon Patties Flavorful and Easy Meal

- 4 bone-in, skin-on chicken thighs - 4 cloves of garlic, finely minced - 2 tablespoons fresh rosemary, finely chopped - 2 tablespoons fresh thyme, finely chopped - 1 tablespoon fresh parsley, finely chopped - Zest of 1 lemon - Juice of 1 lemon - 3 tablespoons extra virgin olive oil - Salt and freshly ground black pepper to taste - Optional: Thin lemon slices and a sprig of rosemary for garnish To make Garlic Herb Roasted Chicken Thighs, you need a few simple ingredients. First, choose four bone-in, skin-on chicken thighs. They give great flavor and stay juicy. Next, grab four cloves of garlic. Mince them finely for the best taste. Fresh herbs are key to this dish. I use two tablespoons each of rosemary and thyme, chopped well. They add depth to the flavor. You also need one tablespoon of parsley for a fresh finish. Don't forget the lemon! You will use the zest and juice from one lemon. This brightens the dish and balances the richness of the chicken. Extra virgin olive oil helps the herbs stick to the chicken and adds a nice richness. Lastly, season with salt and freshly ground black pepper to taste. If you want, you can add thin lemon slices and a sprig of rosemary for garnish. This makes the dish pretty and adds extra flavor when serving. {{ingredient_image_2}} Preheat your oven to 425°F (220°C). A hot oven helps make the skin crispy. This step is key for great roasted chicken thighs. In a small bowl, mix together the minced garlic, chopped rosemary, thyme, parsley, lemon zest, lemon juice, and olive oil. Add a pinch of salt and pepper. Stir until you have a fragrant herb paste. This mix adds a burst of flavor to the chicken. Take the chicken thighs and pat them dry with paper towels. This helps the skin crisp up. Use your hands to rub the herb paste all over the chicken. Make sure to get some under the skin for extra flavor. Place them skin-side up on a lined baking sheet. Put the baking sheet in the preheated oven. Roast the chicken for 30 to 35 minutes. Check that it reaches an internal temperature of 165°F (75°C). The skin should be golden brown and crispy. Once done, remove the chicken from the oven. Let it rest for about 5 minutes. This helps the juices stay in the meat. Each bite will be juicy and full of flavor. To finish, garnish your chicken with fresh lemon slices and a sprig of rosemary. This adds a nice touch and makes it look beautiful. Serve and enjoy your flavorful garlic herb roasted chicken thighs! To get crispy skin, start with dry chicken thighs. After rinsing, pat them dry with paper towels. This helps remove moisture, which can make the skin soggy. Also, rub the herb paste under the skin. This adds flavor and keeps the skin crispy. Finally, roast in a hot oven. A high heat of 425°F (220°C) makes the skin golden and crunchy. For great flavor, use fresh herbs like rosemary, thyme, and parsley. These herbs blend well with garlic and lemon. Rosemary gives a strong, earthy taste. Thyme adds a hint of sweetness. Parsley brightens the dish. Feel free to mix in other herbs like oregano or basil for new flavors. Fresh herbs always taste better than dried ones. Marinating chicken thighs adds depth to the flavor. Make the herb paste a few hours before cooking. Let the chicken sit in the paste for at least 30 minutes. If you have time, marinate overnight in the fridge. This lets the flavors soak in more. Just remember to bring the chicken to room temperature before cooking. This helps it cook evenly. Pro Tips Maximize Flavor: For an even richer taste, marinate the chicken thighs in the herb paste for at least 1 hour, or overnight in the fridge if time allows. Achieve Crispy Skin: Make sure to thoroughly dry the chicken skin before applying the herb paste; moisture can prevent crispiness. Use a Meat Thermometer: To ensure perfectly cooked chicken, check the internal temperature; it should reach 165°F (75°C) for safe consumption. Resting is Key: Allow the chicken to rest for at least 5 minutes after roasting. This helps the juices redistribute for a moist and flavorful bite. {{image_4}} You can create lemon garlic butter chicken thighs for a rich twist. Start by mixing softened butter with minced garlic, lemon juice, and zest. Spread this mix under the skin of the thighs. Roast as usual. The butter adds a creamy texture and a bright flavor. For a kick, try spicy garlic herb chicken thighs. Add red pepper flakes or cayenne pepper to the herb paste. This adds heat and warmth to every bite. You can also include some smoked paprika for a deeper flavor. Roasting brings out the spice, making your meal exciting. If you're in the mood for grilling, use the same herb paste for herb-infused grilled chicken thighs. Marinate the chicken in the paste for a few hours. Then, grill over medium heat until cooked through. This method gives a smoky flavor while keeping the chicken juicy. These variations let you explore different tastes while keeping the core recipe simple and enjoyable! Once your garlic herb roasted chicken thighs cool down, you can store them. Place the chicken in an airtight container. Keep it in the fridge for up to 4 days. The flavors will still shine, and the chicken will taste great reheated. To freeze the chicken, first let it cool completely. Wrap each thigh in plastic wrap. Then, place them in a freezer-safe bag. They can last for about 3 months in the freezer. For best taste, label the bag with the date. When you’re ready to enjoy your leftovers, reheating is key. Preheat your oven to 350°F (175°C). Place the chicken on a baking sheet. Cover it with foil to keep it moist. Heat for about 20-25 minutes until warm. You can also use a microwave, but the oven gives better results for crispy skin. Enjoy your tasty chicken! Roast chicken thighs for 30 to 35 minutes at 425°F (220°C). Check the internal temperature. It must reach 165°F (75°C) for safe eating. This will ensure they are juicy and cooked well. Roasted chicken tastes great with many sides. Here are some tasty options: - Roasted vegetables - Mashed potatoes - Steamed green beans - A fresh garden salad - Rice pilaf These sides balance the rich flavor of chicken thighs and make a hearty meal. Yes, you can use boneless chicken thighs. They will cook faster, usually in about 20 to 25 minutes. Adjust the cooking time to ensure they reach 165°F (75°C). To air fry chicken thighs, preheat your air fryer to 400°F (200°C). Place the seasoned thighs in a single layer in the basket. Cook for about 20 to 25 minutes. Flip them halfway through for even cooking. Check the internal temperature before serving. Marinating is not necessary, but it adds great flavor. If you have time, let the chicken sit in the herb paste for at least 30 minutes. This will make your chicken even tastier. This blog covers how to roast chicken thighs simply and deliciously. We explored key ingredients like herbs, garlic, and lemon. I provided step-by-step instructions to make it easy. You learned tips for crispy skin and tasty variations. Lastly, we discussed how to store and reheat leftovers. Roasting chicken can be fun and rewarding. With these tips, you can make tasty meals every time you cook. Enjoy your culinary adventure!

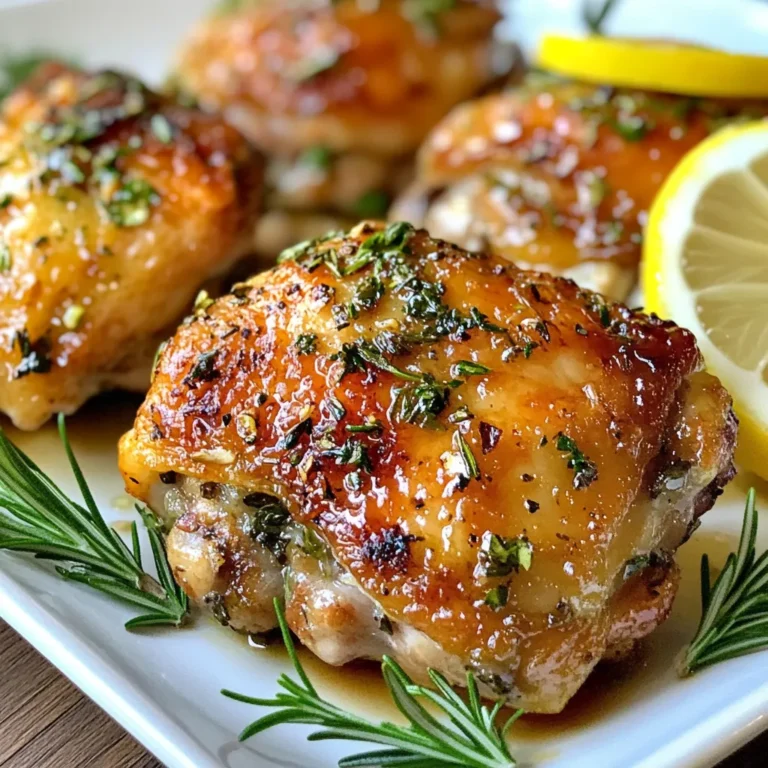
Garlic Herb Roasted Chicken Thighs Easy and Flavorful

- 6 cups fresh baby spinach, thoroughly washed and dried - 1 ½ cups ripe strawberries, hulled and sliced - ½ cup feta cheese, crumbled - ¼ cup red onions, thinly sliced for a subtle bite You need fresh baby spinach for a crisp base. Ripe strawberries add sweetness and color. Feta cheese brings a creamy texture and tang. Red onions offer a mild bite, balancing the flavors. - ½ cup creamy plain Greek yogurt - 2 tablespoons honey for sweetness - 1 tablespoon apple cider vinegar for tang - 1 tablespoon poppy seeds to add texture For the dressing, Greek yogurt gives creaminess. Honey adds natural sweetness. Apple cider vinegar brings a nice zing. Poppy seeds add a delightful crunch. - 1/3 cup sliced almonds, lightly toasted for enhanced crunch - 1 tablespoon sesame seeds, lightly toasted for extra flavor - Salt and freshly cracked pepper to taste You can add sliced almonds for extra crunch. Sesame seeds boost the flavor profile. A pinch of salt and pepper rounds out the taste. {{ingredient_image_2}} To make the dressing, start by grabbing a small bowl. Combine the creamy Greek yogurt, honey, apple cider vinegar, and poppy seeds. Use a whisk to mix these ingredients until smooth. This creates a rich and tangy dressing. After that, season the dressing with salt and fresh pepper to taste. Set it aside so the flavors can blend nicely. In a large bowl, add the washed baby spinach and the sliced strawberries. These two ingredients create a fresh base for your salad. Then, fold in the crumbled feta cheese and lightly toasted sliced almonds. This adds creaminess and crunch. Be gentle as you mix. You don’t want to break the delicate strawberry pieces. Next, carefully add the thinly sliced red onions. Use a gentle motion to combine all the ingredients well. Just before you serve, drizzle the prepared dressing over the salad. Toss the salad gently to coat everything evenly. This ensures every bite is packed with flavor. For the best taste and freshness, serve it right away. Enjoy the vibrant colors and crisp textures of your salad. To bring out the best in your Strawberry Spinach Poppyseed Salad, toasting the almonds and sesame seeds is a must. Lightly toast them in a dry pan over medium heat. This will add a nice crunch and rich flavor. Be sure to keep an eye on them; they can burn quickly. When it comes to the dressing, you can adjust its sweetness and tang. If you prefer a sweeter salad, add more honey. For a tangy kick, increase the apple cider vinegar. Taste as you go to find the perfect balance. For a beautiful display, serve the salad in clear bowls or plates. This way, the vibrant colors pop. Add a few sliced strawberries on top for a fresh look. To make it even more special, garnish with edible flowers. They add a fun touch and make your dish feel fancy. Washing and drying spinach correctly is key. Rinse the leaves under cold water, then spin them in a salad spinner. This removes dirt and keeps the leaves crisp. When slicing strawberries, cut them into even pieces. Aim for a thickness of about 1/4 inch. This makes them easier to eat and looks great on the plate. Pro Tips Choose Fresh Ingredients: Always select the freshest spinach and strawberries for the best flavor and nutritional benefits. Look for vibrant colors and firm textures. Toast Your Nuts and Seeds: Lightly toasting the almonds and sesame seeds enhances their flavor and adds a delightful crunch to your salad. Customize Your Dressing: Feel free to adjust the sweetness or tanginess of your dressing by adding more honey or vinegar according to your taste preferences. Serve Immediately: For optimal freshness and crispness, serve the salad right after dressing it to maintain the vibrant colors and textures. {{image_4}} You can make your Strawberry Spinach Poppyseed Salad heartier by adding protein. Grilled chicken is a great choice. It brings a nice flavor and pairs well with the salad. You can also use shrimp if you prefer seafood. For vegetarian options, try adding chickpeas or black beans. They will give your salad a protein boost without meat. Tofu is another tasty choice. Just make sure to season it well for the best flavor. While the creamy Greek yogurt dressing is delicious, you can switch it up. Try using a light vinaigrette instead. This will give your salad a zesty kick. Adding fresh herbs can also enhance the flavor. Consider mixing in basil or mint for a refreshing twist. These herbs will add depth and freshness to each bite. You can change your salad based on the season. In winter, consider using kale instead of spinach. It holds up well and adds a different texture. In the fall, think about adding roasted sweet potatoes. They give your salad warmth and sweetness. You can also swap in other fruits. Blueberries or mango can brighten your salad and add fun flavors. Each fruit brings its unique taste, making your dish exciting and fresh. To keep your Strawberry Spinach Poppyseed Salad fresh, use airtight containers. Glass or BPA-free plastic containers work best. Make sure to store the salad in the fridge. This helps keep the greens crisp and the flavors intact. - Use a container that fits the amount of salad. - Avoid overfilling to reduce air exposure. The prepared salad stays good for about one to two days in the fridge. After that, the spinach may wilt. For best taste, eat it fresh. If you want to keep it longer, store the dressing separately. This way, the salad stays fresh longer. The dressing can last about a week in the fridge. - Keep dressing in a sealed jar. - Shake well before using again. You do not need to heat this salad. If it loses some crunch, add fresh spinach or strawberries. This boosts flavor and texture. If you have leftover dressing, you can use it on other salads. Just mix it with fresh greens or veggies. - Refresh with a squeeze of lemon juice for bright flavor. - Add more nuts or seeds to enhance crunch. Yes, you can prep this salad ahead. Wash and dry the spinach in advance. Slice the strawberries and store them in a sealed container. You can also mix the poppyseed dressing and keep it in the fridge. Just remember to combine the ingredients right before serving. This keeps the salad fresh and crunchy. If you want a different cheese, try goat cheese or blue cheese. Both add great flavor. For a vegan option, use crumbled tofu or a nut-based cheese. These alternatives keep the salad tasty and cater to different diets. Yes, this salad is gluten-free. All the ingredients, like spinach and strawberries, are gluten-free. For dressings, choose gluten-free options. Many store-bought dressings are safe, or you can make your own to be sure. This blog post covered how to create a delightful Strawberry Spinach Poppyseed Salad. You learned about fresh ingredients, pantry staples for the dressing, and optional extras for flavor. I shared simple steps for preparing the dressing, assembling the salad, and serving it fresh. You also found tips for enhancing flavor and interesting presentation ideas. Remember, you can customize this salad with proteins or seasonal ingredients to keep it exciting. Enjoy making this nutritious dish, and don’t forget to experiment with different flavors!

Strawberry Spinach Poppyseed Salad Fresh and Tasty Dish

- 1 cup Greek yogurt (choose plain, full-fat for a richer texture) - 1 cup dark chocolate chips (opt for at least 70% cocoa for depth of flavor) - 2 tablespoons honey or maple syrup (adjust based on desired sweetness) - 1 teaspoon vanilla extract (for a hint of warmth) - Pinch of sea salt (to enhance sweetness) - Fresh berries for garnish - Additional sweeteners or flavorings When making Greek yogurt chocolate mousse, the right ingredients make a big difference. I always use full-fat Greek yogurt. It gives the mousse a rich, creamy texture. The dark chocolate chips should be at least 70% cocoa. This adds depth and a nice taste. I like to sweeten my mousse with honey or maple syrup. You can adjust the sweetness as you want. A touch of vanilla extract adds warmth to the mix. Just a pinch of sea salt can bring out the sweet notes too. If you want to make it special, add fresh berries on top. Berries like raspberries or strawberries add color and a burst of tart flavor. You can also add extra sweeteners or flavorings if you prefer. {{ingredient_image_2}} Method 1: Microwave Start by measuring out 1 cup of dark chocolate chips. Place them in a microwave-safe bowl. Heat the chocolate in 20-second bursts. Stir the chocolate after each interval. This helps it melt evenly. Stop when the chocolate is smooth and fully melted. Method 2: Double boiler Fill a pot with water and bring it to a gentle simmer. Place a heat-safe bowl on top, making sure it doesn’t touch the water. Add the dark chocolate chips to the bowl. Stir often until the chocolate melts. This method gives you more control. Preparing the yogurt mixture In a mixing bowl, add 1 cup of Greek yogurt. I recommend using plain, full-fat yogurt for a rich flavor. Pour in 2 tablespoons of honey or maple syrup for sweetness. Add 1 teaspoon of vanilla extract and a pinch of sea salt. Whisk this mixture until it is smooth. Incorporating the melted chocolate Let the melted chocolate cool for about 5 minutes. This step is important to prevent curdling the yogurt. Slowly drizzle the melted chocolate into the yogurt mixture. Stir continuously to combine. Aim for a silky, smooth texture. Adjusting sweetness After mixing, taste your mousse. If it needs more sweetness, add a little more honey or maple syrup. Stir until it blends well. Portioning the mousse Using a spoon, scoop the mousse into individual bowls or cups. Aim for even portions, as it makes for a nicer presentation. Chilling time Place the filled bowls in the fridge to chill. Let them sit for at least 30 minutes. This helps the mousse set and brings out the flavors. Choose high-quality dark chocolate. Look for chocolate that has at least 70% cocoa. This gives your mousse a rich and deep flavor. Better chocolate makes a better mousse. It can change the taste and texture. To keep your mousse creamy, avoid curdling the yogurt. Let the melted chocolate cool for five minutes. This step is key. If the chocolate is too hot, it will cook the yogurt. Always mix slowly and gently. This helps keep the mousse smooth and rich. Presentation matters! You can serve your mousse in small bowls or cups. Add fresh berries on top for color. You can also use a dollop of yogurt or shaved chocolate. These toppings not only add beauty but also flavor. Get creative and make your dish shine! Pro Tips Use Quality Chocolate: The flavor of your mousse relies heavily on the chocolate you choose. Opt for high-quality dark chocolate with at least 70% cocoa for a richer taste. Whisk Thoroughly: Ensure your yogurt mixture is fully blended before adding the chocolate. This will help achieve a smooth and creamy texture in your mousse. Chill for Best Results: Allow the mousse to chill for at least 30 minutes. This not only helps it set but also allows the flavors to meld beautifully. Add a Pinch of Salt: A small pinch of sea salt enhances the sweetness of the chocolate and balances the flavors in your mousse. {{image_4}} You can make your Greek yogurt chocolate mousse even more exciting. One way is by adding instant coffee or espresso. This boosts the chocolate flavor and adds a nice touch of richness. Just a teaspoon will do. Mix it in when you stir the melted chocolate into the yogurt. Another great idea is to incorporate zest from orange or lemon. This adds a fresh burst of flavor. Grate a little zest and fold it into the yogurt mixture. It brings a bright note that pairs well with chocolate. If you want to change the sweetness, consider using stevia or agave syrup. Stevia is a natural sweetener with zero calories. Use it sparingly, as it is much sweeter than honey. Agave syrup is another option, offering a mild taste. It blends well and keeps the mousse smooth. Adjust the amount based on your taste. For those who prefer a dairy-free treat, don’t worry! You can easily substitute the Greek yogurt with a dairy-free alternative. Look for coconut yogurt or almond yogurt. These options still provide a creamy texture and delicious flavor. Just ensure they are unsweetened to control sugar levels in your mousse. To keep your Greek yogurt chocolate mousse fresh, store it in an airtight container. This helps prevent it from absorbing any unwanted flavors. Place a piece of plastic wrap directly on the surface of the mousse before sealing the container. This extra layer keeps it smooth and creamy. Refrigerate it right away. You can enjoy the mousse within three days for the best taste. Yes, you can freeze Greek yogurt mousse! To do this, scoop the mousse into freezer-safe containers. Leave a little space at the top for expansion. You may also use ice cube trays for smaller portions. Cover them tightly with plastic wrap or a lid. When you are ready to eat, thaw the mousse in the fridge overnight. Avoid microwaving it, as this can change the texture. In the fridge, your mousse will stay fresh for about three days. In the freezer, it can last for up to one month. After that, the quality may drop. Always check for any off smells or changes in texture before enjoying your mousse. Storing it properly ensures you get the rich, creamy delight every time. You can use non-fat Greek yogurt, but it will change the mousse. The texture might be less creamy. Full-fat yogurt gives a rich and smooth feel. Non-fat yogurt may make it more airy. If you want a thicker mousse, stick with full-fat. For the best results, chill the mousse for at least 30 minutes. This time helps it set well. However, if you can wait, chilling for 1-2 hours is even better. Longer chilling times improve the flavor and texture. Yes, you can add protein powder to boost nutrition. Choose a flavor that matches your mousse. Start with one tablespoon and mix well. If it's too thick, add a little extra yogurt. This way, the mousse stays creamy and delicious. In this post, you learned how to make a rich Greek yogurt mousse. We covered key ingredients like yogurt and dark chocolate. You also explored melting methods and how to mix the base. Remember to taste and adjust sweetness. Use fresh berries for garnish or try different flavors. Lastly, store it well for lasting freshness. Enjoy making this tasty, healthy dessert that’s simple and versatile!

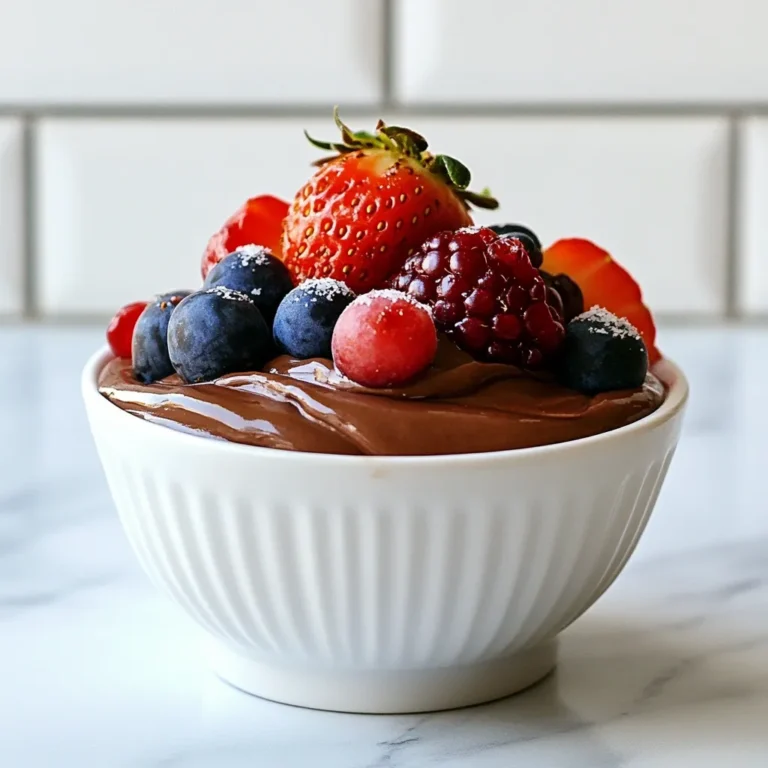
Greek Yogurt Chocolate Mousse Rich and Creamy Delight

- 1 lb ground chicken - 1/2 cup breadcrumbs - 1/4 cup finely chopped green onions - 2 cloves garlic, minced - 1 tablespoon fresh ginger, grated - 2 tablespoons low-sodium soy sauce - 1 tablespoon sesame oil - 1 tablespoon honey - 1/2 teaspoon freshly ground black pepper - 1/4 teaspoon salt - Sesame seeds for garnish - Sliced cucumber and carrots for serving Gather these ingredients for a delicious meal. Ground chicken forms the base of these meatballs. The breadcrumbs help bind the mix together. Green onions add a fresh crunch. Garlic and ginger give a strong taste that shines through. Low-sodium soy sauce brings in umami flavor. Sesame oil adds a nutty touch. Honey sweetens the mix just right. Black pepper and salt enhance the overall flavor. Finally, sesame seeds make a beautiful garnish, while cucumber and carrots add a crisp bite. With these ingredients, you are ready to create a tasty dish that everyone will love. {{ingredient_image_2}} To start, gather all your ingredients. In a large bowl, mix the ground chicken, breadcrumbs, green onions, minced garlic, grated ginger, soy sauce, sesame oil, honey, black pepper, and salt. Use your hands or a spoon to blend everything well. You want a smooth and even mixture. Next, wet your hands with water. This helps prevent sticking. Take small portions of the chicken mix and roll them into balls about 1 inch wide. Place the meatballs on a plate or tray as you form them. Make sure they are spaced out for even cooking later. Before you bake, preheat your oven to 400°F (200°C). This step is key for getting perfect meatballs. While the oven heats, line a baking sheet with parchment paper. This makes cleanup easy and helps the meatballs cook evenly. Once your oven is hot, place the meatballs on the lined baking sheet. Make sure to space them apart so they won't stick together. Bake them for 20 to 25 minutes. The meatballs are done when they are golden brown and reach an internal temperature of 165°F. While your meatballs bake, it's time to make the teriyaki sauce. In a small saucepan, combine 1/4 cup of soy sauce, 1 tablespoon of honey, and a pinch of grated ginger. Heat the mixture over medium-low heat. Stir it often. You want the sauce to warm up and thicken a little. This should take about 5 to 7 minutes. Once the meatballs are baked, take them out of the oven. Drizzle the warm teriyaki sauce over the meatballs. Gently toss them to coat every ball in the sauce. For a great presentation, transfer the meatballs to a nice platter. Sprinkle sesame seeds on top for a fun touch. Serve slices of cucumber and carrots on the side. This adds a fresh crunch that pairs well with the meatballs. Enjoy your meal! - Ensuring moisture and flavor: To keep the meatballs juicy, use fresh ground chicken. You can also add a little more soy sauce or sesame oil. This adds flavor and moisture. - Avoiding overmixing: Mix just enough until combined. Overmixing makes meatballs tough. Use your hands or a spoon to blend the ingredients gently. - Presentation tips: Use a colorful platter for your meatballs. A bright dish makes the meal pop. Sprinkle sesame seeds on top for a nice touch. Add slices of cucumber and carrots around the meatballs for a fresh look. - Suggested dipping options: Serve extra teriyaki sauce in a small bowl. It gives guests a chance to add more flavor to their meatballs. - Alternative proteins: You can use ground turkey or beef instead of chicken. Both options taste great with teriyaki sauce. Adjust cooking times as needed since beef may take longer. - Gluten-free substitutes: If you need gluten-free options, use gluten-free breadcrumbs and soy sauce. These swaps make the dish safe for those with gluten sensitivities. Pro Tips Use Chilled Ingredients: Keeping your ground chicken and other ingredients chilled before mixing helps retain moisture and keeps the meatballs tender. Don’t Overmix: Mix the meatball ingredients just until combined to avoid tough meatballs. Overmixing can lead to a dense texture. Test for Flavor: Before baking, cook a small sample meatball in a skillet to taste and adjust seasoning if needed. This ensures your meatballs are perfectly seasoned. Garnish Creatively: Enhance presentation by using colored garnishes like chopped cilantro or thinly sliced red bell peppers for a pop of color and flavor. {{image_4}} You can make teriyaki chicken meatballs even more fun by turning them into skewers. Grilling adds a smoky flavor and a nice char. If you prefer baking, that works too. For skewers, I like to add vegetables. Bell peppers, onions, and zucchini are great choices. Cut them into chunks and alternate them with meatballs on the skewer. This adds color and crunch. Another tasty way to enjoy these meatballs is in a stir-fry. You can use any vegetables you like. Broccoli, snap peas, and carrots are my favorites. Cook the vegetables first, then add the baked meatballs. Toss everything in the teriyaki sauce for flavor. Serve this over rice or noodles for a complete meal. If you want to mix things up, try different sauces. A spicy teriyaki variation adds heat. Simply add chili paste or sriracha to the teriyaki sauce. For a fresh twist, use a citrus-infused teriyaki sauce. You can mix in orange or lime juice. This gives the sauce a bright flavor. Both variations will keep your taste buds happy! To keep your teriyaki chicken meatballs tasty, store them properly. - Refrigeration tips: Place the meatballs in an airtight container. They stay fresh for up to 3 days in the fridge. Make sure to let them cool before sealing the container. This helps avoid moisture build-up. - Freezing instructions: For longer storage, freeze the meatballs. Arrange them in a single layer on a baking sheet. Freeze until firm, then transfer to a freezer bag. They can last up to 3 months in the freezer. When ready to eat, thaw overnight in the fridge. Reheating meatballs can be tricky. You want them warm without losing flavor. - Best methods for flavor retention: Use the oven for even heating. Preheat it to 350°F (175°C). Place meatballs on a baking sheet. Heat for about 10-15 minutes, or until hot. You can also reheat them in a skillet over medium heat. Add a splash of water or sauce to keep them moist. - Avoiding dryness: Do not overheat the meatballs. This can make them dry. Check them often while reheating. If they seem dry, drizzle a little extra teriyaki sauce over them to restore moisture. To check if the meatballs are done, look for two signs. - Internal temperature: Use a meat thermometer. The meatballs should reach 165°F. This means they are safe to eat. - Visual cues: The meatballs should be golden brown outside. They should not be pink inside. Cut one open to see if the center is cooked through. Yes, you can make these meatballs ahead of time. This is a great way to save time. - Meal prep tips: Prepare the meatballs, but do not bake them. You can store them in the fridge for up to 24 hours. You can also freeze them for longer storage. - Refrigeration and reheating: If you refrigerate, bake them as usual when ready. If frozen, thaw in the fridge overnight. Bake them at 400°F for 25-30 minutes. These meatballs pair well with many sides. They make a great meal when served with the right dishes. - Side dishes and accompaniments: Serve them with steamed rice or quinoa. You can also add stir-fried vegetables for color and crunch. - Ideal pairings for a complete meal: A fresh cucumber and carrot salad adds a nice touch. You can also serve extra teriyaki sauce for dipping. You learned how to make tasty Teriyaki Chicken Meatballs. We covered key ingredients and steps. I shared tips for keeping meatballs moist and flavorful. You also learned about fun variations and side dishes. Remember to try different proteins or sauces to mix things up. Proper storage will keep your leftover meatballs fresh. Enjoy cooking and serving this dish to your family and friends! Your new skills will impress everyone at the table.

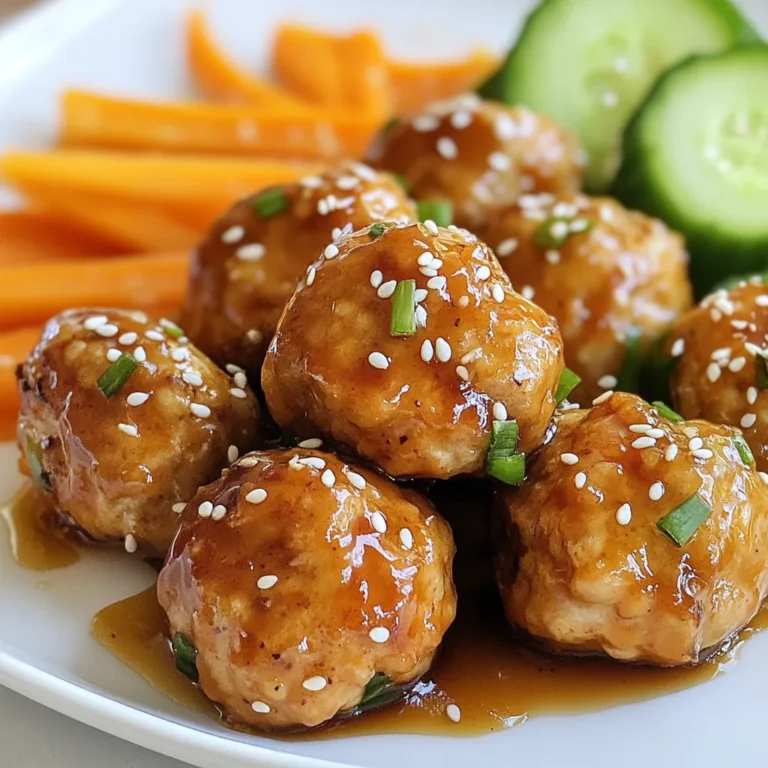
Teriyaki Chicken Meatballs Flavorful and Easy Recipe

To make spicy garlic edamame, you need these main items: - 2 cups edamame (in pods), thawed - 3 tablespoons extra virgin olive oil - 4 cloves garlic, finely minced - 1 tablespoon soy sauce - 1 tablespoon toasted sesame oil - 1 tablespoon freshly squeezed lime juice - Sea salt, to taste Edamame is young soybeans. They are packed with protein and fiber. The olive oil adds a rich flavor. Garlic brings a strong, savory taste that we all love. For the right kick, use these spices: - 1 teaspoon red pepper flakes (adjust based on your spice preference) Red pepper flakes give heat. You can make it more or less spicy by adding more or less. To finish your dish, use these garnishes: - Chopped green onions - Toasted sesame seeds Chopped green onions add freshness. Toasted sesame seeds add a nice crunch. These make your dish not only tasty but pretty too! {{ingredient_image_2}} To start, rinse 2 cups of edamame pods under cold water. This removes any dirt and makes them clean. After rinsing, drain the edamame well. This step is key for flavor absorption later on. Next, heat 3 tablespoons of extra virgin olive oil in a large skillet over medium heat. When the oil shimmers, add 4 finely minced garlic cloves and 1 teaspoon of red pepper flakes. Sauté for about 2 minutes until the garlic smells great and turns a light golden color. Be careful not to burn the garlic! Now, add the drained edamame pods to the skillet. Toss them well so each pod is coated in the garlic-oil mix. This ensures every bite is flavorful. Then, pour in 1 tablespoon of soy sauce and 1 tablespoon of toasted sesame oil. Stir-fry the edamame for 3 to 4 more minutes until everything is heated through. Once cooked, take the skillet off the heat. Squeeze 1 tablespoon of fresh lime juice over the edamame. Toss again to mix everything together. Season with sea salt to taste. For a lovely finish, sprinkle chopped green onions and toasted sesame seeds on top. Serve the spicy garlic edamame in a bright bowl, maybe with lime wedges on the side. Enjoy this bold snack! To get the best garlic taste, use fresh garlic. Fresh garlic gives a stronger flavor than pre-minced. Mince the garlic finely so it cooks evenly. Be careful not to burn it. Burnt garlic turns bitter. Sauté it on medium heat until golden and fragrant. This takes about two minutes. Want to change the heat? Start with one teaspoon of red pepper flakes. This amount gives a nice kick. If you love spice, add more. Taste the edamame after cooking. You can always add more spice later, but you can't take it away. Make it just right for you! Planning a party? You can make this dish ahead of time. Cook the edamame and let it cool. Store it in the fridge for up to two days. When you’re ready to serve, reheat it in a skillet on low heat. Add lime juice and salt right before serving. This way, it stays fresh and tasty! Pro Tips Fresh Edamame: Use fresh or frozen edamame that is still in the pods for the best flavor and texture. Avoid pre-shelled edamame as it can become mushy when cooked. Garlic Timing: Add the minced garlic only when the oil is hot to prevent it from burning, which can lead to a bitter taste in your dish. Custom Spice Level: Adjust the amount of red pepper flakes according to your spice tolerance. You can also experiment with other spices like smoked paprika for a different flavor profile. Garnish Wisely: For a pop of color and texture, don’t skimp on the green onions and sesame seeds. They not only enhance the visual appeal but also add a burst of flavor. {{image_4}} You can easily add protein to your spicy garlic edamame. Try mixing in cooked shrimp or chicken. These options give your snack a satisfying boost. Tofu is another great choice. Just cube it and sauté it in the garlic oil first. This way, the tofu soaks up all the delicious flavors. Do you want to change the taste? Try different sauces! You can use teriyaki or sriracha for a new twist. Each sauce adds its own unique flavor. Just keep the soy sauce and sesame oil for balance. This lets you create a spicy, sweet, or tangy version of edamame. Get creative and find your favorite! Want to try a new way to cook edamame? Steaming is a healthy option. It keeps the beans tender and bright green. Just steam them for about 5 minutes before seasoning. Grilling is another fun method. Toss the pods on the grill for a smoky flavor. The char adds an exciting crunch. Both methods work well, so choose what you like best! You can store leftover spicy garlic edamame in an airtight container. Make sure to let them cool first. Keep them in the fridge. They stay fresh for up to three days. To reheat, place the edamame in a skillet over medium heat. Add a splash of olive oil to keep them moist. Stir them for about five minutes until they are warm. You can also use the microwave. Heat them in a bowl for one to two minutes. Freezing is a great way to keep extra edamame. First, let them cool completely. Then, place them in a freezer-safe bag. Remove as much air as possible. They can last up to three months in the freezer. To use, simply thaw in the fridge overnight before reheating. Edamame is young soybeans. They are often served in their pods. Edamame is rich in protein and fiber. They also contain vitamins and minerals. These nutrients help with digestion and muscle growth. Eating edamame can lower cholesterol and support heart health. This snack is tasty and good for you. Yes, you can use frozen edamame. Frozen edamame is easy to find. It is also quick to prepare. Just thaw it before cooking. This saves time and keeps the flavor. You can follow the same recipe steps with frozen edamame. It will taste great! Yes, this recipe is perfect for vegans. It contains no animal products. You use olive oil, soy sauce, and garlic. These ingredients add flavor without animal-based items. Enjoy this spicy garlic edamame as a vegan snack! This blog post covered how to prepare and cook edamame in simple steps. We explored the main ingredients, spices, and garnishes that elevate this snack. I shared tips for perfecting flavors and offered various ways to enjoy edamame. Remember, you can store leftovers and even freeze them for future snacks. Edamame is healthy and vegan-friendly, making it a great choice. Now, you have all the tools to create tasty edamame dishes that impress! Enjoy your cooking adventure!

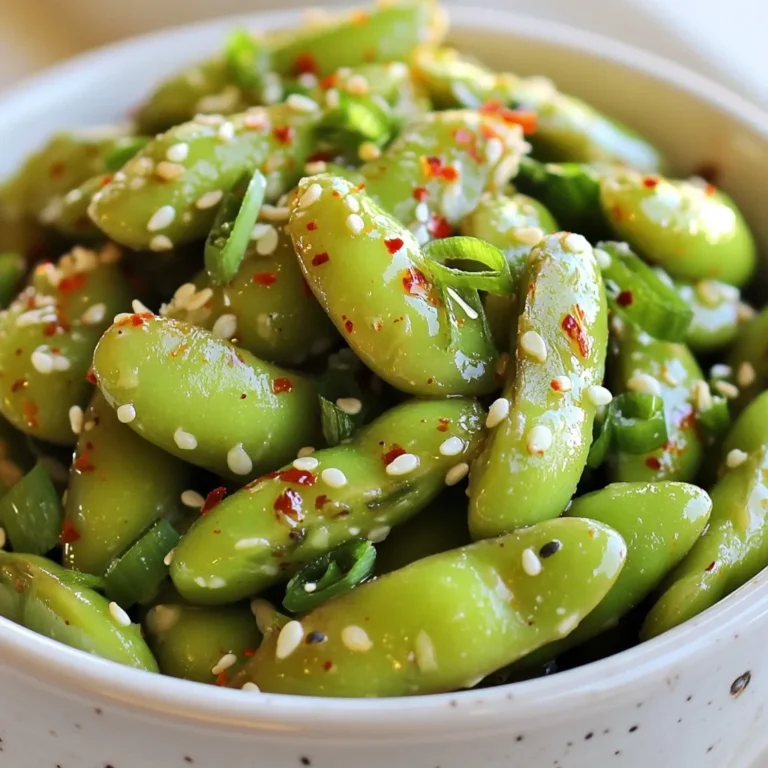
Spicy Garlic Edamame Flavorful and Bold Snack Idea

To make delicious sesame crusted tuna steaks, gather these main ingredients: - 4 fresh tuna steaks (approximately 6 oz each) - 1/4 cup sesame seeds (mix of white and black) - 2 tablespoons soy sauce - 2 tablespoons sesame oil - 1 teaspoon freshly grated ginger - 1 clove garlic, finely minced - Salt and freshly ground black pepper, to taste These fresh tuna steaks are the star of the dish. The sesame seeds bring a nice crunch and flavor. Soy sauce adds depth, while ginger and garlic give it a nice zing. You can elevate your dish with these optional garnishes and sides: - 2 green onions, thinly sliced (for garnish) - Slices of avocado - Thinly sliced radish These garnishes not only add color but also fresh flavors. The creamy avocado pairs well with the rich tuna, while the radish adds a crisp bite. Using the right cooking oil is key. I recommend sesame oil for its nutty flavor. It enhances the dish and complements the sesame seeds. You can also use other oils, like canola or avocado, if you prefer. Heat your skillet until the oil shimmers. This ensures a great sear. A good sear locks in moisture and keeps the tuna tender. Now you have all the essential ingredients and tips to start your sesame crusted tuna steaks! {{ingredient_image_2}} To start, you need to make the marinade. Grab a small bowl and add these ingredients: - 2 tablespoons soy sauce - 2 tablespoons sesame oil - 1 teaspoon freshly grated ginger - 1 clove garlic, finely minced - A pinch of salt - A dash of black pepper Whisk everything together until it blends well. This mixture gives the tuna a great flavor. Next, take your fresh tuna steaks. You should have four, each about 6 ounces. Place them in a shallow dish made of glass or ceramic. Pour the marinade over the tuna so each piece gets coated evenly. Cover the dish and pop it in the fridge. Let it sit for 15 to 20 minutes. This will let the flavors soak in. While the tuna is marinating, prepare to coat it. Spread your sesame seeds on a shallow plate. After marinating, take the tuna out of the fridge. Let any extra marinade drip off. Now, press each steak into the sesame seeds. Make sure both sides are well coated. Now it's time to cook! Heat a non-stick skillet over medium-high heat and add 1 tablespoon of sesame oil. Wait until the oil shimmers. Place the sesame-crusted tuna steaks in the hot skillet. Sear each side for 1 to 2 minutes if you like it rare. For a more well-done steak, cook for an extra minute. Once cooked, remove the tuna and let it rest for 1 minute. This step helps keep the juices inside. Finally, slice the tuna into thin strips. This helps show off that beautiful crust. Arrange the slices on a plate and garnish with green onions. You can also add avocado and radish for extra flair. Enjoy your delicious sesame crusted tuna steaks! To get that perfect sesame crust, choose a mix of white and black sesame seeds. This mix not only looks great but also adds depth to the flavor. When coating the tuna, press the steaks into the seeds firmly. Make sure to cover both sides well. This step ensures the seeds stick during cooking. A good crust adds a nice crunch and flavor contrast to the tender fish. Searing tuna steaks needs careful timing. Heat your skillet until the oil shimmers. This indicates it's hot enough. For rare tuna, sear each side for just 1-2 minutes. If you like it more well-done, add an extra minute. The center should remain pink, giving it that fresh taste. Remember, overcooking can dry out the fish. It’s better to undercook slightly than to ruin the texture. Having the right tools makes cooking easier. Here’s what you need for this recipe: - Non-stick skillet - Shallow dish for marinating - Shallow plate for sesame seeds - Whisk for mixing marinade - Sharp knife for slicing tuna - Serving plate for presentation These tools will help you prepare and serve your sesame crusted tuna steaks effortlessly. Pro Tips Choosing Fresh Tuna: Look for bright red color and a firm texture when selecting tuna steaks. Freshness is key to achieving the best flavor and texture. Marination Time: Marinating the tuna for just 15-20 minutes is ideal; longer can alter the delicate texture of the fish. Keep it simple to enhance the natural flavors. Searing Technique: Ensure your skillet is hot before adding the tuna to achieve a perfect sear. This helps to lock in the juices and create a crispy sesame crust. Resting Period: Allowing the tuna to rest for a minute after cooking helps retain moisture and enhances the overall juiciness of each slice. {{image_4}} You can change the flavor of your tuna steaks easily. Try different marinades to make it fun. For a zesty twist, mix lime juice and honey with soy sauce. This adds a sweet and tangy kick. Another option is to use teriyaki sauce with sesame oil for a sweeter profile. If you love spice, add chili flakes to your soy sauce mix. This will give your tuna a nice heat. You don’t have to stick to just searing. Grilling the tuna steaks adds a smoky flavor. Heat your grill to medium-high and place the steaks directly on the grates. Cook for about 2-3 minutes per side. Baking is another great option. Preheat your oven to 400°F. Place the coated tuna on a baking sheet and bake for 10 minutes. This method gives a tender finish without much fuss. Pair your sesame crusted tuna with fresh sides. A simple cucumber salad adds crunch and freshness. You can also serve it with jasmine rice for a filling meal. For a colorful plate, add roasted veggies like carrots or bell peppers. If you want a bit more flair, try avocado slices and radishes. They not only look nice but also add great flavor. Store leftover tuna steaks in an airtight container. Make sure to let them cool down first. Place them in the fridge within two hours of cooking. They can stay fresh for 1 to 2 days. If you want to keep them longer, consider freezing. To reheat tuna steaks, use a skillet. Heat it on low heat to avoid overcooking. Add a splash of water or broth to keep them moist. Cook for about 2 to 3 minutes on each side. You can also use a microwave. Heat on low power in 30-second intervals until warm. For freezing, wrap tuna steaks tightly in plastic wrap. Then, place them in a freezer bag. Remove as much air as possible to prevent freezer burn. They can be frozen for up to 3 months. When ready to use, thaw in the fridge overnight before reheating. This helps keep their texture and flavor intact. The best way to cook tuna steaks is by searing them. Searing gives the tuna a nice crust while keeping the center pink and tender. Heat a non-stick skillet over medium-high heat and add a bit of oil. Sear the tuna for 1-2 minutes on each side for a rare finish. If you prefer it more cooked, add an extra minute per side. This method locks in flavors and keeps the fish moist. Yes, you can prepare sesame crusted tuna in advance. Marinate the tuna steaks ahead of time and coat them with sesame seeds. Store them in the fridge until you’re ready to cook. It’s best to cook them fresh for optimal taste and texture. However, marinating them a few hours before cooking enhances the flavors. To check if tuna steaks are done, look for a pink center. Use a sharp knife to cut into the steak. If it is light pink, it is rare. For medium, look for a slightly opaque center. The outside should show a nice sear. Always trust your senses; the smell and texture will guide you as well. Cooking times can vary, so keep an eye on them! This blog post covered how to make delicious sesame crusted tuna steaks. We explored key ingredients, cooking techniques, and helpful tips to perfect your dish. Remember to experiment with marinades and sides to suit your taste. Proper storage can keep leftovers fresh for later enjoyment. With these steps, you can make a meal that impresses everyone. Get ready to enjoy your tasty creation next time you cook!

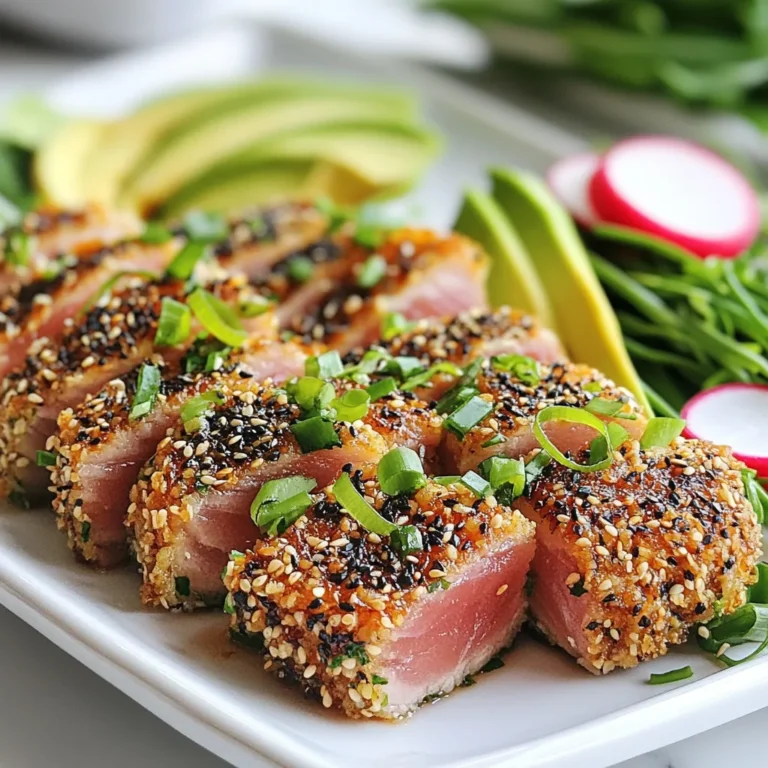
Savory Sesame Crusted Tuna Steaks Recipe Guide

PREV 1 … 16 17 18 … 20 NEXT
purelyyumrecipes

explore

DessertsDinnerAppetizersDrinks

Our Policies

  • Cookie Policy
  • Copyright Policy
  • Disclaimer
  • GDPR Policy
  • Terms Of Use
Back to Top
  • About
  • Contact Us
  • Privacy Policy
© 2025 purelyyumrecipes