FREE DINNER EBOOK! Get your copy!
  • Cookie Policy
  • GDPR Policy
  • Disclaimer
  • Terms Of Use
  • Visit my other site: Fun Cookie Recipes
purelyyumrecipes
  • Home
  • Dinner
  • Desserts
  • Drinks
  • Appetizers
  • Contact
  • About
  • Privacy Policy
  • Home
  • Dinner
  • Desserts
  • Drinks
  • Appetizers
  • Contact
  • About
  • Privacy Policy
  • Cookie Policy
  • GDPR Policy
  • Disclaimer
  • Terms Of Use
Visit my other site: Fun Cookie Recipes

HOME / CATEGORIES /

Latest

- 1 lb ground chicken - 1 tablespoon olive oil - 1 red bell pepper, finely chopped - 1/2 cup water chestnuts, finely diced - 3 green onions, sliced (plus extra for garnish) - 2 cloves garlic, minced - 1/4 cup sweet chili sauce - 1 tablespoon soy sauce - 1 tablespoon rice vinegar - 1 teaspoon freshly grated ginger - Salt and pepper to taste - 1 head of iceberg or butter lettuce, leaves carefully separated - Sesame seeds for garnish - Fresh cilantro leaves for garnish To measure correctly, use dry measuring cups for solids. For liquids, use a liquid measuring cup. Always level off dry ingredients with a knife for accuracy. For sticky ingredients like sweet chili sauce, spray the cup with cooking oil first. This helps them slide out easily. Fresh ingredients make a big difference. Choose bright red peppers and firm water chestnuts. Check green onions for crispness and vibrant color. For the chicken, look for lean ground meat with no added fillers. Fresh herbs like cilantro add flavor. Always wash your lettuce before using to remove dirt and bacteria. Enjoying fresh food elevates the taste of your dish! {{ingredient_image_2}} First, grab a large skillet. Heat one tablespoon of olive oil over medium heat. Once the oil is hot, add one pound of ground chicken. Use a spatula to break it up. Cook the chicken for about 5 to 7 minutes. Look for a nice golden brown color. This means it’s ready for the next step. Next, add two cloves of minced garlic and one teaspoon of freshly grated ginger. Cook for one more minute. This helps to mix in the flavors. The kitchen will smell amazing! Now it’s time to add some crunch. Chop one red bell pepper finely and dice half a cup of water chestnuts. Stir these into the skillet. Cook for 3 to 4 minutes. You want the bell pepper to soften and become bright. Keep stirring to mix everything well. In a small bowl, mix together a quarter cup of sweet chili sauce, one tablespoon of soy sauce, and one tablespoon of rice vinegar. Whisk these ingredients until they blend nicely. Pour the sauce over the chicken and vegetables in the skillet. Stir well to coat everything evenly. Let the mixture simmer for 2 to 3 minutes. This warms it up and helps the flavors blend together. Season to taste with salt and pepper. Now the filling is ready for your lettuce wraps! To boost flavor, use fresh garlic and ginger. They add a bright taste. Choose ripe red bell peppers for sweetness and color. For extra depth, add a splash of lime juice. This enhances the sweet chili sauce. Taste and adjust salt and pepper as needed. You can prepare the chicken mixture ahead of time. Cook it and let it cool. Store it in the fridge for up to three days. When you’re ready to eat, warm it on the stove. This saves time on busy nights. You can also wash and dry the lettuce leaves in advance. Serve the wraps on a pretty platter. This makes it fun and inviting. Add lime wedges for a zesty touch. You can also provide extra toppings like chopped peanuts or diced avocado. These add crunch and creaminess. Enjoy making this meal a fun event! Pro Tips Use Fresh Ingredients: Always opt for fresh vegetables and herbs for the best flavor. Fresh ingredients elevate the dish and provide vibrant colors. Customize Your Wraps: Feel free to add additional ingredients like shredded carrots or cucumber for extra crunch and flavor in your wraps. Make Ahead: Prepare the chicken mixture ahead of time and store it in the refrigerator. Just assemble the wraps when you're ready to serve for a quick meal. Experiment with Sauces: While sweet chili sauce is delicious, try experimenting with different sauces like hoisin or teriyaki for a unique twist on flavor. {{image_4}} You can switch up the protein in these wraps. Ground turkey works well and keeps it light. For a plant-based option, try crumbled tofu or tempeh. Both options absorb flavors like chicken. They offer great taste and texture too. If you enjoy heat, add chili flakes to the mix. Start with a pinch and taste as you go. This small change can make the dish exciting. You might even want to use a spicy chili sauce instead of sweet chili sauce. This will kick up the heat significantly. Looking for a low-carb option? Try using romaine or butter lettuce. These types hold the filling well and add a nice crunch. You can also use cabbage leaves for a fun twist. Each option keeps the wraps light and fresh. To keep your Sweet Chili Chicken Lettuce Wraps fresh, store them in an airtight container. Place any leftover chicken mixture in the container. Keep the lettuce leaves separate. This helps the leaves stay crisp. You can enjoy the leftovers for up to three days. When you want to eat the leftovers, heat the chicken mixture in a skillet. Use medium heat and stir until it is hot. You can also use the microwave if you prefer. Just heat it for about one to two minutes. Make sure to check that it’s heated through before serving. You can freeze the chicken mixture for later use. Place it in a freezer-safe bag or container. Remove as much air as possible to avoid freezer burn. The mixture can last for up to three months in the freezer. When ready to eat, thaw it in the fridge overnight before reheating. Yes, you can use chicken thighs. They add great flavor. Just chop them into small pieces. Cook them in the skillet until they are fully done. This will take about 10 to 12 minutes. You can mix hot sauce with honey. This gives you a sweet and spicy taste. Another option is to use teriyaki sauce. It will change the flavor but still taste good. These wraps last about three days in the fridge. Store the chicken mix in a container. Keep the lettuce leaves separate to stay fresh. Reheat the chicken mix before serving. We explored the key ingredients, cooking steps, and helpful tips for Sweet Chili Chicken Lettuce Wraps. You learned how to prepare chicken and mix a tasty sauce. We discussed variation options to keep your meals exciting. Finally, proper storage techniques can keep your leftovers fresh. Incorporate these tips for success. Enjoy your cooking and sharing these wraps with others. Embrace your creativity in the kitchen!

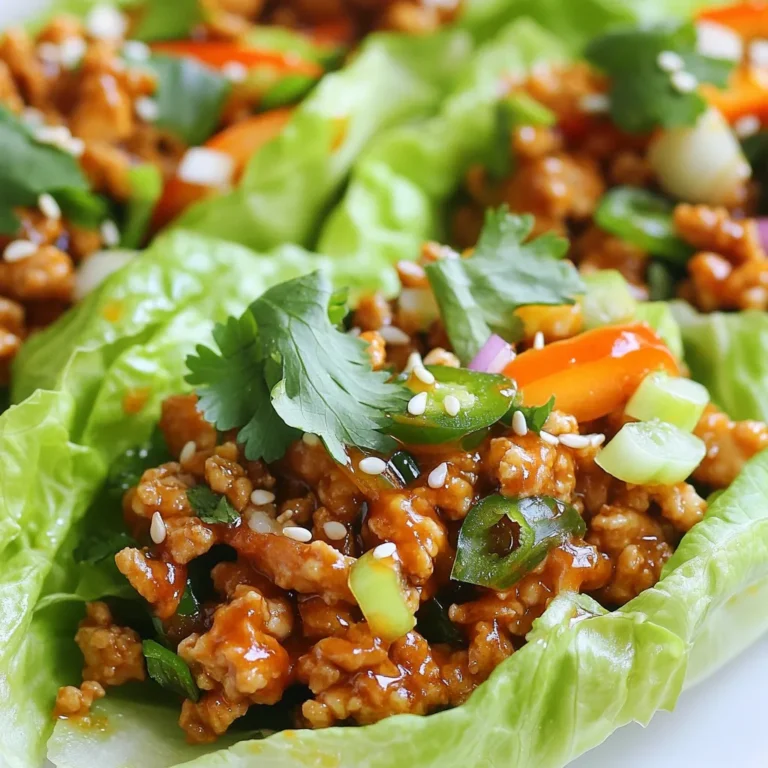
Sweet Chili Chicken Lettuce Wraps Tasty and Easy Meal

- 12 oz. penne pasta - 1 lb. Cajun or Andouille sausage, sliced into rounds - 1 tablespoon olive oil - 1 medium onion, diced finely - 3 cloves garlic, minced - 1 red bell pepper, diced - 1 green bell pepper, diced - 1 cup heavy cream - 1 cup chicken broth (low sodium recommended) - 1 tablespoon Cajun seasoning - 1 teaspoon smoked paprika - Salt and black pepper to taste - 1 cup grated Parmesan cheese - Fresh parsley, chopped (for garnish) Gather these ingredients before you start. The penne pasta gives a nice bite. The sausage adds a spicy kick. I love using Cajun or Andouille sausage for the best flavor. You need olive oil to sauté the sausage and veggies. Dice the onion, red bell pepper, and green bell pepper. These veggies add color and sweetness. Minced garlic gives a strong, aromatic flavor. Heavy cream and chicken broth make the sauce rich and smooth. Cajun seasoning and smoked paprika bring warmth and depth. Salt and black pepper sharpen the dish's overall taste. Don’t forget the grated Parmesan cheese! It melts beautifully into the sauce. Finally, fresh parsley makes a bright and colorful garnish. Enjoy the rainbow of flavors in this dish! {{ingredient_image_2}} First, fill a large pot with water. Add a generous amount of salt. Bring it to a rolling boil. Add your penne pasta to the boiling water. Cook it for about 10-12 minutes. You want it to be al dente. When the pasta is done, drain it in a colander. Save a cup of pasta water for later use. Now, take a large skillet and heat olive oil over medium heat. Add the sliced sausage to the skillet. Cook it for about 5 minutes. You want it to brown and get crispy. Once it's done, remove the sausage from the skillet. Set it aside on a plate, but leave those tasty drippings in the pan. In the same skillet, add your diced onion, red bell pepper, and green bell pepper. Sauté these for about 5-7 minutes. You want them to be tender and a bit caramelized. Next, add the minced garlic. Cook it for one more minute until you smell that wonderful aroma. Pour the chicken broth into the skillet and bring it to a gentle simmer. Then, stir in the heavy cream. Add the Cajun seasoning and smoked paprika for that kick. Let the sauce simmer for about 3-5 minutes. Stir it occasionally until it thickens and becomes creamy. Return the browned sausage to the skillet. Mix it well with the sauce. Then, add the cooked penne pasta. Toss everything together until the pasta is coated in the creamy sauce. If the sauce feels too thick, add a splash of the reserved pasta water. Adjust it until you like the consistency. Season with salt and pepper to taste. Finally, sprinkle the grated Parmesan cheese over the pasta. Stir until the cheese melts into the sauce. This creates a luscious, creamy texture. Once mixed, remove the skillet from the heat. Enjoy your delicious creamy Cajun sausage pasta! - Avoiding Overcooking: Always cook your pasta in boiling salted water. Follow the package time closely, aiming for al dente. Test a piece before draining to ensure it’s firm yet tender. Overcooking leads to mushy pasta, which ruins the dish. - Ensuring Flavorful Sauces: Use the sausage drippings left in the skillet. They add depth to the sauce. Simmer the sauce gently to blend flavors well. Stir in the heavy cream slowly, allowing it to thicken nicely. - Options for Sausage Alternatives: If you prefer a lighter option, turkey sausage works well. You can also use vegetarian sausage or mushrooms for a meat-free version. Both alternatives bring unique flavors to your pasta. - Dairy-Free Adjustments: To make this dish dairy-free, use coconut cream instead of heavy cream. Nutritional yeast can replace Parmesan cheese for a cheesy flavor without dairy. - Plating Ideas for Visual Appeal: Serve the pasta in shallow bowls. Twirl the pasta into a nest for a nice look. This presentation adds elegance to your meal. - Garnishing Options with Fresh Ingredients: Top the dish with extra Parmesan cheese and chopped parsley. A light drizzle of olive oil adds shine and flavor. You can also add a squeeze of lemon for brightness. Pro Tips Cook Pasta Al Dente: Make sure to cook your penne pasta until just al dente for the best texture. It will continue to cook slightly when mixed with the sauce. Use Fresh Ingredients: Fresh vegetables and herbs will elevate the flavor of your dish. Consider using fresh garlic and parsley for a vibrant taste. Adjust Spice Level: If you prefer a milder dish, reduce the amount of Cajun seasoning or opt for a milder sausage. You can always add more spice later! Save Pasta Water: Always reserve a cup of pasta water before draining. This starchy water can be used to adjust the sauce's consistency and help it cling to the pasta. {{image_4}} You can make your dish hotter with a few simple tweaks. First, try adding red pepper flakes. Just a pinch can boost the heat. If you want even more spice, increase the Cajun seasoning. Adjust it to your taste. If you want a meat-free option, you can swap the sausage for veggies. Try mushrooms or zucchini. They add great flavor and texture. For creaminess, use non-dairy options like almond milk or coconut cream. These keep the dish rich without the dairy. One-pot meals save time and cleanup. Start by cooking the sausage in a large pot. Remove it once browned. Next, add the veggies and cook them in the same pot. Add your pasta and broth together, letting it cook until tender. This method keeps all the flavors in one dish. Use a lid to trap steam for faster cooking. - Refrigeration Guidelines: After you finish your meal, let the pasta cool. Store it in an airtight container. Place it in the fridge within two hours of cooking. This keeps the pasta fresh. - Recommended Storage Containers: Use glass or BPA-free plastic containers. They help keep the flavor and texture. Choose containers that fit your portion size. - Best Practices for Freezing Pasta Dishes: To freeze the pasta, let it cool completely. Then, divide it into portions. Use freezer-safe bags or containers. Remove as much air as possible before sealing. - Thawing and Reheating Instructions: To thaw, place the frozen pasta in the fridge overnight. Reheat it in a saucepan over medium heat with a splash of chicken broth. Stir until warmed through. - When to Consume Leftovers: Eat leftovers within three to four days if stored in the fridge. If frozen, use them within three months for best taste. - Signs of Spoilage: Look for changes in color or texture. If it smells off or has mold, do not eat it. Always trust your senses when it comes to food safety. Yes, you can make this dish ahead of time. To prep, cook the pasta and sausage as directed. Store them separately in sealed containers in the fridge. When you're ready to eat, reheat the sausage and sauce in a skillet. Add the pasta and stir until warm. This keeps the pasta from getting mushy. You can serve this dish with a fresh salad or garlic bread. A simple green salad adds crunch and freshness. Garlic bread pairs well with the creamy sauce and is great for dipping. You might also enjoy steamed vegetables like broccoli or green beans on the side. To reduce the spice, use less Cajun seasoning. You can also add a bit more cream or cheese to the sauce. This will help tone down the heat. Consider using bell peppers or cream to balance the flavors. Absolutely! You can use any pasta you like. Penne works well, but rotini or farfalle are great choices too. Just adjust the cooking time based on the pasta type. The key is to keep it al dente for the best texture. Yes, this recipe is perfect for meal prep! Cook and portion it out in advance. Store in airtight containers in the fridge. It will stay good for up to four days. For longer storage, you can freeze it for up to three months. Just remember to reheat it gently. This blog post covered how to make a delicious Creamy Cajun Sausage Pasta. We discussed all the key ingredients and detailed steps to cook it perfectly. I shared tips for storing leftovers and variations to suit different tastes. Remember, you can easily adjust spices and substitutes for a personalized dish. Cooking should be fun, so try out different ideas. With practice, you'll make it your very own. Enjoy your cooking adventure with this creamy, flavorful dish!

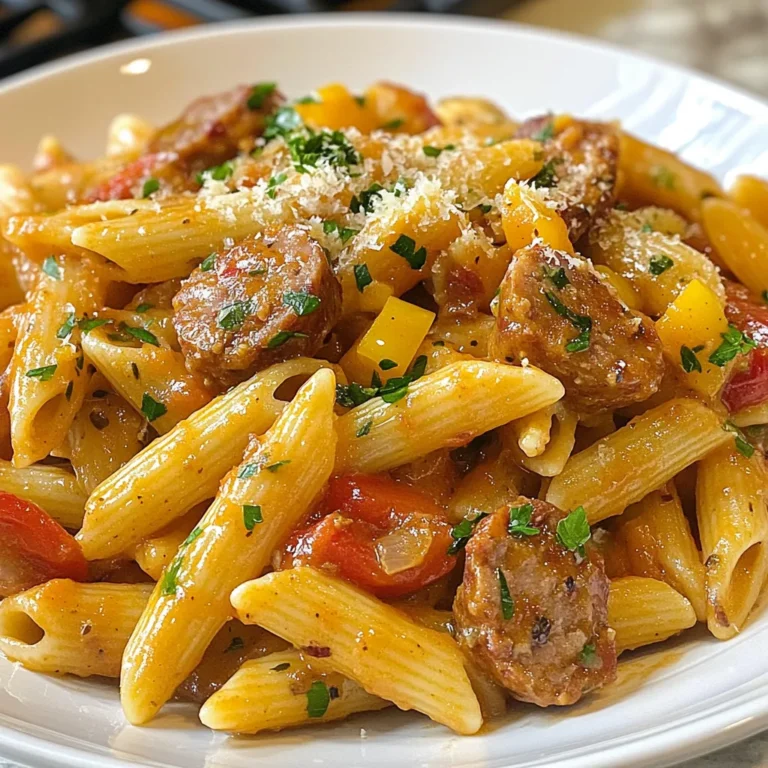
Creamy Cajun Sausage Pasta Simple and Flavorful Dish

- 1 lb large shrimp, peeled and deveined - 2 tablespoons Cajun seasoning - 8 small corn tortillas - 1 cup red cabbage, thinly sliced - 1 cup green cabbage, thinly sliced - 1 grated carrot - 1/4 cup fresh cilantro, chopped - 1/4 cup avocado crema (store-bought or homemade) - Juice of 2 limes - 1 tablespoon honey - Salt and pepper to taste The main ingredients for Cajun shrimp tacos are key to great flavor. Large shrimp add a sweet, tender bite. The Cajun seasoning gives a spicy kick that makes the dish pop. Corn tortillas are perfect for wrapping all these tasty bits. Moving on to the lime slaw, it balances the meal with crunch and freshness. Red and green cabbage add a crisp texture. The grated carrot brings a subtle sweetness, while fresh cilantro adds a bright flavor. Don't forget the extra ingredients! Avocado crema lends creaminess and richness. Fresh lime juice brightens the dish. Honey adds a touch of sweetness, while salt and pepper help bring out all these flavors. With these ingredients, you can create a delightful meal that is both vibrant and satisfying. {{ingredient_image_2}} - In a medium mixing bowl, add 1 pound of large shrimp. - Sprinkle 2 tablespoons of Cajun seasoning over the shrimp. - Drizzle 1 tablespoon of olive oil on top. - Add salt and pepper to taste. - Toss the shrimp until they are fully coated. - Let the shrimp marinate for at least 15 minutes. Marinating helps the shrimp soak up the tasty spices. The oil keeps the shrimp moist as they cook. This time allows the flavors to deepen and makes each bite delicious. - In a large mixing bowl, combine 1 cup of thinly sliced red cabbage and 1 cup of thinly sliced green cabbage. - Add 1 grated carrot and 1/4 cup of chopped cilantro. - Squeeze the juice of 2 limes into the bowl. - Mix in 1 tablespoon of honey for a hint of sweetness. - Season with salt and pepper to taste. - Let the slaw sit for about 10 minutes. The lime slaw adds a crunchy contrast to the shrimp. The honey balances the tartness of the lime. Letting it sit allows the flavors to mix well. - Heat a large skillet over medium-high heat. - Once hot, add the marinated shrimp in a single layer. - Cook for 2-3 minutes on each side. - The shrimp should turn pink and opaque when done. - Remove the skillet from heat. Cooking shrimp is quick. They change color when they are ready. Avoid overcooking, as this can make them tough. - In a dry skillet, gently warm 8 small corn tortillas. - Heat each tortilla for about 30 seconds on each side. - They should become soft and pliable. Warm tortillas make the tacos easier to fold. This step enhances the overall taste of the dish. - Take a warm tortilla and add a scoop of lime slaw in the center. - Top with a few pieces of the cooked shrimp. - Drizzle with 1/4 cup of avocado crema for creaminess. - Optionally, sprinkle more chopped cilantro for freshness. Layering ingredients builds flavor and texture. Each taco should be a balance of slaw and shrimp. - Serve the tacos warm on a plate. - Add lime wedges on the side for extra brightness. - Consider pairing with tortilla chips and salsa for a full meal. Serving warm keeps the flavors vibrant. Lime wedges add a refreshing zest to each bite. To make your shrimp shine, avoid overcooking it. Cook shrimp just until they turn pink and opaque. This usually takes about 2-3 minutes per side. If you overcook shrimp, they become tough and rubbery. Choosing the right Cajun seasoning is key. Look for a blend with paprika, garlic, and cayenne pepper. You want a balance of spice and flavor. If you prefer a milder taste, start with less seasoning and adjust as you cook. Letting the lime slaw sit is crucial. This allows all the flavors to meld and become more vibrant. Aim for at least 10 minutes of resting time. Taste the slaw before serving. Adjust seasoning with salt and pepper to suit your preference. Feel free to add more lime juice if you want extra tang. A dash of honey can also enhance the sweetness and balance the flavors. For the best tacos, choose small corn tortillas. They hold up well and add a nice flavor. You can also try flour tortillas, but corn is traditional. To keep tortillas warm, stack them in a clean kitchen towel. Place them in a bowl or in an insulated container. This keeps them soft and pliable until you are ready to serve. Pro Tips Perfectly Cooked Shrimp: To ensure the shrimp are juicy and tender, avoid overcooking. They should turn pink and opaque in just 2-3 minutes per side. Homemade Avocado Crema: For a fresher taste, blend ripe avocado with Greek yogurt or sour cream, lime juice, and a pinch of salt to create a creamy topping. Flavorful Slaw: Allow the lime slaw to sit for at least 10 minutes before serving. This resting time helps the vegetables soften and the flavors to meld beautifully. Warming Tortillas: Heat tortillas in a dry skillet to enhance their flavor and pliability. This simple step elevates the overall taco experience. {{image_4}} You can switch shrimp for chicken or fish. Chicken thighs work great. Just marinate them like the shrimp. Grill or pan-fry until cooked. For fish, use a firm type like tilapia or cod. Cook until opaque and flaky. If you prefer a vegetarian option, black beans are a fantastic choice. They add protein and a hearty texture. Simply heat them up with some spices. You can then layer them in the tacos just like shrimp. You can make slaw with different types of cabbage or greens. Try Napa cabbage for a softer crunch. You can also use kale for more nutrients. Each option gives a unique twist to the tacos. Adding fruits can also bring sweetness. Try diced mango or pineapple. They pair well with the lime and spice. Just mix them in with your slaw for a refreshing touch. You can adjust the spice in your Cajun seasoning. If you like it mild, use less seasoning. You can also add more lime juice to balance heat. For those who want heat, add sliced jalapeños or a spicy salsa. You can sprinkle them on top of the tacos. This way, everyone can customize their tacos to their taste. For shrimp, I recommend placing it in an airtight container. This keeps it fresh. Use it within two days for the best taste. For the slaw, store it in a separate container. The slaw can last for about three days in the fridge. To reheat shrimp, I suggest using a skillet. Heat it on medium for about 2 minutes. This keeps the shrimp juicy. For tortillas, warm them in a dry skillet. Heat each side for about 30 seconds. This way, they stay soft and flexible. To avoid sogginess, do not microwave the tortillas or shrimp. You can freeze cooked shrimp. Place it in a freezer-safe bag, removing as much air as possible. It can last for up to three months. When freezing tortillas, stack them with parchment paper between each one. Store them in a freezer bag. The slaw does not freeze well, so it’s best to make it fresh. You can use flour tortillas as a substitute. They add a soft texture. Lettuce wraps are great for a low-carb option. You can also try whole wheat tortillas for more fiber. Look for the shrimp to turn pink and opaque. The flesh should be firm but not rubbery. If the shrimp curls into a tight "C" shape, it is overcooked. Aim for a gentle curve instead. Yes, you can prepare lime slaw a day in advance. Store it in an airtight container in the fridge. This helps the flavors blend well. Just give it a stir before serving. Tortilla chips and salsa pair perfectly. You can also serve a fresh avocado salad. A side of black beans adds protein and flavor, too. Consider serving with a light cilantro lime rice. Add more Cajun seasoning to the shrimp. You could also mix in diced jalapeños or hot sauce. For a smoky kick, try chipotle powder. Adjust to your heat level for the best flavor. These Cajun shrimp tacos combine bold flavors and fresh ingredients. You learned about marinating shrimp, making lime slaw, and warming tortillas. Don't forget to customize your tacos with optional proteins and sides. Use tips to enhance your cooking and storage methods. With practice, you can master this dish. Enjoy sharing these tasty tacos with friends and family. Keep experimenting, and make it your own!

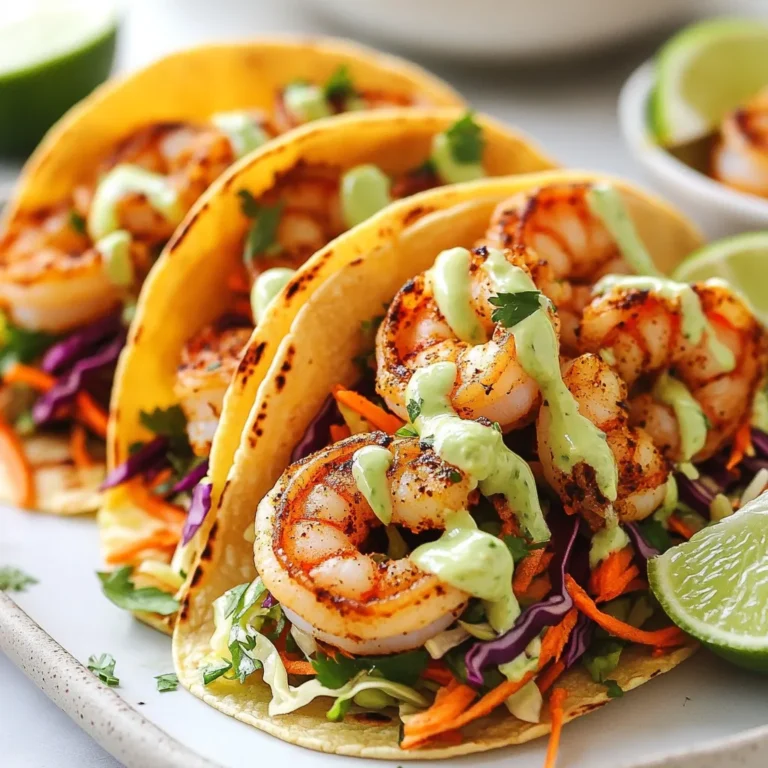
Cajun Shrimp Tacos with Lime Slaw Delightful Recipe

- 8 oz rice noodles - 1 cup shredded carrots - 1 bell pepper, julienned (any color for a vibrant look) - 1 cup snap peas, trimmed - ½ cup red cabbage, thinly sliced - ¼ cup fresh cilantro, chopped - ¼ cup green onions, sliced - ¼ cup roasted unsalted peanuts, chopped The rice noodles form the base of this salad. They are light and soak up flavors well. Fresh vegetables add crunch and color. Carrots, bell peppers, snap peas, and red cabbage brighten the dish. Each bite offers a mix of textures. The herbs like cilantro and green onions give it a fresh finish. The roasted peanuts add a nutty taste and a nice crunch. - 3 tablespoons creamy peanut butter - 2 tablespoons soy sauce (or tamari for a gluten-free version) - 1 tablespoon sesame oil - 1 tablespoon rice vinegar - 1 tablespoon honey or maple syrup - 1 teaspoon grated ginger - 1 teaspoon garlic, minced - 1 teaspoon chili paste (adjust according to heat preference) - Water to thin, as needed The dressing is key to this salad’s flavor. Creamy peanut butter brings richness. Soy sauce provides umami, while sesame oil adds depth. Rice vinegar gives a tangy kick. Honey or maple syrup balances the flavors. Ginger and garlic give it a warm spice. Chili paste adds a hint of heat. You can adjust water to reach your desired consistency. - Ginger - Garlic - Chili paste These optional seasonings enhance the dish. Fresh ginger brightens flavors, while garlic adds depth. If you like heat, chili paste is a great choice. Mix and match to suit your taste! {{ingredient_image_2}} To cook the noodles, start by boiling water in a large pot. Add a pinch of salt for flavor. Once the water is boiling, add 8 oz of rice noodles. Cook them for about 5-7 minutes. Check the package for specific times. When the noodles are tender, drain them. Rinse them under cold water to stop the cooking. Let the noodles cool completely before using them in your salad. Now, let’s make the dressing. In a mixing bowl, combine these ingredients: - 3 tablespoons creamy peanut butter - 2 tablespoons soy sauce - 1 tablespoon sesame oil - 1 tablespoon rice vinegar - 1 tablespoon honey or maple syrup - 1 teaspoon grated ginger - 1 teaspoon minced garlic - 1 teaspoon chili paste Whisk everything together until it becomes smooth. If the dressing is too thick, add water. Stir in one tablespoon of water at a time until it reaches a creamy, pourable consistency. In a large bowl, gather the cooled rice noodles and these fresh veggies: - 1 cup shredded carrots - 1 bell pepper, julienned - 1 cup snap peas, trimmed - ½ cup red cabbage, thinly sliced - ¼ cup chopped cilantro - ¼ cup sliced green onions Add the veggies to the noodles. Drizzle the dressing over the mixture. Use tongs or two forks to gently toss everything together. Ensure each noodle and vegetable gets coated with that tasty dressing. To keep your noodles from clumping, rinse them well. After cooking, drain the noodles. Then, run cold water over them. This stops cooking and cools them down fast. Toss the noodles with a little oil if needed. This helps them stay separate. When you dress the salad, make sure each part gets coated. Use tongs or two forks to toss gently. Start with a small amount of dressing. You can always add more later. This way, you can avoid sogginess. For an attractive serving, use a large bowl. You can also serve portions on individual plates. This makes it easy for guests to enjoy. Adding lime wedges gives a pop of color and flavor. Garnish the salad with fresh cilantro and chopped peanuts. This adds crunch and makes it look great. For an extra touch, sprinkle sesame seeds on top right before serving. It adds an appealing look and enhances the flavor. If you want a gluten-free option, use tamari instead of soy sauce. Tamari works great and still gives that rich flavor. For a vegetarian version, this salad is perfect as is. The peanut butter adds protein. You can also include tofu for extra protein. This way, you keep it tasty and filling for everyone. Pro Tips Use Fresh Ingredients: For the best flavor and texture, choose fresh vegetables and herbs. This will enhance the overall taste of your salad. Adjust the Spice Level: The chili paste can be adjusted according to your heat preference. Start with a small amount and increase gradually. Make Ahead: This salad can be made ahead of time. Just keep the dressing separate until you are ready to serve to maintain the crunchiness of the vegetables. Garnish Creatively: Don't hesitate to experiment with garnishes! Try adding sesame seeds or sliced avocado for an extra layer of flavor and visual appeal. {{image_4}} You can change the vegetables to suit your taste. Try cucumbers or bell peppers for a fresh crunch. You can also switch the nut butter. Almond or cashew butter works well too. If you want a different dressing, try tahini or a sesame dressing. These changes keep the dish fun and exciting. Add spices or herbs to boost the flavor. Cilantro gives a fresh taste, while sesame seeds add a nice crunch. You can also put in proteins like tofu or chicken. This adds heartiness and makes the salad more filling. Grilled chicken tastes great with the noodles. Tofu brings a nice texture if you want a vegetarian option. Think about the season when you choose ingredients. In summer, use fresh tomatoes or zucchini. In winter, root vegetables like carrots and radishes are great. You can also use local produce. This supports your community and brings fresh flavors to your dish. Each season offers new tastes and textures that make this salad special. To keep your Sesame Peanut Noodle Salad fresh, store it in an airtight container. This helps to keep moisture and air out. If you have a large batch, divide it into smaller portions. This way, you can grab just what you need. Glass containers work great for storage. They won’t stain and can go from fridge to table easily. When stored properly, the salad lasts about 3 to 5 days in the fridge. Always check for signs of spoilage before eating. If you see any mold or the salad smells off, it’s best to throw it away. Fresh veggies will start to look limp, which is another sign it’s time to say goodbye. If you want to enjoy the salad warm, heat it gently in a pan over low heat. Avoid cooking it too long, as you don’t want to overcook the veggies. After storage, the dressing may thicken. To fix this, add a splash of water and mix it in. This keeps the dressing smooth and tasty. Yes, you can make this salad ahead of time. It tastes even better after the flavors mix. To prepare it, cook the noodles and chop the veggies. Keep the dressing separate until you are ready to eat. This way, the noodles do not get soggy. Benefits: - Saves time on busy days. - Great for lunch or dinners. - You can customize the veggies as you like. If you need a peanut butter substitute, try sunflower seed butter. It gives a nutty flavor without peanuts. You can also use tahini, which is made from sesame seeds. Both options work well in the dressing. Alternatives for nut-free diets: - Sunflower seed butter - Tahini - Soy nut butter Absolutely! This salad is perfect for meal prep. You can make it on the weekend and enjoy it all week. Just store it in airtight containers. Tips for preparing in advance: - Cook the noodles and chop the veggies. - Keep the dressing in a jar. Add it when you are ready to eat. - Store in the fridge for up to five days for the best taste. This salad combines rice noodles, fresh veggies, and a creamy peanut dressing. You learned how to cook noodles, mix the dressing, and combine the salad. We explored tips for perfecting the dish and making it visually appealing. You can adapt the salad to fit your diet or the season, and store leftovers easily. Final thoughts: Enjoy your salad as a healthy meal, lunch, or side dish. Get creative with flavors and ingredients. Have fun making it your own!

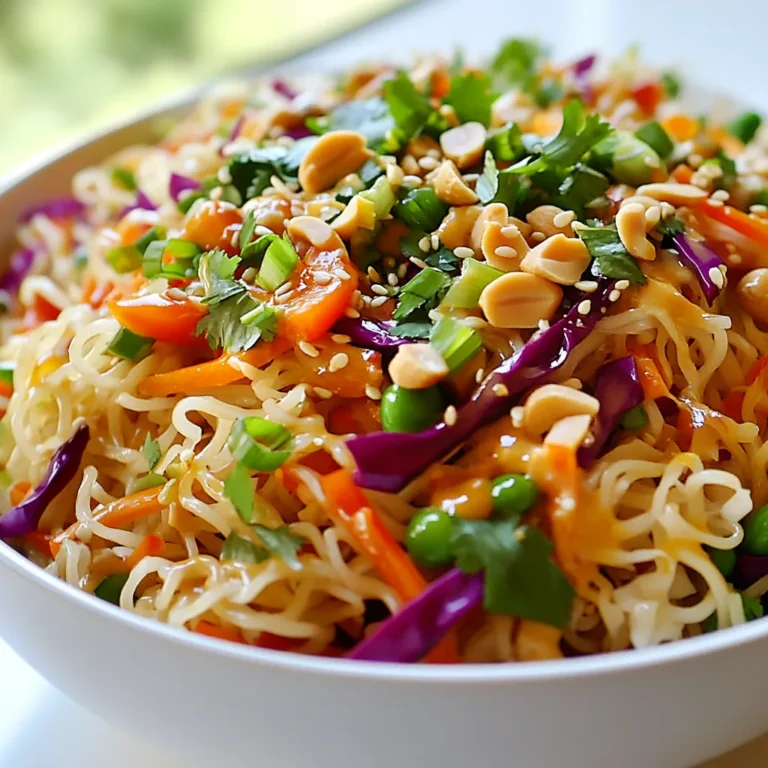
Sesame Peanut Noodle Salad Quick and Flavorful Recipe

Let’s dive into the tasty ingredients you'll need for Cauliflower Buffalo Pizza Bites. This recipe is simple and fun. Each ingredient plays a key role in making this snack delicious. - Fresh cauliflower florets - Shredded mozzarella cheese - Grated parmesan cheese - Almond flour (or breadcrumbs) - Eggs - Frank's RedHot sauce (or preferred hot sauce) - Garlic powder - Onion powder - Italian seasoning - Salt and pepper - Fresh parsley for garnish (optional) Each item brings its own flavor and texture to the bites. The cauliflower serves as a great base. It adds a nice crunch and absorbs all the tasty spices. Mozzarella and parmesan give a cheesy richness. Almond flour keeps it gluten-free and adds a bit of nuttiness. The eggs help bind everything together, while the hot sauce adds a spicy kick. Garlic and onion powder bring depth, and Italian seasoning adds aromatic herbs. Finally, a sprinkle of parsley gives a fresh touch. With these ingredients, you can create a fun snack that is perfect for game day or any gathering. {{ingredient_image_2}} - Preheat the oven to 425°F (220°C). - Prepare a baking sheet with parchment paper. - Steam cauliflower florets for 5-7 minutes until tender. - Drain and let cool. - Remove excess moisture from cauliflower. - Combine all ingredients in a mixing bowl. - Form small portions (about 1.5 inches) and place on the baking sheet. - Bake for 25-30 minutes until golden and crispy. - Add hot sauce and return to the oven for an additional 5 minutes. - Garnish with parsley and serve with dipping sauces. To make your Cauliflower Buffalo Pizza Bites crispy, moisture removal is key. After steaming the cauliflower, let it cool. Then, use a clean kitchen towel to squeeze out any leftover water. This step helps the bites become crunchy and not soggy. If you use frozen cauliflower, bake them a bit longer. Frozen cauliflower holds more water, so adjust the baking time to get that perfect crisp. Don't be afraid to play with spices! You can add more garlic powder or even some smoked paprika for a different taste. Consider mixing in other spices you enjoy, like cumin or cayenne. You can also experiment with cheese. Try using a blend of cheddar and mozzarella for a richer flavor and different texture. This can make the bites even more enjoyable. These pizza bites shine when paired with dips. Ranch or blue cheese dressing makes a great match. The coolness of the dip contrasts nicely with the spicy bites. For side dishes, consider serving with a fresh salad or veggie sticks. This can balance the meal and add more crunch. Enjoy your game day snack! Pro Tips Choose the Right Cauliflower: Use a fresh head of cauliflower for the best flavor and texture. Look for firm florets without blemishes. Remove Excess Moisture: Pressing the cauliflower to remove moisture is crucial for achieving a crispy texture. Don’t skip this step! Customize the Heat: Adjust the amount of hot sauce according to your spice preference. You can also mix different sauces for a unique flavor! Perfectly Bake for Crunch: For an extra crunchy crust, bake the bites a little longer or broil them for the last minute to achieve a golden finish. {{image_4}} You can make these pizza bites even more fun. Try adding different veggies to the mix. Chopped spinach, broccoli, or bell peppers work great. They add color and nutrition. If you want a vegan version, swap out the cheese. Use plant-based cheese instead of mozzarella and parmesan. This keeps the flavor while making it dairy-free. If you love heat, this is for you! You can boost the spice by adding more hot sauce. Just mix in an extra tablespoon to the mixture. For an even bigger kick, toss in chili flakes or diced jalapeños. This will make your pizza bites super spicy and tasty! You can easily make these bites gluten-free. Instead of breadcrumbs, use more almond flour. This keeps the texture right. Be sure to check all your ingredients for gluten. Some sauces or seasonings may have hidden gluten. Always read labels to stay safe! Store the Cauliflower Buffalo Pizza Bites in an airtight container. Glass or plastic containers work well. Keep them in the fridge for up to 3 days. If you want to enjoy the bites later, make sure they cool completely before sealing. To freeze these pizza bites, first let them cool fully. Place them in a single layer on a baking sheet. Once frozen, transfer them to a freezer-safe bag or container. They can stay fresh in the freezer for up to 2 months. This method helps keep them from sticking together. To reheat, take the frozen bites and place them on a baking sheet. Bake at 400°F (200°C) for about 20-25 minutes, until they are hot throughout. When cooking directly from the freezer, no need to thaw. Just add a few extra minutes to the baking time. Keep an eye on them. The bites should turn golden brown and crispy. Cooking time may vary, so check for doneness as needed. Yes, you can use frozen cauliflower. Just make sure to thaw it first. Drain any excess water well. This helps keep the texture right. You may need to adjust baking time. Frozen cauliflower might need a few extra minutes in the oven. You can use crushed crackers or cornmeal as a substitute. If you want a gluten-free option, use more almond flour. These options will help keep the pizza bites together. Experiment to find what you like best. To add more heat, increase the hot sauce amount. You can also mix in chili flakes or diced jalapeños. This adds a nice kick to the flavor. Adjust based on your spice preference. Yes, you can make them without cheese. Just replace the cheese with more cauliflower or a dairy-free alternative. The bites may be less creamy but still tasty. Adjust the other ingredients to maintain the mixture’s consistency. The best way to reheat them is in the oven. Preheat to 350°F (175°C) and bake for about 10 minutes. This keeps them crispy. You can also use an air fryer for about 5 minutes. These Cauliflower Buffalo Pizza Bites are easy to make and fun to eat. We covered the ingredients, cooking steps, and different ways to customize the recipe. Remember to remove moisture for crispiness and feel free to experiment with spices and dips. You can even make vegetarian or spicy versions. These bites freeze well and reheat easily, ensuring tasty snacks whenever you want. I hope you enjoy making and sharing these bites as much as I do!

Cauliflower Buffalo Pizza Bites Tasty Game Day Snack

For this dish, you will need: - 2 cups cooked chicken, shredded - 1 cup cream cheese, softened - 1 cup shredded sharp cheddar cheese - 1/2 cup diced jalapeños, fresh or pickled - 1/2 cup sour cream - 1/2 cup panko breadcrumbs - 1 tablespoon garlic powder - 1 tablespoon onion powder - 1 teaspoon smoked paprika - Salt and freshly ground black pepper - 2 tablespoons olive oil - 1/4 cup green onions, thinly sliced You can add these for a twist: - 1/2 cup diced tomatoes, for freshness To enhance the flavor, I suggest using: - Garlic powder and onion powder for depth - Smoked paprika for a subtle smokiness - A sprinkle of salt and black pepper to taste - Panko breadcrumbs create a crispy topping - Green onions for a bright finish {{ingredient_image_2}} First, make sure your oven is hot. Preheat it to 350°F (175°C). Grease a 9x13 inch casserole dish with olive oil. This keeps the casserole from sticking. A light coat works great and helps with clean-up. In a big bowl, mix the softened cream cheese and shredded chicken. Add the sharp cheddar cheese, diced jalapeños, and sour cream. Use a spatula or wooden spoon to blend until smooth. Make sure all the ingredients are well mixed. This is where the flavors come together. Next, add garlic powder, onion powder, smoked paprika, and a pinch of salt and pepper. Stir well again to combine everything. Once your chicken filling is ready, transfer it to the greased casserole dish. Spread it evenly across the bottom. In another bowl, mix the panko breadcrumbs with a splash of olive oil. This gives them a nice crunch. Sprinkle the breadcrumb mix over the chicken filling. If you want, add diced tomatoes on top for color and taste. Now, it's time to bake! Place the casserole in your preheated oven. Bake for 25 to 30 minutes. Keep an eye on it until the top turns golden brown and bubbly. Once done, carefully take it out of the oven. Let it cool for a few minutes before serving. Top with sliced green onions for a fresh touch. To make your filling extra creamy, start with soft cream cheese. This makes it easy to mix. Combine it well with shredded chicken and sour cream. If you want more creaminess, add a bit more sour cream. You can also try using a mixer for a smoother texture. Mixing by hand works too, but it takes a bit longer. Ensure all ingredients are at room temperature. This helps them blend without lumps. For that crunchy top, use panko breadcrumbs. They give the best texture. Before adding them, coat them lightly with olive oil. This way, they brown nicely in the oven. Spread the panko evenly over the casserole. If you want more crunch, you can mix in some grated cheese with the breadcrumbs. Bake until the top is golden brown and bubbling. Keep an eye on it, so it doesn’t burn. Serving is just as fun! Bring the casserole straight from the oven to the table. Garnish with fresh green onions for color. If you like, add extra sliced jalapeños on top. For an extra treat, serve with a dollop of sour cream on the side. This adds creaminess to each bite. Another great idea is to sprinkle diced tomatoes on top before baking. They add color and a fresh taste. Enjoy every bite of your creation! Pro Tips Use Fresh Jalapeños: Opt for fresh jalapeños for a more vibrant flavor and extra crunch. If you prefer less heat, remove the seeds before dicing. Customize Your Cheese: Feel free to mix different types of cheese, like pepper jack or mozzarella, for a unique twist on the classic flavor. Make Ahead: Assemble the casserole a day in advance, cover it tightly, and refrigerate. Just pop it in the oven when you're ready to bake! Serve with a Side Salad: Pair this casserole with a fresh side salad for a balanced meal that complements the rich and cheesy flavors. {{image_4}} You can make a tasty vegetarian version of this casserole. Start by swapping out the chicken for cooked quinoa or chickpeas. Both options add protein and texture. Next, use more jalapeños for that spicy kick. You can also add black beans for extra fiber. Replace cream cheese with a vegan cream cheese or a cashew-based sauce. This keeps the creamy texture while making it plant-based. If you love heat, you can easily amp up the spice. Add more diced jalapeños to the filling. For an extra kick, try using serrano peppers or even habaneros, if you dare. You can also mix in some hot sauce or chili powder for flavor. Just remember, more spice means you may want to balance it with more cream cheese or sour cream. Cheese lovers can play around with different types of cheese. Swap sharp cheddar for pepper jack to add more flavor and spice. You can mix in mozzarella for a gooey texture. Try adding crumbled feta for a tangy twist. Don't forget to adjust the amounts to keep the casserole creamy and delicious. To keep your Jalapeño Popper Chicken Casserole fresh, let it cool first. Transfer leftovers to an airtight container. Store them in the fridge for up to three days. Label the container with the date to track freshness. Make sure to use a shallow dish for better cooling. This helps it stay tasty for later meals. When reheating, I suggest using the oven. Preheat it to 350°F (175°C). Place the casserole in an oven-safe dish. Cover it with foil to keep it moist. Heat for about 20 minutes or until warm. You can also use the microwave for a quicker option. Just make sure to cover it to avoid drying out. Heat in short bursts, checking often. To freeze your casserole, let it cool completely. Wrap it tightly in plastic wrap or foil. Place it in a freezer-safe container for best results. It can last up to three months in the freezer. When ready to eat, thaw it overnight in the fridge. Then, reheat it using the oven for the best taste. Yes, you can use frozen chicken. Just make sure to thaw it first. Cooked chicken works best. If you use raw chicken, you will need to adjust the cooking time. Aim for safe cooking temperatures. To make it spicier, add more jalapeños. You can use fresh or pickled ones. Also, try adding diced serrano peppers. For extra heat, include a dash of cayenne pepper or hot sauce in the mix. Just remember to balance the flavors. Some great sides include a light salad or garlic bread. You can also serve it with rice or quinoa for a hearty meal. Chips and salsa make a fun snack too. Choose sides that balance the richness of the casserole. Yes, you can substitute cream cheese with Greek yogurt. It gives a similar creamy texture. Cottage cheese is another option, but it may change the flavor slightly. For a vegan option, use cashew cream or a dairy-free cream cheese alternative. In this post, I covered how to make Jalapeño Popper Chicken Casserole. We talked about key ingredients and how to mix them well. I shared tips for a creamy filling and a crunchy top, plus ways to make it your own. Remember to store leftovers properly to enjoy later. This dish is fun to make and even better to share. Enjoy creating your own version of this tasty casserole!

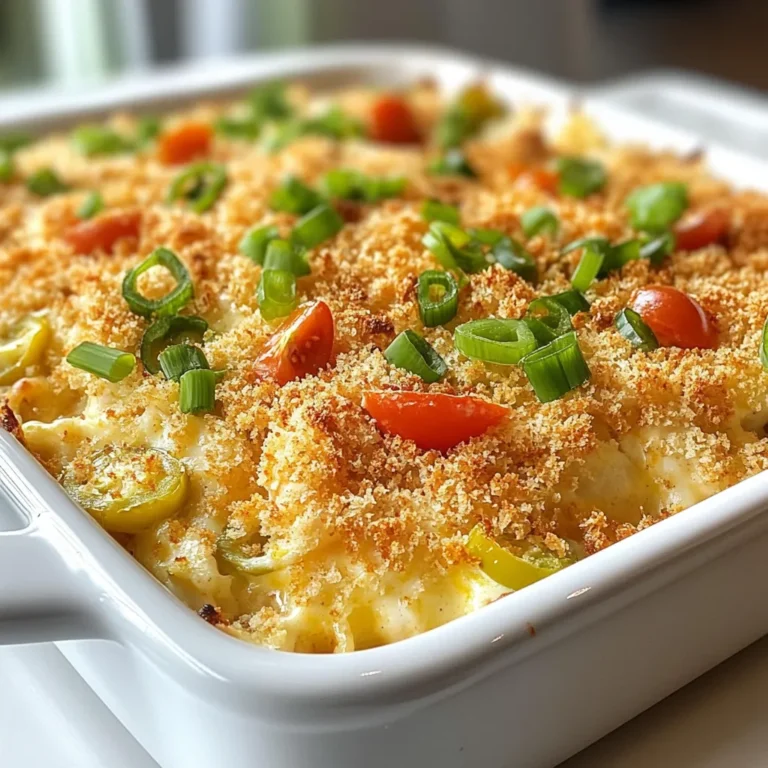
Jalapeño Popper Chicken Casserole Delightful Recipe

- 1 lb chicken breast, cut into bite-sized pieces - 1 cup all-purpose flour - 2 large eggs, beaten - 1 cup panko breadcrumbs - 2 tablespoons sesame seeds - 1 teaspoon garlic powder - 1 teaspoon onion powder - 1/2 teaspoon black pepper - Salt, to taste - 1 tablespoon vegetable oil for frying I love using chicken breast for this dish. It cooks quickly and stays juicy. The all-purpose flour gives the chicken a nice base. Eggs add a coat that helps the breadcrumbs stick. Panko breadcrumbs make each bite super crispy. Sesame seeds add a nutty flavor and crunch. Garlic and onion powders bring depth. Black pepper gives a hint of spice. Don't forget to add salt; it enhances all the flavors. - 1/4 cup soy sauce - 2 tablespoons honey - 1 tablespoon rice vinegar - 1 teaspoon fresh ginger, grated - 1 teaspoon sesame oil - 1 green onion, finely chopped (for garnish) The sauce is a key part of this dish. Soy sauce gives a savory kick, while honey adds sweetness. Rice vinegar brightens the flavor. Fresh ginger brings warmth and zest. Sesame oil rounds it out with a rich taste. I like to sprinkle green onions on top for a fresh touch. This sauce makes every bite delightful! {{ingredient_image_2}} To start, I mix the soy sauce, honey, rice vinegar, fresh ginger, and sesame oil in a small bowl. I whisk these together until the sauce is smooth and well-blended. This sauce adds a burst of flavor to the chicken bites. Next, I prepare my breading station with three bowls. In the first bowl, I combine the all-purpose flour, garlic powder, onion powder, black pepper, and a pinch of salt. In the second bowl, I beat the eggs until they look smooth and slightly frothy. The last bowl holds the panko breadcrumbs mixed with sesame seeds. Now, I take each chicken piece and dip it into the flour mixture. I make sure it’s fully coated and shake off any extra flour. Then, I immerse it in the beaten eggs, letting any excess egg drip back into the bowl. Finally, I roll the chicken in the panko and sesame seed mix, pressing gently to help it stick. For frying, I heat vegetable oil in a large skillet over medium-high heat. Once the oil shimmers, I carefully add the breaded chicken bites in batches, avoiding overcrowding. I fry each batch for about 4 to 5 minutes per side, until they are golden brown and cooked through. After frying, I transfer the chicken bites to a plate lined with paper towels to drain excess oil. When all the chicken bites are crispy and golden, I either drizzle the prepared sauce over them or serve it on the side for dipping. To finish, I sprinkle chopped green onion over the chicken for a fresh touch. For a nice presentation, I arrange the chicken bites on a platter with a bowl of sauce in the center. A sprinkle of sesame seeds on top adds an elegant finish. To get the best crunch, use panko breadcrumbs. They are lighter than regular breadcrumbs. This creates a great texture. Also, heat your oil to the right temperature. It should shimmer but not smoke. If the oil is too cool, the chicken will soak up oil instead of frying. Crispy sesame chicken bites go well with many sides. You can serve them with fluffy rice. The rice will soak up the sauce nicely. A fresh salad also makes a great pairing. It adds a nice crunch and balance to the meal. To cook the chicken evenly, avoid overcrowding the skillet. If you add too many pieces, they will not fry well. Cook in small batches. This helps each piece get golden brown and crispy. Make sure to flip them halfway through cooking for even browning. Pro Tips Use Fresh Ingredients: Always use fresh chicken and high-quality sesame seeds for the best flavor and texture in your crispy bites. Maintain Oil Temperature: Ensure the oil is at the right temperature before frying to achieve a crispy exterior without absorbing too much oil. Try Different Breading: Experiment with different types of breadcrumbs, like whole wheat or flavored varieties, to add unique tastes and textures. Serve Immediately: For the best experience, serve the chicken bites right after frying while they are still hot and crispy. {{image_4}} If you want a lighter dish, try baking the chicken bites. Start by preheating your oven to 400°F (200°C). Instead of frying, place the breaded chicken bites on a lined baking sheet. Lightly spray them with cooking oil to help them crisp up. Bake for about 20 minutes or until they are golden brown. This method cuts down on fat while still giving you that crispy texture. You can easily change the flavor of your chicken bites. For a spicy kick, add cayenne pepper to the flour mixture. This small change can make a big difference. You can also experiment with different sauces. Try using sweet chili sauce or teriyaki for a fun twist. Each sauce can bring a new taste to your dish, making it exciting every time you cook it. Don't hesitate to swap ingredients if needed. For a gluten-free option, replace all-purpose flour and panko with gluten-free alternatives. Almond flour and gluten-free breadcrumbs work well. You can also try different proteins like tofu or shrimp for a unique flavor. These swaps keep the dish fresh and allow you to cater to various dietary needs. To keep your crispy sesame chicken bites fresh, store them in an airtight container. Place a paper towel at the bottom to soak up moisture. This method helps maintain the crispiness. Store them in the fridge for up to three days. When you want to eat them again, it's best to reheat them. To reheat and keep the chicken bites crispy, use the oven. Preheat your oven to 375°F (190°C). Place the chicken bites on a baking sheet in a single layer. Bake for about 10-15 minutes. This method helps restore their crunch. Avoid using a microwave, as it makes them soggy. You can freeze these chicken bites for later. To prepare, let them cool completely. Arrange them in a single layer on a baking sheet. Freeze for about an hour until firm. Then, transfer them to a freezer bag. Squeeze out the air before sealing. When ready to eat, thaw them in the fridge overnight and reheat as mentioned. To add heat, try these tips: - Use cayenne pepper in the flour mix. - Add chili sauce to the dipping sauce. - Toss the cooked chicken bites in hot sauce. Each option gives a kick. Adjust the heat to match your taste. Just a pinch can change everything! Yes, you can try other sweeteners: - Maple syrup works well and adds a unique flavor. - Brown sugar can also be used, but it may change the texture. - Agave nectar makes a nice swap, too. These alternatives will change the taste slightly, but they still taste great! For a full meal, consider these sides: - Steamed rice is a classic choice. - A fresh salad adds crunch and color. - Roasted vegetables make a healthy option. These sides balance the meal and make it more satisfying. Cooked chicken bites stay fresh for about three days in the fridge. To store: - Keep them in an airtight container. - Place a paper towel inside to soak up moisture. For longer storage, freeze them. Just ensure they are well-packed to prevent freezer burn. This blog post outlined how to make crispy sesame chicken bites with delicious sauce and tips. You learned about the key ingredients, easy steps for preparation, and helpful cooking tricks. Remember, achieving the best crispiness comes from using panko breadcrumbs and keeping oil at the right temperature. You can also experiment with healthier options or different spices. Enjoy these chicken bites fresh or stored well for later. Cooking can be fun and flexible! Happy cooking!

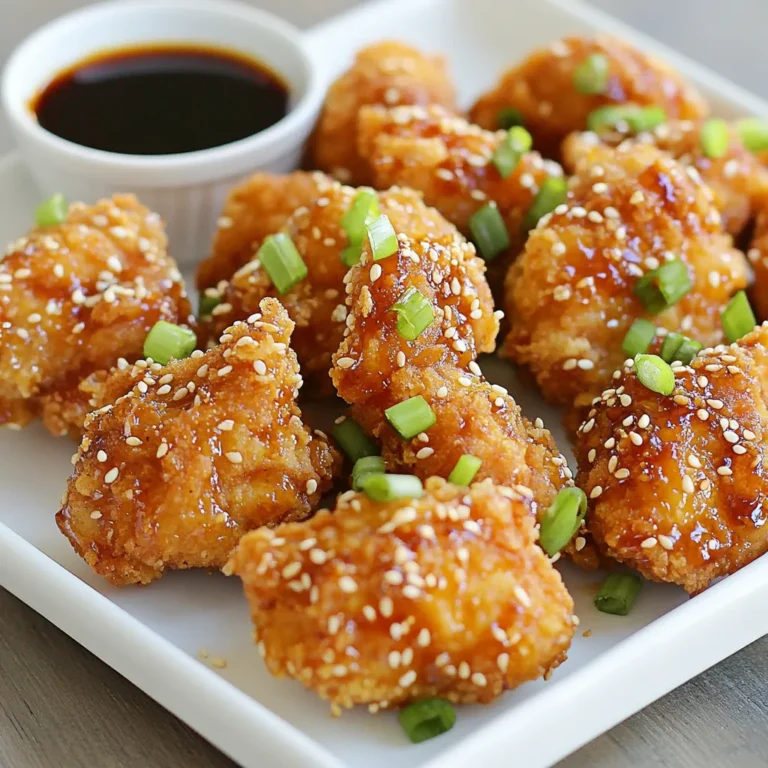
Crispy Sesame Chicken Bites Flavorful and Easy Recipe

To make a warm bowl of creamy chicken gnocchi soup, gather these key items: - 1 tablespoon olive oil - 1 pound boneless, skinless chicken breasts, diced - 1 medium onion, finely chopped - 3 cloves garlic, minced - 3 medium carrots, diced - 3 celery stalks, diced - 4 cups chicken broth - 1 teaspoon dried thyme - 1 teaspoon dried oregano - Salt and freshly ground black pepper - 1 package (16 oz) potato gnocchi - 1 cup heavy cream - 2 cups fresh spinach, chopped - 1/4 cup freshly grated Parmesan cheese For this soup, I prefer using olive oil. It adds a nice flavor and helps cook the chicken. You can use other oils if you like, but olive oil always works best. For an extra touch, consider adding: - Fresh parsley, chopped This adds color and a fresh taste to your soup. You can also skip this step if you want a simpler look. {{ingredient_image_2}} Start by heating 1 tablespoon of olive oil in a large pot over medium heat. Once the oil is hot, add 1 pound of diced chicken breasts. Season the chicken well with salt and freshly ground black pepper. Cook the chicken for about 5 to 7 minutes. You want it to turn golden brown and be cooked through. When done, take the chicken out of the pot and place it in a bowl. This step builds a great base for your soup. In the same pot, without cleaning it, add 1 medium chopped onion, 3 diced medium carrots, and 3 diced celery stalks. Sauté these veggies for 5 to 6 minutes. You want them to soften and smell great. After this, add 3 minced garlic cloves. Keep sautéing for an extra minute. This will make the garlic fragrant and delicious. Now, pour in 4 cups of chicken broth. Add 1 teaspoon of dried thyme and 1 teaspoon of dried oregano. Turn up the heat to bring it to a gentle simmer. This helps the flavors blend well. Carefully add a package of potato gnocchi to the simmering broth. Cook according to the package instructions, which is usually about 3 to 4 minutes. You'll know they are ready when they float to the top. Next, reduce the heat to low. Stir in 1 cup of heavy cream and the cooked chicken. Let everything warm for about 5 minutes, stirring occasionally. Then, add 2 cups of chopped fresh spinach. Stir until the spinach wilts, which takes about 2 minutes. Finally, mix in 1/4 cup of grated Parmesan cheese. This will melt into the soup, making it creamy and rich. Taste your soup and adjust the seasoning with more salt and pepper if needed. Serve your soup hot. If you like, garnish each bowl with chopped fresh parsley for a lovely touch. Enjoy your creamy chicken gnocchi soup! To make the soup creamy, use heavy cream. This gives it a rich finish. Stir it in slowly to blend well. If you want a lighter soup, swap half the cream with milk. Remember, the gnocchi will soak up some liquid. So, don’t make it too thick at first. You can always add more broth later. Fresh herbs can boost flavor. I love using thyme and oregano for warmth. Add them early in the cooking process. This lets their flavors infuse the broth. If you want a pop of freshness, sprinkle some parsley just before serving. It adds a nice touch to the look and taste. Avoid overcooking the gnocchi. They should float in the soup, which means they are done. If you cook them too long, they can become mushy. Also, don’t rush adding the spinach. Let it wilt gently in the soup to keep its bright color and crunch. Lastly, taste as you cook. Adjusting the seasoning early can save your soup from being bland. Pro Tips Use Homemade Broth: If possible, use homemade chicken broth for a richer flavor and better quality soup. Customize the Vegetables: Feel free to add or substitute other vegetables like peas or mushrooms for extra nutrition and flavor. Adjust Creaminess: For a lighter version, you can substitute half of the heavy cream with milk or use a plant-based cream alternative. Store Properly: To keep the gnocchi from becoming mushy, store the soup and gnocchi separately if you plan to have leftovers. {{image_4}} You can change the chicken to suit your taste. Try turkey, which works well too. If you prefer seafood, shrimp adds a nice twist. Just cook shrimp until pink and tender. You can also use tofu for a plant-based protein. Dice it, then sauté until golden. This keeps the soup rich and satisfying. For a vegan version, skip the chicken and cream. Use vegetable broth instead of chicken broth. Replace heavy cream with coconut cream or cashew cream. These options add a creamy texture. Use beans or lentils for protein. They make the soup hearty and filling. Add more veggies like mushrooms or zucchini for extra flavor. Incorporating seasonal vegetables can enhance your soup. Try adding sweet potatoes in fall. They add sweetness and color. In spring, use peas and asparagus for a fresh taste. Summer brings zucchini and corn, making the soup light. In winter, root vegetables like parsnips work great. These additions keep the dish exciting and flavorful. To store leftovers, wait until the soup cools. Then, pour it into an airtight container. Make sure to seal it well. Place the container in the fridge. It can last for 3 to 4 days. If you want to keep it longer, consider freezing it. When you're ready to enjoy the soup again, reheat it gently. You can use a pot on the stove. Pour the soup in and heat over medium-low heat. Stir often to prevent sticking. You can also use a microwave. Transfer the soup to a microwave-safe bowl. Heat it in short bursts, stirring in between. To freeze the soup, use a freezer-safe container. Leave some space at the top for expansion. The soup can last up to 3 months in the freezer. When you’re ready to eat, defrost it in the fridge overnight. Reheat it on the stove or in the microwave. This soup will taste great even after freezing! Yes, you can use frozen gnocchi in this soup. Just add them directly to the broth without thawing. They will cook in about the same time as fresh gnocchi. This saves time and makes the soup even easier. You can make a gluten-free version of this soup. Use gluten-free gnocchi made from rice or potato. Make sure the chicken broth is also gluten-free. This way, you can enjoy this dish without gluten. The soup lasts for about three to four days in the fridge. Store it in an airtight container to keep it fresh. Just remember, the gnocchi may soak up some broth as it sits. Yes, you can make this soup ahead of time. Just prepare it and store it in the fridge. Reheat it when you are ready to serve. This dish tastes even better the next day! You can add other vegetables to this soup. For example, peas, corn, or green beans work well. Just make sure to add them at the right time so they cook fully. This soup pairs well with crusty bread or a fresh salad. The bread is great for dipping, and the salad adds a nice crunch. Both make for a complete meal. Yes, you can add more protein if you like. Cooked shrimp or diced ham are good options. Just add them in while the soup is warming on low heat. In this blog post, we explored essential ingredients, step-by-step cooking, and tips for success. You learned how to prepare chicken, sauté veggies, and create a tasty soup with gnocchi. We covered easy ways to add flavor and avoid common mistakes. You also saw different options for proteins and how to store leftovers. With this knowledge, you can create a warm, delicious soup any time. Enjoy making it your own!

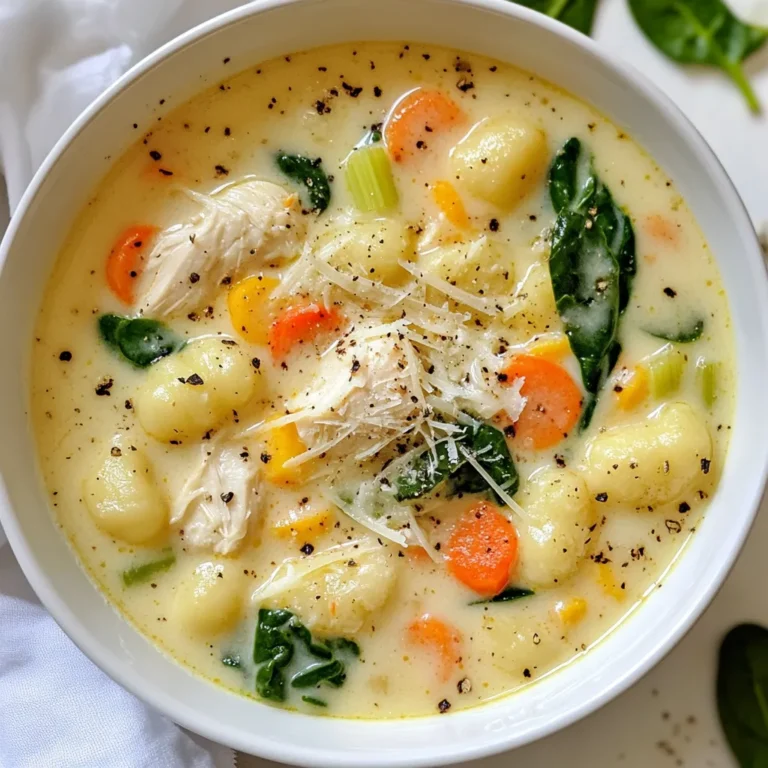
Creamy Chicken Gnocchi Soup Flavorful Comfort Dish

For this crumble, I love using ripe strawberries, blueberries, and raspberries. Each berry adds its own flavor and color. The strawberries should be hulled and quartered. This makes them easy to mix and eat. Blueberries and raspberries should be fresh and plump. They burst with juice, making your crumble delicious. To sweeten the berries, we use granulated sugar and brown sugar. Granulated sugar gives a clean sweetness. Brown sugar adds a hint of caramel flavor. I often mix the two for a balanced taste. Adding two tablespoons of fresh lemon juice brightens the flavor. It makes the berries shine. The dry mixture brings everything together. You will need all-purpose flour, old-fashioned rolled oats, ground cinnamon, and fine sea salt. The flour helps bind the crumble. Rolled oats add a nice chewiness. Cinnamon gives warmth and depth. The sea salt enhances all the sweet flavors. Unsalted butter is key for a great crumble. Chilled butter is important because it keeps the crumble light. When you mix it into the dry ingredients, do not overwork it. You want small bits of butter to remain. This creates a tender, flaky topping that contrasts with the juicy berries. {{ingredient_image_2}} Start by preheating your oven to 350°F (175°C). This step is key for baking. It helps the crumble cook evenly. While waiting, you can gather your ingredients. In a medium bowl, mix together the strawberries, blueberries, and raspberries. Add 1/2 cup of granulated sugar and 2 tablespoons of fresh lemon juice. Stir gently to avoid crushing the fruit. This allows the flavors to blend nicely. Set this bowl aside while you prepare the crumble. Take another bowl and whisk together 1 cup of all-purpose flour, 1/2 cup of rolled oats, 1/2 cup of brown sugar, 1/2 teaspoon of ground cinnamon, and 1/4 teaspoon of sea salt. Next, add 1/2 cup of cold, cubed butter. Mix it in using a pastry cutter or your fingers. You want the mixture to look like coarse crumbs, with some small bits of butter still showing. This adds rich flavor and texture. Grease a 9x9-inch baking dish. Pour the berry mixture into it, spreading it out evenly. Sprinkle the crumble topping over the berries. Make sure to cover them well. Now, put the dish in your preheated oven. Bake for 30 to 35 minutes. You want the topping to turn golden brown and see the berry juices bubbling. Once done, let it cool for about 10 minutes before serving. This will help the juices set a bit. To get the right texture for your crumble topping, use cold butter. Cold butter makes the topping flaky. Cut the butter into small cubes. Then, mix it into the dry ingredients using your fingers. You want to see some pea-sized bits of butter. This adds richness. Don’t overmix; you want a coarse crumb texture. You can add spices for extra flavor. A pinch of nutmeg can warm the taste. You might try a splash of vanilla extract for a sweet note. If you love citrus, add some lemon zest. These small additions can change the taste and make it unique. Serve the crumble warm for the best taste. Top it with vanilla ice cream or whipped cream. This adds creaminess and contrast. For a fun twist, garnish with fresh mint leaves. It makes your dish look pretty and fresh! Use a nice dish to present your crumble. A colorful bowl or plate enhances the appeal. Pro Tips Use Fresh Berries: The quality of your berries can greatly affect the flavor of your crumble. Opt for ripe, in-season berries for the best taste and texture. Chill Your Butter: Using cold butter is crucial for achieving that perfect crumbly texture. Make sure your butter is well-chilled before cutting it into the dry ingredients. Let It Rest: Allowing the crumble to cool for about 10 minutes before serving not only helps the juices set but also makes it easier to scoop out portions without it falling apart. Experiment with Spices: While cinnamon is a classic choice, consider adding a pinch of nutmeg or ginger to your crumble for a unique flavor twist. {{image_4}} You can change the berries in this recipe. Instead of strawberries, blueberries, and raspberries, try blackberries or cherries. You can also mix in some peaches or apples for a new twist. Just keep the total amount of fruit the same. This gives you a chance to enjoy different flavors each time you make the crumble. If you want a lower-sugar version, use less granulated sugar. You can also swap out granulated sugar for coconut sugar or honey. For a vegan option, replace the butter with coconut oil or vegan butter. Use maple syrup instead of sugar to sweeten the fruit. These small changes can make your dessert healthier without losing taste. Using seasonal fruits can add fun flavors. In summer, try using fresh peaches or plums. In fall, apples and pears are perfect. Winter offers citrus fruits like oranges or grapefruits. These fruits can change the taste and look of your crumble. Each season brings a new opportunity to create something special and delicious! To keep your Triple Berry Crumble fresh, refrigerate leftovers. Place it in an airtight container. This helps prevent the crumble from drying out. You can store it in the fridge for up to three days. When you are ready to enjoy it again, simply take it out. You can freeze your crumble for later enjoyment. First, let it cool completely. Then, wrap it tightly in plastic wrap. After that, place it in a freezer-safe bag or container. This method keeps it fresh for up to three months. When you're ready to eat it, you can thaw it in the fridge overnight. Reheating is simple and easy. Preheat your oven to 350°F (175°C). Place the crumble in an oven-safe dish. Cover it with foil to keep it moist. Heat for about 20 minutes. If you want a crispy top, remove the foil for the last 5 minutes. You can also reheat individual portions in the microwave. Just warm them for about 30 seconds. Enjoy your tasty crumble warm! Yes, you can use frozen berries. They work well in this recipe. Just remember to thaw them first. Drain any excess juice to avoid a soggy crumble. Frozen berries may take a bit longer to cook. Keep an eye on the baking time. You will know the crumble is ready when the topping turns golden brown. Look for bubbling juices around the edges. This shows the berries are cooked through. A good baking time is 30 to 35 minutes at 350°F. Yes, you can prep it ahead. Mix the berries and topping separately. Store them in the fridge for up to a day. When ready to bake, layer them in your dish and cook. This keeps your crumble fresh and tasty. This crumble pairs well with vanilla ice cream or whipped cream. A scoop of ice cream adds creaminess. Whipped cream gives a light touch. Fresh mint leaves make a nice garnish, too! This blog post shared how to craft a delicious Triple Berry Crumble. We covered fresh ingredients like ripe berries and efficient baking methods. The steps were clear, from preheating the oven to mixing the crumble. I also offered tips on flavor boosts and variations. In my view, enjoying this dessert is about making it your own. Try different fruits or toppings. Remember, the best crumble is one that brings joy to your table. Happy baking!

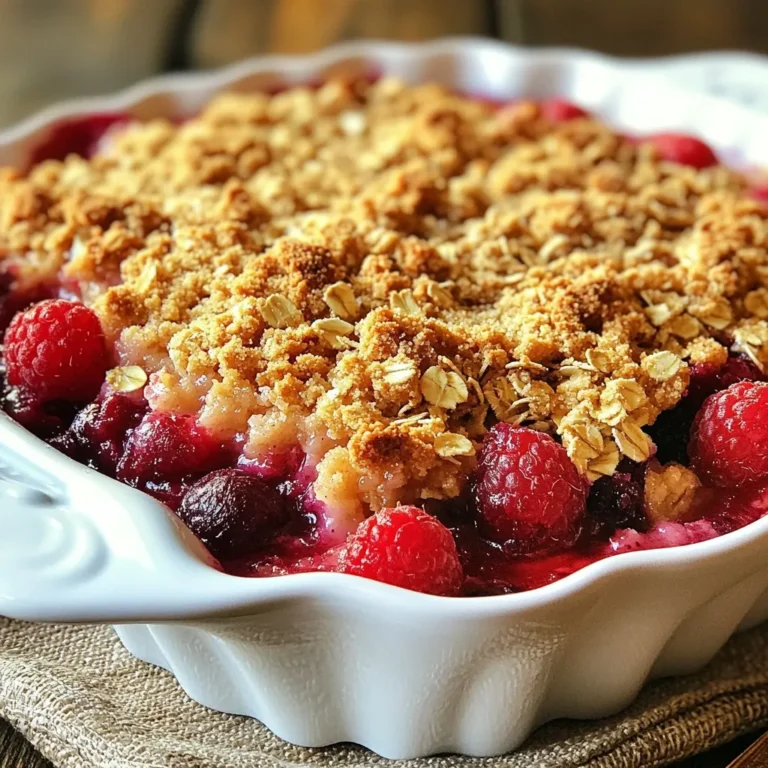
Triple Berry Crumble Delightful and Easy Recipe

- 1.5 lbs Brussels sprouts, trimmed and sliced in half - 3 tablespoons extra virgin olive oil - 2 tablespoons pure maple syrup - 1 tablespoon whole grain Dijon mustard - 2 cloves garlic, finely minced - Salt and freshly ground black pepper to taste - 1/4 teaspoon red pepper flakes (optional) - 1/4 cup pecans, toasted and roughly chopped You can add some red pepper flakes for a spicy kick. This adds warmth and depth. If you love nuts, consider adding a mix of walnuts or almonds. You can also sprinkle some fresh herbs like thyme or rosemary for extra aroma. If you don’t have Brussels sprouts, try using green beans or cauliflower. For the maple syrup, honey or agave syrup works well. You can replace whole grain Dijon mustard with yellow mustard if needed. If you are out of pecans, toasted walnuts or sunflower seeds can be a great alternative. {{ingredient_image_2}} Start by preheating your oven to 400°F (200°C). This high heat helps the Brussels sprouts turn golden and caramelized. A hot oven makes a big difference in flavor. Trim and slice 1.5 lbs of Brussels sprouts in half. This size allows them to roast well. In a large bowl, mix the halved sprouts with 3 tablespoons of extra virgin olive oil, 2 tablespoons of pure maple syrup, and 1 tablespoon of whole grain Dijon mustard. Add 2 cloves of finely minced garlic, salt, and freshly ground black pepper. If you like a kick, add 1/4 teaspoon of red pepper flakes. Mix everything together until the Brussels sprouts are well-coated in the tasty sauce. Line a baking sheet with parchment paper. This makes cleanup easy. Spread the Brussels sprouts mixture in a single layer on the sheet. Place the baking sheet in the preheated oven. Roast for 20-25 minutes. Stir the sprouts halfway to ensure even cooking. They should be tender and golden brown on the edges. Once done, take the sheet out and toss the sprouts with 1/4 cup of toasted pecans. This adds a nice crunch. Serve warm, drizzling any leftover maple mixture from the pan over the top for extra flavor. Enjoy! To get the best Brussels sprouts, start with fresh ones. Look for firm, bright green sprouts. Trim the ends and slice them in half. This allows the edges to caramelize well. Preheat your oven to 400°F (200°C). The high heat makes them crispy. Spread the sprouts in a single layer on the baking sheet. This helps them roast evenly. Stir them halfway through cooking for a nice brown color. They should be tender and golden brown in about 20-25 minutes. Maple syrup and Dijon mustard bring great taste. You can add garlic for a nice kick. If you like heat, sprinkle in red pepper flakes. This adds a fun twist. After roasting, toss in toasted pecans for crunch. They add a nutty flavor that pairs well. Experiment with fresh herbs too, like thyme or parsley, for extra depth. Each addition makes your dish more exciting. Serve your Maple Dijon Roasted Brussels Sprouts warm. A vibrant bowl makes the dish look inviting. Consider garnishing with more toasted pecans for crunch. Drizzle any leftover maple mixture from the pan over the top. This adds sweetness and makes it shine. These sprouts make a great side dish for roasted meats or as part of a cozy vegetarian meal. Enjoy your delicious creation! Pro Tips Choose Fresh Brussels Sprouts: Select Brussels sprouts that are firm and tightly closed for the best flavor and texture. Preheat Your Oven: Always preheat your oven to ensure even roasting and maximum caramelization. Experiment with Sweetness: Adjust the amount of maple syrup based on your personal taste; you can add a little more for a sweeter dish. Perfect Pecan Toasting: Toast your pecans in a dry skillet over medium heat for a few minutes for enhanced flavor before adding them to the dish. {{image_4}} You can use different types of maple syrup for this recipe. Light syrup has a mild flavor, while dark syrup is richer. Try both to see which one you like best. You can even mix different types for a unique taste. Just remember, the sweetness level may change, so adjust the amount in your recipe. Brussels sprouts are great, but you can add other veggies too. Carrots, sweet potatoes, or even cauliflower work well. Cut them into similar sizes for even cooking. Toss them in the same maple Dijon mix. This addition boosts flavor and makes the dish more colorful. Pecans add a nice crunch, but you can swap them out. Walnuts or almonds also provide great texture. If you prefer seeds, pumpkin or sunflower seeds are tasty choices too. Toast them lightly before adding for an extra crunch. This gives the dish a new twist while keeping it healthy. To keep your Maple Dijon Roasted Brussels fresh, first let them cool. Place the sprouts in an airtight container. Store in the fridge for up to 4 days. If you plan to eat them later, keep the pecans separate. This helps them stay crunchy. Reheat Brussels sprouts in the oven for best results. Preheat your oven to 350°F (175°C). Spread the sprouts on a baking sheet. Heat for about 10 minutes, until hot. You can also use the microwave. Heat in short bursts of 30 seconds. Stir between each burst to avoid sogginess. You can freeze Maple Dijon Roasted Brussels, but they may lose some texture. Cool the sprouts completely. Place them in a freezer-safe bag. Squeeze out air before sealing. They can last up to 3 months. When ready to eat, thaw in the fridge overnight. Reheat as mentioned above for best taste. Yes, you can use frozen Brussels sprouts. Just remember they may not roast as well as fresh ones. Frozen sprouts often contain more water, which can lead to less crispness. If you choose frozen, thaw them first and pat them dry to help them crisp up in the oven. To make this recipe vegan, replace the honey with more maple syrup. Ensure your Dijon mustard does not contain honey. All other ingredients are already vegan-friendly. This way, you keep the sweet and tangy flavor without any animal products. Maple Dijon Roasted Brussels sprouts pair great with many dishes. They work well with roasted chicken or turkey. You can serve them with mashed potatoes or a quinoa salad for a hearty meal. They also complement grilled meats or fish beautifully, adding a nice contrast to savory flavors. In this blog post, we explored how to make Maple Dijon Roasted Brussels Sprouts. We covered the ingredients, including substitutions and optional flavor boosters. Next, we discussed step-by-step cooking directions and tips for achieving crispy texture and rich flavor. We also featured variations you can try and provided storage methods for leftovers. Remember, these Brussels sprouts are not just a side dish; they can shine on your table. Use this guide to make a tasty dish anyone will love!

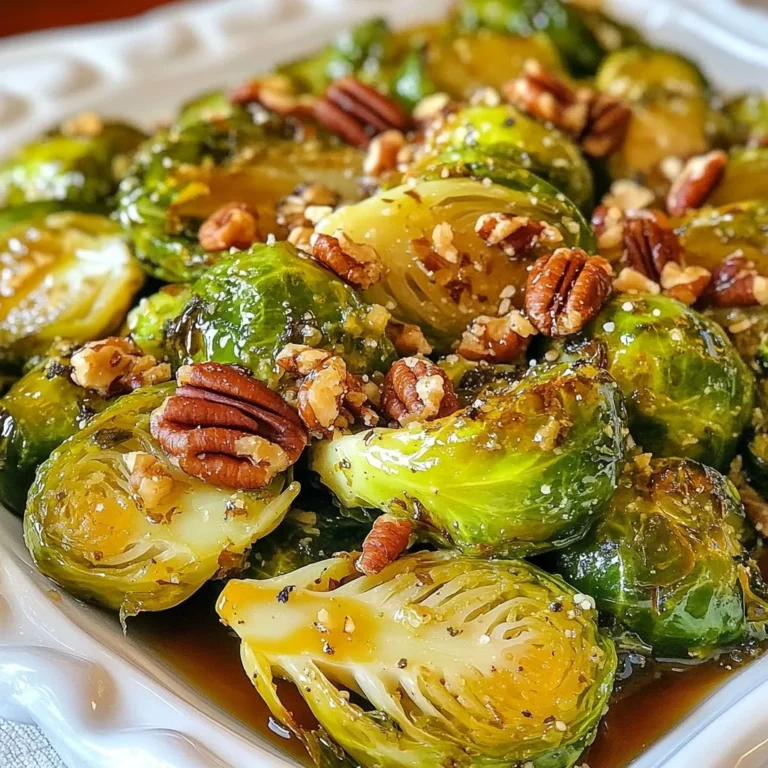
Maple Dijon Roasted Brussels Flavorful and Easy Recipe

PREV 1 … 17 18 19 20 NEXT
purelyyumrecipes

explore

DessertsDinnerAppetizersDrinks

Our Policies

  • Cookie Policy
  • Copyright Policy
  • Disclaimer
  • GDPR Policy
  • Terms Of Use
Back to Top
  • About
  • Contact Us
  • Privacy Policy
© 2025 purelyyumrecipes