FREE DINNER EBOOK! Get your copy!
  • Cookie Policy
  • GDPR Policy
  • Disclaimer
  • Terms Of Use
  • Visit my other site: Fun Cookie Recipes
purelyyumrecipes
  • Home
  • Dinner
  • Desserts
  • Drinks
  • Appetizers
  • Contact
  • About
  • Privacy Policy
  • Home
  • Dinner
  • Desserts
  • Drinks
  • Appetizers
  • Contact
  • About
  • Privacy Policy
  • Cookie Policy
  • GDPR Policy
  • Disclaimer
  • Terms Of Use
Visit my other site: Fun Cookie Recipes

HOME / CATEGORIES /

Latest

To create a delicious Strawberry Cheesecake Smoothie, you need fresh and simple ingredients: - 1 cup fresh strawberries, hulled and sliced - 1/2 cup cream cheese, softened to room temperature - 1/2 cup Greek yogurt (plain or vanilla) - 1/2 cup milk (dairy or non-dairy alternatives) - 2 tablespoons honey or maple syrup - 1 teaspoon pure vanilla extract - 1/2 cup graham cracker crumbs - A handful of ice cubes These ingredients work together to create a rich and creamy smoothie that tastes just like cheesecake. Fresh strawberries give a sweet and tangy flavor, while cream cheese adds that signature richness. Greek yogurt enhances the creamy texture and boosts protein. The milk makes it smooth, while honey or maple syrup adds sweetness. Vanilla extract deepens the flavor, and graham cracker crumbs bring that classic cheesecake crust taste. Finally, ice cubes make the smoothie refreshing and chilled. Make sure to use ripe strawberries for the best flavor. If you have leftovers, you can store them in the fridge for a short time. However, it’s best enjoyed fresh! {{ingredient_image_2}} - Adding the Base Ingredients First, slice the fresh strawberries. Place them in the blender with the softened cream cheese, Greek yogurt, and milk. Make sure the cream cheese is soft to blend well. - Sweetening the Mixture Next, drizzle in the honey or maple syrup. Add one teaspoon of pure vanilla extract to boost the flavor. - Achieving a Smooth Consistency Blend on high speed until the mixture is creamy and smooth. Pause to scrape down the sides if needed. This step helps combine everything well. - Incorporating Ice and Crumbs After the mixture is smooth, add the handful of ice cubes and graham cracker crumbs. Blend again until the ice is crushed and mixed in. - Adjusting Sweetness to Preference Taste your smoothie. If you want it sweeter, add more honey or maple syrup. Blend briefly to mix in any extra sweetness. - Pouring and Presenting Carefully pour the smoothie into tall glasses. For a nice touch, sprinkle some graham cracker crumbs on top. You can also add a slice of strawberry or a dollop of whipped cream for a fun finish. - Adjusting Milk Consistency You can change the thickness by using more or less milk. If you want a thicker smoothie, use less milk. For a thinner consistency, add more. This way, you control how it feels when you sip. - Using Frozen Strawberries for Extra Creaminess Frozen strawberries add a nice creaminess. They chill the smoothie and give it a thick texture. Just swap fresh strawberries for frozen ones. This makes your drink even more refreshing and smooth. - Garnishing with Graham Cracker Crumbs To make your smoothie look nice, sprinkle some graham cracker crumbs on top. This gives it a cheesecake feel and adds a crunchy texture. It’s a simple touch that makes a big difference. - Adding Fresh Fruit or Whipped Cream For a fun look, add a slice of fresh strawberry on the rim of the glass. You can also top it with a dollop of whipped cream. Both options make your smoothie look tempting and delicious. Pro Tips Use Frozen Strawberries: If fresh strawberries are not available, you can substitute with frozen strawberries for a thicker smoothie that's just as delicious. Adjust Sweetness: Always taste your smoothie before serving. Feel free to add more honey or maple syrup to suit your sweetness preference. Experiment with Flavors: Try adding a splash of lemon juice or a handful of fresh mint for an exciting flavor twist that complements the strawberries. Presentation Matters: For a beautiful presentation, consider using clear glasses and add garnishes like whipped cream or a fresh strawberry slice. {{image_4}} You can change the taste of your smoothie by using different fruits. Try bananas for a creamy texture or blueberries for a sweet twist. Each fruit adds its own flavor and fun. If you want a dairy-free version, use non-dairy cream cheese. Almond or coconut yogurt works well too. You can also swap cow's milk with almond or oat milk. These options keep the smoothie tasty and creamy. For a low-calorie option, reduce the honey or maple syrup. You can also use a sugar substitute. This way, you keep the flavor without extra calories. Want a protein boost? Add a scoop of protein powder. This makes the smoothie more filling and great for post-workout. Just blend it in with the other ingredients for a smooth result. To keep your smoothie fresh, store it in an airtight container. This helps prevent air from spoiling the taste. You can use a mason jar or any sealed cup to keep it safe. Duration of Storage: The smoothie stays good in the fridge for up to two days. After that, it may lose flavor and texture. You can freeze your smoothie for later use. Pour it into ice cube trays or freezer bags. This way, you can enjoy it when you want a cool treat. Thawing Techniques: To thaw, place the smoothie in the fridge overnight. If you're in a hurry, use the microwave on low power. Stir it well before drinking to ensure a smooth texture. You can use several alternatives for cream cheese. Here are some great options: - Silken tofu: Blend it until smooth for a creamy texture. - Greek yogurt: This adds protein and a tangy flavor. - Cottage cheese: Blend until smooth for a lighter option. - Vegan cream cheese: Look for brands made from nuts or soy. These substitutes keep the smoothie tasty and creamy. Choose what fits your diet best. Yes, you can prepare this smoothie ahead. Here are some tips: - Blend and store: Make the smoothie and store it in the fridge. - Use an airtight container: This helps keep it fresh. - Drink within 24 hours: The smoothie tastes best when fresh. If you want to prepare it for later, just follow these steps. You can easily make this smoothie vegan with a few swaps: - Cream cheese: Use vegan cream cheese or silken tofu. - Greek yogurt: Choose dairy-free yogurt, like coconut or almond. - Milk: Use any non-dairy milk, like almond, oat, or soy. These changes will keep your smoothie creamy and delicious while fitting a vegan diet. Enjoy this tasty treat! This blog post shared a tasty strawberry smoothie recipe. We covered fresh ingredients needed, step-by-step instructions, and useful tips. You learned about variations, storage tips, and common questions. Creating smoothies is both fun and easy. You can mix flavors and adjust sweetness. Enjoy making this refreshing drink for yourself or friends. Get creative, and don’t forget to have fun!

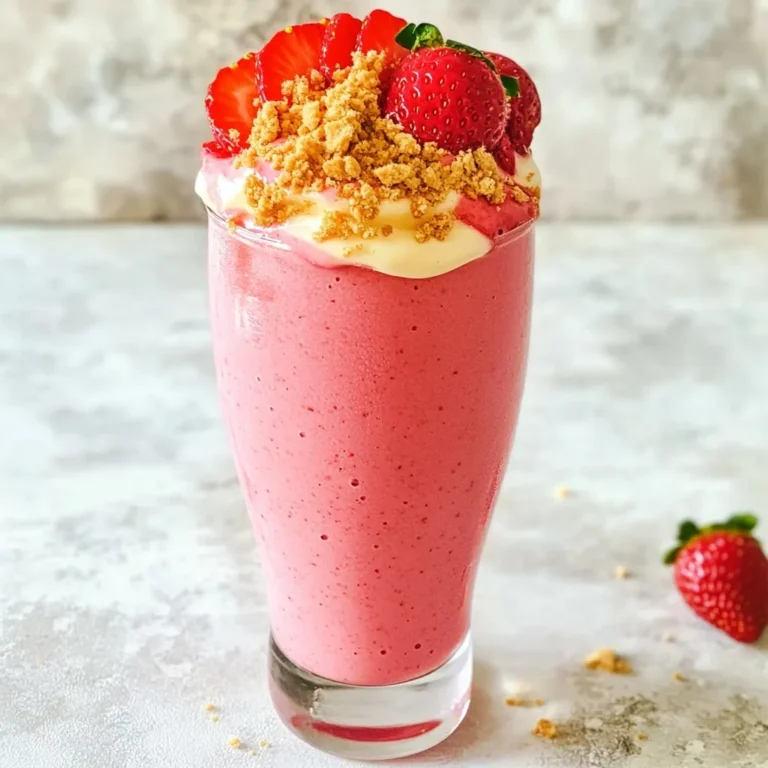
Strawberry Cheesecake Smoothie Quick and Tasty Treat

- 8 oz high-quality dark chocolate (70% cocoa), finely chopped - 1/2 cup heavy cream - 1/2 teaspoon pure vanilla extract - 1/2 cup fresh raspberries, plus additional for garnish - 1 cup unsweetened cocoa powder (for dusting) These main ingredients create the rich base for the truffles. The dark chocolate gives a deep flavor. The heavy cream adds creaminess, while the vanilla extract enhances the taste. Fresh raspberries provide a burst of fruity goodness. - 1/4 cup finely chopped pistachios (optional, for an elegant coating) - Pinch of sea salt (optional, for a sophisticated finish) The pistachios add crunch and color. A pinch of sea salt can elevate flavors, balancing the sweetness. Both options make the truffles special. Each truffle has about 130 calories. - Fat: 9g - Carbohydrates: 11g - Protein: 2g This information helps you enjoy these treats mindfully. Moderation is key, as these truffles are rich and indulgent. {{ingredient_image_2}} To make the ganache, start with 8 ounces of high-quality dark chocolate. Chop it finely and place it in a heatproof bowl. Add 1/2 teaspoon of pure vanilla extract to the chocolate. This step adds a rich flavor. Next, heat 1/2 cup of heavy cream in a small saucepan. Keep an eye on it while it warms. You want it simmering, not boiling. When the cream is ready, pour it over the chocolate. Let it sit for 2 minutes. This helps the chocolate melt. After waiting, stir gently until it becomes smooth and shiny. Now it’s time to add the fresh raspberries. Use 1/2 cup of berries for a burst of flavor. Gently fold them into the chocolate ganache. Be careful not to break them apart. You want some whole for texture. They will add a nice, fruity note to your truffles. Cover the bowl with plastic wrap. Place it in the fridge for 1 to 2 hours. You want the ganache to firm up. Once it’s ready, take a melon baller or small cookie scoop. Portion out the ganache and roll each piece into a smooth ball. Do this quickly! Your hands can melt the chocolate. For the next step, roll each truffle in unsweetened cocoa powder. This gives them a classic look and taste. If you want to mix it up, roll some in chopped pistachios for a crunchy twist. Place the truffles on a baking sheet lined with parchment paper. For a fancy touch, sprinkle a tiny pinch of sea salt on a few. This enhances the rich chocolate flavor. Once all the truffles are coated, put them back in the fridge for another 30 minutes. This helps them set before you enjoy them! Select high-quality dark chocolate with at least 70% cocoa. This gives the truffles a rich, deep flavor. Avoid chocolate chips, as they often have additives. Instead, find bars that are smooth and pure. The better the chocolate, the better the truffle! To keep the right texture, let the ganache cool slowly. Avoid rushing the chilling process. If it chills too fast, it may become too hard. Use a gentle hand when shaping the truffles. Warm hands can melt the chocolate, making it tricky to roll. Add a pinch of sea salt for a bold flavor. You can also mix in orange zest or espresso powder for an extra kick. If you love nuts, roll some truffles in finely chopped pistachios. Fresh herbs like mint can give a bright twist too. Each variation brings a new taste to enjoy! Pro Tips Quality Chocolate Matters: Use high-quality dark chocolate with at least 70% cocoa for the richest flavor and smoothest texture in your truffles. Chill Time is Key: Allow the ganache to chill thoroughly to ensure that the truffles hold their shape when rolled and coated. Gentle Handling: When rolling the truffles, work quickly and gently to avoid melting the chocolate with your hands. Garnish for Appeal: Enhance presentation by garnishing with fresh raspberries and mint leaves, which add color and freshness to your dessert display. {{image_4}} You can coat your truffles in various ways. Cocoa powder is classic and rich. Try rolling them in finely chopped nuts like pistachios or almonds for a crunchy bite. You can also use shredded coconut for a tropical twist. To make them sparkle, dip them in melted chocolate. Let them cool on parchment paper until set. This adds a shiny finish that looks great on any plate. Want to change the taste? Add a splash of orange zest to the ganache. It gives a fresh, bright note. For a hint of spice, mix in a pinch of cinnamon or chili powder. These flavors pair well with dark chocolate. If you enjoy coffee, a teaspoon of espresso powder enhances the depth of flavor. Get creative and find the perfect combo that excites your taste buds! Raspberries are delicious, but other berries work well too. Try using blackberries for a bold flavor. Strawberries can add a juicy sweetness that many love. Blueberries bring a unique twist with their mild taste. Just remember to chop larger berries into smaller pieces. This keeps the texture smooth and gives you a lovely pop of color in each truffle. To keep your Dark Chocolate Raspberry Truffles fresh, store them in an airtight container. This helps prevent them from absorbing odors from other foods. Layer parchment paper between the truffles to avoid sticking. Always place the container in a cool, dry spot away from sunlight. Refrigeration is best for short-term storage. You can keep the truffles in the fridge for up to two weeks. If you want to store them longer, freezing is an option. Wrap each truffle tightly in plastic wrap. Then, place them in a freezer bag. They can last for up to three months in the freezer. Dark Chocolate Raspberry Truffles can last about two weeks in the fridge. This is due to the cream and fresh raspberries. In the freezer, they can last up to three months. Just remember that the texture might change slightly after freezing. Before serving, let them thaw in the fridge overnight for the best experience. To make these truffles vegan, swap the heavy cream for coconut cream. Use a dark chocolate that is dairy-free, ensuring it has at least 70% cocoa for rich flavor. You can also add a touch of maple syrup for sweetness if desired. This way, you keep the same creamy texture while staying plant-based. Yes, you can use milk chocolate instead of dark chocolate. However, keep in mind that milk chocolate will add extra sweetness. This change will also alter the flavor and texture of the truffles. You might want to adjust the amount of cream to balance the richness. Gifting truffles is a lovely idea! Place them in a small, decorative box or a clear jar. Add some ribbon for a personal touch. You can also include a note explaining the flavors. This makes your gift feel special and thoughtful. To avoid a messy coating process, chill the truffles well after shaping them. Cold truffles are easier to handle. Use a fork or a toothpick to roll them in cocoa powder. This keeps your hands clean and makes the process smoother. We explored how to make dark chocolate raspberry truffles, from key ingredients to storage tips. You learned about optional ingredients, possible variations, and how to avoid mess when coating. Remember, the right chocolate and proper techniques keep your truffles tasty. Don’t hesitate to try different flavors or berries. These truffles make great gifts and treats! Enjoy creating your own batch and sharing with others. Keep experimenting until you find your perfect mix. Happy truffle-making!

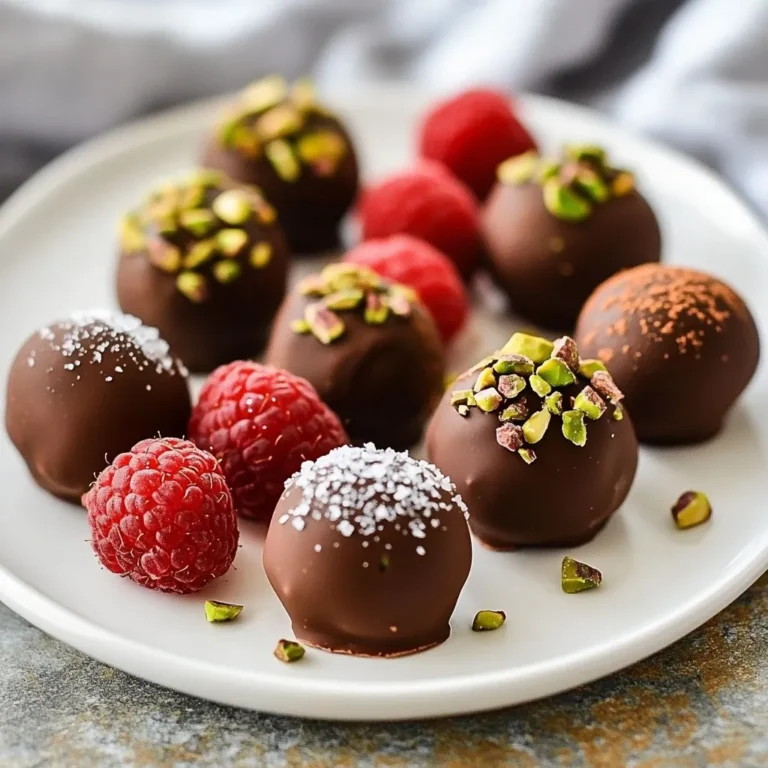
Dark Chocolate Raspberry Truffles Irresistible Delight

To create a delicious chocolate hazelnut babka, you need a few key items: - 4 cups all-purpose flour - 1/2 cup granulated sugar - 2 teaspoons instant yeast - 1 teaspoon salt - 1/4 cup unsalted butter, melted - 1 cup whole milk, warmed to about 110°F (43°C) - 2 large eggs, at room temperature - 1 teaspoon pure vanilla extract - 1 cup chocolate hazelnut spread (like Nutella) - 1/2 cup chopped hazelnuts - 1 egg, beaten (for egg wash) These ingredients work together to create a rich, fluffy texture and a sweet, nutty flavor. Having the right tools makes baking easier and more fun. Here’s what you need: - Large mixing bowl - Medium mixing bowl - Whisk - Wooden spoon or spatula - Rolling pin - Sharp knife - Loaf pan - Plastic wrap or damp cloth - Baking brush These tools help you mix, shape, and bake your babka perfectly. Fresh ingredients make a big difference in taste. Here’s how to choose them: - Flour: Look for a fine texture and check the expiration date. - Sugar: Use granulated sugar that is dry and free from clumps. - Yeast: Ensure it is active by checking the date; it should be fresh. - Butter: Choose unsalted butter for better control of flavor. - Milk: Use whole milk for richness; check that it’s not expired. - Eggs: Pick eggs that are clean and have no cracks. - Chocolate Hazelnut Spread: Go for a well-known brand for best flavor. - Hazelnuts: Choose whole nuts that are firm and smell fresh. Selecting the best ingredients will make your babka shine. {{ingredient_image_2}} Start by getting a large bowl. In it, mix four cups of all-purpose flour, half a cup of granulated sugar, two teaspoons of instant yeast, and one teaspoon of salt. Whisk these dry ingredients until they blend well. In a separate medium bowl, combine a quarter cup of melted butter, one cup of warmed milk, two large eggs, and one teaspoon of pure vanilla extract. Whisk these until smooth. Gradually pour this wet mixture into the dry bowl. Stir with a wooden spoon or spatula until you form a soft dough. Next, transfer this dough onto a floured surface. Knead it for eight to ten minutes. You want the dough to be smooth and a bit tacky. Now, place it in a greased bowl and cover it. Let it rise in a warm spot for about one hour, or until it doubles in size. After the dough has risen, turn it out onto a floured surface. Roll it into a large rectangle, about a quarter inch thick. Make sure the edges are nice and neat. Spread one cup of chocolate hazelnut spread evenly over the rectangle, leaving a half-inch border around the edges. Next, sprinkle half a cup of chopped hazelnuts on top of the chocolate. This adds a nice crunch. Now, starting from one long edge, tightly roll the dough into a log. Pinch the seams shut to keep all that filling inside. Use a sharp knife to cut the log in half lengthwise. This will show off the beautiful filling. Twist the two halves together, keeping the cut sides facing up. Gently press them to secure the twist. Next, coil this twisted dough into a spiral shape. Place it into a greased loaf pan to shape it like babka. Cover the pan with a cloth and let it rise for another 30 minutes. Preheat your oven to 350°F (175°C). Brush the top of the babka with a beaten egg for a nice golden crust. Bake it for 30 to 35 minutes. The babka is done when it’s golden brown, and a toothpick comes out clean. Once baked, let it cool in the pan for about ten minutes. Then, transfer it to a wire rack to cool completely. Enjoy your delicious chocolate hazelnut babka! To get the best dough, start with warm milk. The milk should be about 110°F. This helps the yeast grow well. Mix the dry and wet ingredients until they form a soft dough. Knead the dough for about 8 to 10 minutes. It should feel smooth and slightly sticky. If it feels too dry, add a tiny bit of milk. If it’s too wet, add a little flour. The right dough will rise nicely. One big mistake is not letting the dough rise enough. It should double in size. If you skip this step, your babka will be dense. Also, be careful when rolling the dough. If you roll it too thin, the filling may leak out. When twisting the dough, keep the cut sides facing up. This makes the swirl look pretty when baked. Lastly, don’t skip the egg wash. It gives a nice golden color to your babka. For the egg wash, use a beaten egg. Brush it gently over the top of the babka. This helps it turn golden brown in the oven. Make sure to cover all areas, but don’t soak the dough. A light coat is all you need. You can add a bit of milk to the egg for extra shine. This small step makes your babka look even more tempting! Pro Tips Use Warm Milk: Ensure the milk is warmed to about 110°F (43°C) to activate the yeast effectively, leading to a better rise. Knead Until Smooth: Knead the dough for a full 8-10 minutes until it is smooth and elastic, which helps develop gluten for structure. Don’t Rush the Rising: Allow the dough ample time to rise in a warm environment; this is crucial for achieving a light and fluffy babka. Egg Wash for Shine: Brushing the top with beaten egg before baking gives the babka a beautiful golden crust and shiny finish. {{image_4}} You can mix things up with different fillings. Try fruit jams like raspberry or apricot. Cream cheese with sugar and zest creates a tasty sweet option. You could also use almond paste for a nutty flavor. Get creative! If you need dairy-free options, use almond or coconut milk. Swap regular butter for vegan butter or coconut oil. For gluten-free babka, use a gluten-free flour blend. Make sure it has a good binding agent, like xanthan gum, to hold it together. Serve your babka warm or at room temperature. It pairs nicely with coffee or tea. For a fun touch, offer extra chocolate hazelnut spread on the side for dipping. Adding fresh fruit like strawberries or bananas can brighten your plate. Enjoy! To keep your chocolate hazelnut babka fresh, store it in an airtight container. You can also wrap it in plastic wrap. This method helps prevent it from drying out. Place the container in a cool, dry area. Avoid direct sunlight or heat, as they can spoil the flavor. For best results, enjoy your babka within a few days. If you want to save some for later, freezing is a great option. First, let the babka cool completely. Then, wrap it tightly in plastic wrap. After that, place it in a freezer bag or container. This will help keep it fresh for up to three months. When you’re ready to eat it, thaw it at room temperature. You can warm it in the oven for a few minutes for a fresh-baked taste. When stored properly, chocolate hazelnut babka lasts about 3 to 5 days at room temperature. In the fridge, it can last about a week. If you freeze it, you can enjoy it for up to three months. Always check for any signs of spoilage before enjoying your babka, especially if it has been stored for a while. Babka is a sweet bread. It has roots in Eastern Europe. People often serve it during Jewish holidays. The name "babka" means "grandmother" in Polish. This bread has a rich filling, often chocolate or cinnamon. The twisting shape adds to its charm. It is soft, sweet, and perfect for breakfast or dessert. Yes, you can use store-bought dough. It saves time and effort. Look for dough labeled as brioche or sweet dough. Just make sure it is thawed before using. Roll it out and add your filling as usual. This makes it easy for busy cooks to enjoy babka. To make a healthier babka, try these tips: - Use whole wheat flour instead of all-purpose flour. - Substitute coconut sugar for granulated sugar. - Use a low-sugar chocolate hazelnut spread. - Add ground flaxseed for extra fiber. These swaps can reduce calories while keeping the taste delicious. If you want a different spread, try these options: - Almond butter for a nutty flavor. - Peanut butter for a classic taste. - Fruit jam for a fruity twist. - Cream cheese mixed with cocoa for a rich filling. These options let you customize your babka to your liking. You now have all the tools to make a delicious Chocolate Hazelnut Babka. We covered the essential ingredients and kitchen tools needed to get started. I shared tips for selecting fresh ingredients and detailed step-by-step instructions for making the dough, filling, shaping, and baking. You learned how to avoid common mistakes and achieve the perfect texture. Think about trying different fillings or even dairy-free options. Lastly, remember the best ways to store or freeze your Babka for later enjoyment. Now, it’s time to bake and savor your masterpiece!

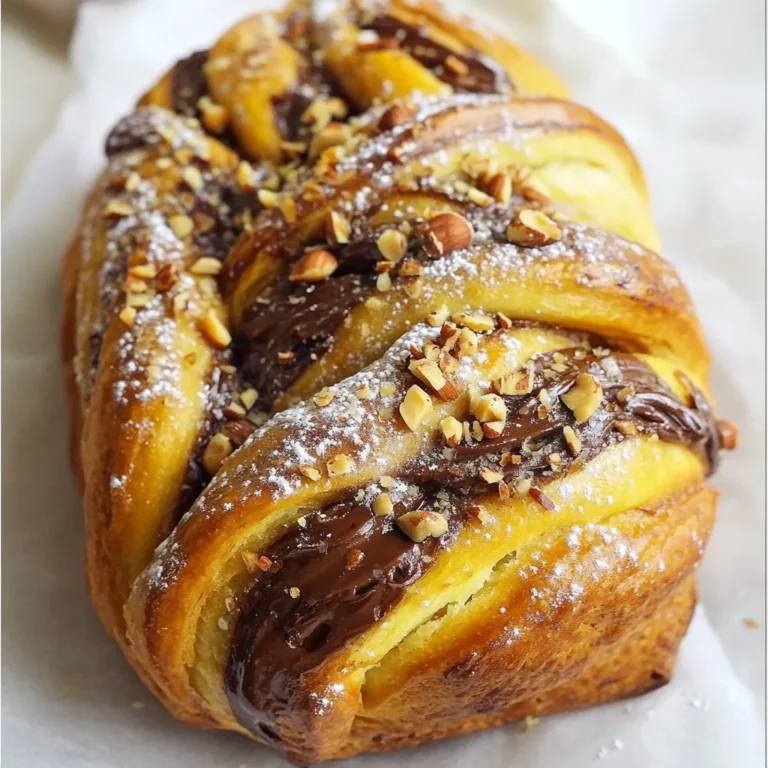
Chocolate Hazelnut Babka Delicious and Easy Recipe

For this crumble, I love using ripe strawberries, blueberries, and raspberries. Each berry adds its own flavor and color. The strawberries should be hulled and quartered. This makes them easy to mix and eat. Blueberries and raspberries should be fresh and plump. They burst with juice, making your crumble delicious. To sweeten the berries, we use granulated sugar and brown sugar. Granulated sugar gives a clean sweetness. Brown sugar adds a hint of caramel flavor. I often mix the two for a balanced taste. Adding two tablespoons of fresh lemon juice brightens the flavor. It makes the berries shine. The dry mixture brings everything together. You will need all-purpose flour, old-fashioned rolled oats, ground cinnamon, and fine sea salt. The flour helps bind the crumble. Rolled oats add a nice chewiness. Cinnamon gives warmth and depth. The sea salt enhances all the sweet flavors. Unsalted butter is key for a great crumble. Chilled butter is important because it keeps the crumble light. When you mix it into the dry ingredients, do not overwork it. You want small bits of butter to remain. This creates a tender, flaky topping that contrasts with the juicy berries. {{ingredient_image_2}} Start by preheating your oven to 350°F (175°C). This step is key for baking. It helps the crumble cook evenly. While waiting, you can gather your ingredients. In a medium bowl, mix together the strawberries, blueberries, and raspberries. Add 1/2 cup of granulated sugar and 2 tablespoons of fresh lemon juice. Stir gently to avoid crushing the fruit. This allows the flavors to blend nicely. Set this bowl aside while you prepare the crumble. Take another bowl and whisk together 1 cup of all-purpose flour, 1/2 cup of rolled oats, 1/2 cup of brown sugar, 1/2 teaspoon of ground cinnamon, and 1/4 teaspoon of sea salt. Next, add 1/2 cup of cold, cubed butter. Mix it in using a pastry cutter or your fingers. You want the mixture to look like coarse crumbs, with some small bits of butter still showing. This adds rich flavor and texture. Grease a 9x9-inch baking dish. Pour the berry mixture into it, spreading it out evenly. Sprinkle the crumble topping over the berries. Make sure to cover them well. Now, put the dish in your preheated oven. Bake for 30 to 35 minutes. You want the topping to turn golden brown and see the berry juices bubbling. Once done, let it cool for about 10 minutes before serving. This will help the juices set a bit. To get the right texture for your crumble topping, use cold butter. Cold butter makes the topping flaky. Cut the butter into small cubes. Then, mix it into the dry ingredients using your fingers. You want to see some pea-sized bits of butter. This adds richness. Don’t overmix; you want a coarse crumb texture. You can add spices for extra flavor. A pinch of nutmeg can warm the taste. You might try a splash of vanilla extract for a sweet note. If you love citrus, add some lemon zest. These small additions can change the taste and make it unique. Serve the crumble warm for the best taste. Top it with vanilla ice cream or whipped cream. This adds creaminess and contrast. For a fun twist, garnish with fresh mint leaves. It makes your dish look pretty and fresh! Use a nice dish to present your crumble. A colorful bowl or plate enhances the appeal. Pro Tips Use Fresh Berries: The quality of your berries can greatly affect the flavor of your crumble. Opt for ripe, in-season berries for the best taste and texture. Chill Your Butter: Using cold butter is crucial for achieving that perfect crumbly texture. Make sure your butter is well-chilled before cutting it into the dry ingredients. Let It Rest: Allowing the crumble to cool for about 10 minutes before serving not only helps the juices set but also makes it easier to scoop out portions without it falling apart. Experiment with Spices: While cinnamon is a classic choice, consider adding a pinch of nutmeg or ginger to your crumble for a unique flavor twist. {{image_4}} You can change the berries in this recipe. Instead of strawberries, blueberries, and raspberries, try blackberries or cherries. You can also mix in some peaches or apples for a new twist. Just keep the total amount of fruit the same. This gives you a chance to enjoy different flavors each time you make the crumble. If you want a lower-sugar version, use less granulated sugar. You can also swap out granulated sugar for coconut sugar or honey. For a vegan option, replace the butter with coconut oil or vegan butter. Use maple syrup instead of sugar to sweeten the fruit. These small changes can make your dessert healthier without losing taste. Using seasonal fruits can add fun flavors. In summer, try using fresh peaches or plums. In fall, apples and pears are perfect. Winter offers citrus fruits like oranges or grapefruits. These fruits can change the taste and look of your crumble. Each season brings a new opportunity to create something special and delicious! To keep your Triple Berry Crumble fresh, refrigerate leftovers. Place it in an airtight container. This helps prevent the crumble from drying out. You can store it in the fridge for up to three days. When you are ready to enjoy it again, simply take it out. You can freeze your crumble for later enjoyment. First, let it cool completely. Then, wrap it tightly in plastic wrap. After that, place it in a freezer-safe bag or container. This method keeps it fresh for up to three months. When you're ready to eat it, you can thaw it in the fridge overnight. Reheating is simple and easy. Preheat your oven to 350°F (175°C). Place the crumble in an oven-safe dish. Cover it with foil to keep it moist. Heat for about 20 minutes. If you want a crispy top, remove the foil for the last 5 minutes. You can also reheat individual portions in the microwave. Just warm them for about 30 seconds. Enjoy your tasty crumble warm! Yes, you can use frozen berries. They work well in this recipe. Just remember to thaw them first. Drain any excess juice to avoid a soggy crumble. Frozen berries may take a bit longer to cook. Keep an eye on the baking time. You will know the crumble is ready when the topping turns golden brown. Look for bubbling juices around the edges. This shows the berries are cooked through. A good baking time is 30 to 35 minutes at 350°F. Yes, you can prep it ahead. Mix the berries and topping separately. Store them in the fridge for up to a day. When ready to bake, layer them in your dish and cook. This keeps your crumble fresh and tasty. This crumble pairs well with vanilla ice cream or whipped cream. A scoop of ice cream adds creaminess. Whipped cream gives a light touch. Fresh mint leaves make a nice garnish, too! This blog post shared how to craft a delicious Triple Berry Crumble. We covered fresh ingredients like ripe berries and efficient baking methods. The steps were clear, from preheating the oven to mixing the crumble. I also offered tips on flavor boosts and variations. In my view, enjoying this dessert is about making it your own. Try different fruits or toppings. Remember, the best crumble is one that brings joy to your table. Happy baking!

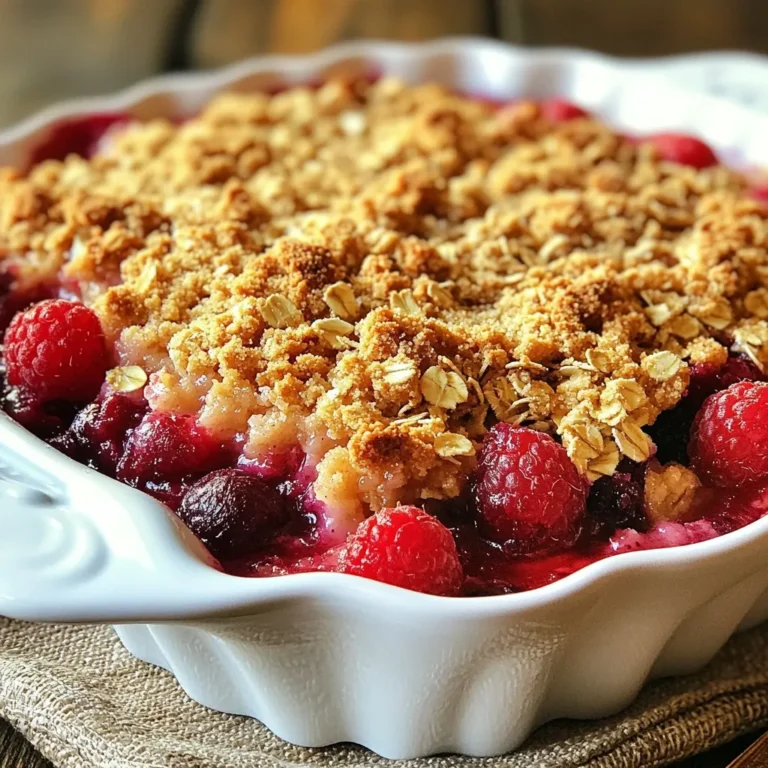
Triple Berry Crumble Delightful and Easy Recipe

To make this creamy treat, gather these main ingredients: - 4 ripe bananas - 1/2 cup creamy peanut butter - 1/2 cup full-fat coconut milk - 1 teaspoon vanilla extract - Pinch of salt These items form the base of our ice cream. The ripe bananas provide natural sweetness and creaminess. The peanut butter adds rich flavor and protein. Full-fat coconut milk gives a smooth texture, while vanilla and salt enhance the taste. You can add a few optional ingredients for extra flavor: - 2 tablespoons maple syrup (for added sweetness) - Crushed peanuts (for topping) - Chocolate drizzle (for indulgence) - Cinnamon (for a warm touch) These extras let you customize your ice cream. You can adjust the sweetness with maple syrup. Toppings like crushed peanuts or chocolate make it even more fun! Each ingredient brings unique benefits: - Bananas: Rich in potassium and vitamins, they aid digestion. - Peanut Butter: Packed with protein and healthy fats, it helps keep you full. - Coconut Milk: Offers healthy fats and adds creaminess. - Maple Syrup: Natural sweetener with some antioxidants. - Vanilla Extract: May have calming effects and adds flavor. This ice cream not only tastes good but also nourishes you. Each bite is a mix of fun and health! {{ingredient_image_2}} To start, peel the ripe bananas. You want them to be very ripe for the best flavor. Slice the bananas into small, even rounds. This helps them freeze quickly and evenly. Next, spread the banana slices in a single layer on a baking sheet. Make sure they are not touching each other. Place the baking sheet in the freezer. Let the banana slices freeze for at least 2 hours. They should be completely solid before you move on. Once your banana slices are frozen, take them out of the freezer. Transfer the slices to a food processor. Add in the creamy peanut butter and full-fat coconut milk. This will give your ice cream a rich texture. If you like it sweeter, include the maple syrup too. Don’t forget the vanilla extract and a pinch of salt. Blend everything on high speed. Stop a few times to scrape down the sides. This ensures all the ingredients mix well. Keep blending until you reach a smooth and creamy consistency. After blending, taste your mixture. If you want more sweetness, add a bit more maple syrup. Blend again briefly to mix in the extra sweetness. If you prefer a soft-serve texture, serve it now! If you want a firmer ice cream, transfer the mixture to an airtight container. Freeze it for about 1-2 more hours. When you’re ready to serve, let it sit for about 5 minutes at room temperature. This makes scooping easier and more fun! Choose ripe bananas for the best taste and texture. Look for bananas with brown spots. These spots mean the bananas are sweet and soft. This softness helps create a creamy ice cream. If the bananas are too green, they won't blend well. Avoid using overripe bananas as they can taste too strong. When you blend, start on low speed. This helps break down the frozen bananas. Gradually increase the speed to high. Stop and scrape the sides of the bowl often. This step ensures all ingredients mix well. Blend until the mixture is smooth and creamy. Don’t rush; it might take a few minutes. If your blender struggles, add a little coconut milk to help. For the best taste, serve right after blending. This gives you a soft-serve style. If you prefer it firmer, freeze it for 1-2 hours. When ready to serve, let it sit at room temperature for 5 minutes. This makes scooping easier. Store leftovers in an airtight container. To keep it fresh, press plastic wrap directly on the surface before sealing. Enjoy within a week for the best flavor! Pro Tips Use Very Ripe Bananas: The riper the bananas, the sweeter and creamier the ice cream will be. Look for bananas with plenty of brown spots for the best flavor. Chill Your Ingredients: For an extra creamy texture, chill the peanut butter and coconut milk in the fridge before blending. This helps them incorporate more smoothly with the frozen bananas. Experiment with Sweetness: Adjust the amount of maple syrup based on your personal taste. Remember that freezing can dull sweetness, so taste the mixture before freezing! Storage Tips: Store any leftover ice cream in an airtight container. To prevent ice crystals, press a piece of parchment paper directly onto the surface before sealing. {{image_4}} Toppings can make your ice cream even better. You can try crushed peanuts, which add a nice crunch. Dark chocolate chips bring a rich taste. A drizzle of maple syrup gives a sweet touch. You can also sprinkle cinnamon for a warm flavor. Fresh fruit slices like strawberries or raspberries brighten up the dish. Get creative with your toppings and make your ice cream unique! If you want to change the sweet flavor, there are many options. You can swap maple syrup for agave nectar. Honey works too, but it's not vegan. For a low-calorie option, use stevia or erythritol. If you prefer a fruity taste, try adding pureed dates. Adjust the sweetness to what you like best. Remember, small changes can lead to big flavor! Mix-ins can make your ice cream more fun. Try adding dairy-free chocolate chunks for a sweet treat. Shredded coconut adds texture and a tropical vibe. You can also mix in some chia seeds for extra fiber. For a nutty twist, add almond slices or sunflower seeds. These extras can change the taste and make your ice cream special. Experiment with what you love! To store leftover ice cream, use an airtight container. This helps keep the ice cream fresh. Make sure to press a piece of plastic wrap against the surface before sealing the lid. This extra layer helps prevent ice crystals from forming. To maintain a creamy texture, avoid leaving the ice cream in the freezer for too long. If it hardens, let it sit at room temperature for a few minutes before scooping. Stirring the ice cream every 30 minutes while it freezes can also help keep it smooth and creamy. You can keep this ice cream for about two weeks in the freezer. However, for the best taste, enjoy it within a week. If you notice any ice crystals forming, it’s a sign that it’s time to eat up! Always store it in a cold part of the freezer, away from the door. This helps maintain a consistent temperature. Yes, you can use other nut butters. Almond butter or cashew butter works well too. Just make sure the nut butter is smooth and creamy. This keeps the ice cream soft and rich. Each nut butter adds its own flavor. Almond butter gives a nutty taste, while cashew butter adds a mild sweetness. Absolutely! This recipe is perfect for kids. It uses natural ingredients like bananas and peanut butter. Kids love the sweet, creamy texture. Plus, it has no added dairy. You can even let them help with the mixing. It’s a fun way to get them involved in the kitchen! If you don’t have a food processor, don’t worry! You can use a blender instead. Just make sure to cut the frozen bananas into smaller pieces. This helps the blender work better. Blend in batches if needed. You can also use a potato masher for a chunky texture. It may take more time, but you’ll still enjoy a tasty treat! This blog post shares how to create delicious vegan peanut butter banana ice cream. We explored key ingredients that not only taste great but also provide health benefits. I gave step-by-step instructions to make your ice cream smooth and creamy. Tips helped you choose the best bananas and blend effectively. We looked at fun variations for flavor and how to store your treats properly. Making vegan ice cream is simple and rewarding. Enjoy your creation and share it with others!

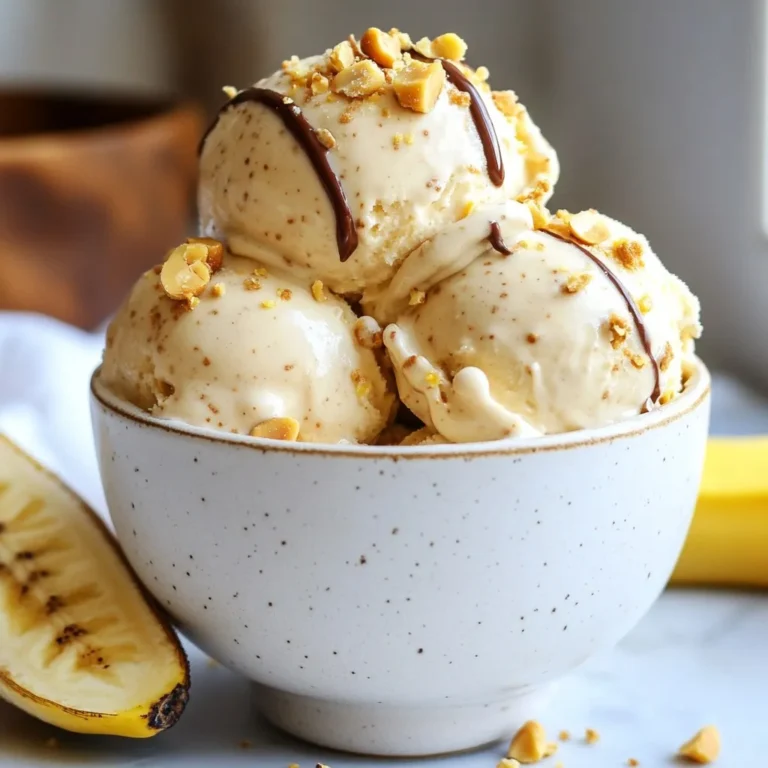
Vegan Peanut Butter Banana Ice Cream Simple Delight

- 2 cups all-purpose flour - 1/2 cup granulated sugar - 2 teaspoons baking powder - 1/2 teaspoon salt - 1/2 cup unsalted butter, chilled and cut into small cubes - 1/2 cup fresh blueberries (or frozen, thawed and drained) - Zest of 1 lemon - 1/4 cup heavy cream - 1 large egg, beaten - 1 teaspoon vanilla extract - 1 tablespoon fresh lemon juice When choosing blueberries, look for bright, plump berries. They should feel firm and smooth. Avoid any that are soft, shriveled, or have mold. Fresh blueberries burst with flavor. They add sweetness to your scones. If you can, buy them from a local farm. They will taste better than store-bought ones. You can switch some ingredients if needed. For a lighter scone, use whole wheat flour. Swap out the heavy cream for buttermilk for a tangy taste. If you like a different flavor, try using orange zest instead of lemon. You can also replace blueberries with raspberries or chopped strawberries. This makes the recipe flexible for your taste! {{ingredient_image_2}} Start by preheating your oven to 400°F (200°C). This step is key for crisp scones. While the oven heats, line a baking sheet with parchment paper. This makes it easy to remove the scones later. In a large bowl, combine 2 cups of all-purpose flour, 1/2 cup of granulated sugar, 2 teaspoons of baking powder, and 1/2 teaspoon of salt. Use a whisk to mix these dry ingredients well. This helps the baking powder spread evenly, ensuring your scones rise nicely. Add 1/2 cup of chilled, cubed unsalted butter to your dry mix. Use a pastry cutter or your fingers to blend the butter in until you see pea-sized pieces. This gives the scones their flaky texture. In another bowl, whisk together 1/4 cup of heavy cream, 1 beaten large egg, 1 teaspoon of vanilla extract, and 1 tablespoon of fresh lemon juice. Pour this mix into the flour and butter mixture. Stir gently until just combined, keeping the dough a bit sticky. Lightly flour a clean surface. Turn the dough out onto this surface and shape it into a rectangle, about 1 inch thick. Use a sharp knife or pastry cutter to slice the dough into triangles. You can also use a round cutter if you prefer classic shapes. Place the cut scones on the lined baking sheet, leaving space between each piece. Place the baking sheet in your preheated oven. Bake the scones for 15-18 minutes, or until they turn golden brown on top. Once done, let them cool on the sheet for a few minutes. Then, transfer the scones to a wire rack to cool completely. Enjoy the delightful aroma as they cool! To get scones that are soft and fluffy, you need to focus on the dough. Do not overmix it. When you add the wet ingredients, stir just enough to combine them. This keeps the scones light. Also, remember to keep your butter cold. This step helps create flaky layers in your scones. One common mistake is using warm butter. Warm butter makes for dense scones. Make sure your butter is chilled and cut into small cubes. Another mistake is rolling the dough too thin. Aim for about one inch thick to keep them airy. Lastly, avoid using too much flour when shaping. Too much flour can lead to dry scones. Having the right tools makes baking easier. Here are some essentials: - Mixing bowls - Whisk - Pastry cutter or fork - Baking sheet - Parchment paper - Sharp knife or pastry cutter These tools will help you create the best lemon blueberry scones. Having a reliable oven thermometer can also ensure your oven is at the right temperature. This detail is key for even baking. Pro Tips Chill Your Ingredients: Make sure your butter and cream are very cold before mixing. This will help create flaky layers in your scones. Don’t Overwork the Dough: Mix just until combined to keep your scones tender. Overworking can lead to dense scones. Use Fresh Ingredients: Fresh blueberries and lemons will enhance the flavor significantly compared to frozen or bottled alternatives. Experiment with Add-ins: Feel free to add other flavors like poppy seeds or almond extract for a unique twist on the classic scone. {{image_4}} You can boost the flavor of your Lemon Blueberry Scones in many ways. Adding spices like cinnamon or nutmeg can bring warmth to the mix. A dash of almond extract can add a nice touch too. For a tangy twist, try a bit of lime zest along with the lemon. These small changes make a big difference. While blueberries shine in this recipe, you can swap them for other fruits. Chopped strawberries or raspberries work well. You can even mix fruits, like blueberries and cranberries together. This adds color and different flavors. Just remember to adjust the sugar if you use tart fruit. Making these scones gluten-free is easy. Use a gluten-free flour blend that measures cup for cup. For a vegan version, replace the butter with coconut oil or vegan butter. You can also substitute the heavy cream with almond milk. Use a flax egg instead of the egg for binding. These swaps keep the scones tasty while meeting different diets. To keep your leftover scones fresh, place them in an airtight container. This keeps moisture in and prevents them from drying out. You can also wrap them in plastic wrap before placing them in the container. Store the scones at room temperature for up to two days. If you want them to last longer, consider refrigerating them. When you are ready to enjoy your scones again, reheating is easy. Preheat your oven to 350°F (175°C). Place the scones on a baking sheet and warm them for about 5 to 10 minutes. You can also use a microwave. Heat them for 10 to 15 seconds, but be careful not to overdo it. A warm scone tastes best! If you have extra scones, freezing is a great option. First, let them cool completely. Then, wrap each scone in plastic wrap. After that, place them in a freezer bag. Remove as much air as possible before sealing. Your scones can last in the freezer for up to three months. When you want to eat them, just thaw them in the fridge overnight and reheat as mentioned above. Enjoy them fresh and tasty! Lemon Blueberry Scones can last about 2 to 3 days at room temperature if stored in an airtight container. If you want to keep them fresh longer, put them in the fridge for up to a week. They may dry out if left out too long, so I recommend enjoying them fresh! Yes, you can use frozen blueberries! Just make sure to thaw and drain them before adding to the dough. This helps prevent excess moisture in your scones. Frozen blueberries can also add a nice touch of color, making them just as appealing! Serve your scones warm for the best flavor. You can place them on a tiered stand or a lovely wooden board. A light dusting of powdered sugar adds a sweet touch. Pair them with lemon curd or clotted cream for a special treat. Enjoy them with your favorite tea or coffee! Yes, you can make the dough ahead of time! Wrap it tightly in plastic wrap and store it in the fridge for up to 24 hours. When ready to bake, just shape and cut the dough as normal. This gives you a quick and easy way to enjoy fresh scones anytime! You learned about making Lemon Blueberry Scones from start to finish. We covered key ingredients, steps, and useful tips. You now know how to pick fresh blueberries and make tasty variations. Remember to store extras properly for later enjoyment. Baking can be fun and rewarding. With these tips, you’ll create great scones each time. Enjoy your baking journey and share your delicious results with others!

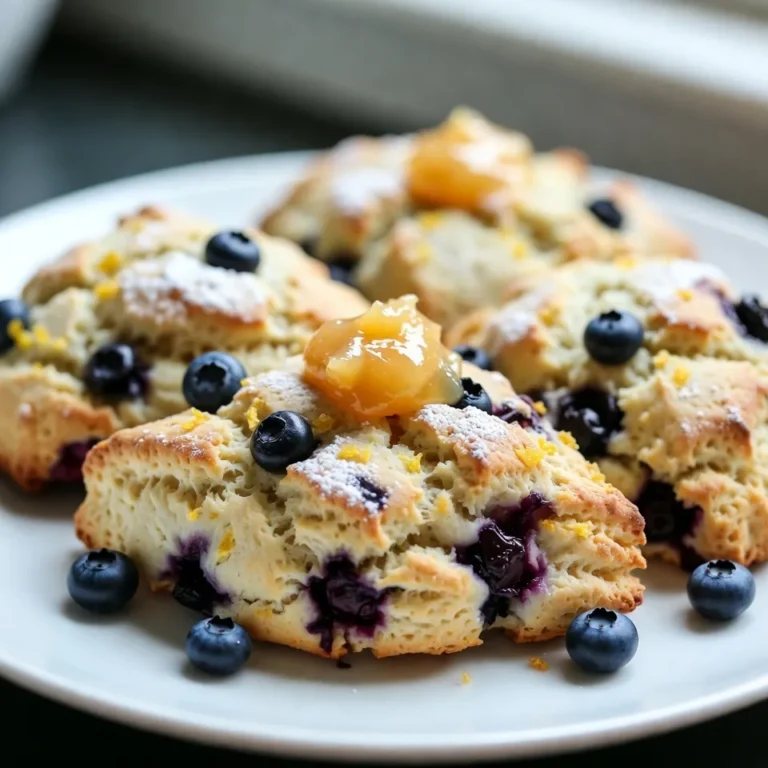
Lemon Blueberry Scones Fresh and Flavorful Recipe

- 1.5 lbs Brussels sprouts, trimmed and sliced in half - 3 tablespoons extra virgin olive oil - 2 tablespoons pure maple syrup - 1 tablespoon whole grain Dijon mustard - 2 cloves garlic, finely minced - Salt and freshly ground black pepper to taste - 1/4 teaspoon red pepper flakes (optional) - 1/4 cup pecans, toasted and roughly chopped You can add some red pepper flakes for a spicy kick. This adds warmth and depth. If you love nuts, consider adding a mix of walnuts or almonds. You can also sprinkle some fresh herbs like thyme or rosemary for extra aroma. If you don’t have Brussels sprouts, try using green beans or cauliflower. For the maple syrup, honey or agave syrup works well. You can replace whole grain Dijon mustard with yellow mustard if needed. If you are out of pecans, toasted walnuts or sunflower seeds can be a great alternative. {{ingredient_image_2}} Start by preheating your oven to 400°F (200°C). This high heat helps the Brussels sprouts turn golden and caramelized. A hot oven makes a big difference in flavor. Trim and slice 1.5 lbs of Brussels sprouts in half. This size allows them to roast well. In a large bowl, mix the halved sprouts with 3 tablespoons of extra virgin olive oil, 2 tablespoons of pure maple syrup, and 1 tablespoon of whole grain Dijon mustard. Add 2 cloves of finely minced garlic, salt, and freshly ground black pepper. If you like a kick, add 1/4 teaspoon of red pepper flakes. Mix everything together until the Brussels sprouts are well-coated in the tasty sauce. Line a baking sheet with parchment paper. This makes cleanup easy. Spread the Brussels sprouts mixture in a single layer on the sheet. Place the baking sheet in the preheated oven. Roast for 20-25 minutes. Stir the sprouts halfway to ensure even cooking. They should be tender and golden brown on the edges. Once done, take the sheet out and toss the sprouts with 1/4 cup of toasted pecans. This adds a nice crunch. Serve warm, drizzling any leftover maple mixture from the pan over the top for extra flavor. Enjoy! To get the best Brussels sprouts, start with fresh ones. Look for firm, bright green sprouts. Trim the ends and slice them in half. This allows the edges to caramelize well. Preheat your oven to 400°F (200°C). The high heat makes them crispy. Spread the sprouts in a single layer on the baking sheet. This helps them roast evenly. Stir them halfway through cooking for a nice brown color. They should be tender and golden brown in about 20-25 minutes. Maple syrup and Dijon mustard bring great taste. You can add garlic for a nice kick. If you like heat, sprinkle in red pepper flakes. This adds a fun twist. After roasting, toss in toasted pecans for crunch. They add a nutty flavor that pairs well. Experiment with fresh herbs too, like thyme or parsley, for extra depth. Each addition makes your dish more exciting. Serve your Maple Dijon Roasted Brussels Sprouts warm. A vibrant bowl makes the dish look inviting. Consider garnishing with more toasted pecans for crunch. Drizzle any leftover maple mixture from the pan over the top. This adds sweetness and makes it shine. These sprouts make a great side dish for roasted meats or as part of a cozy vegetarian meal. Enjoy your delicious creation! Pro Tips Choose Fresh Brussels Sprouts: Select Brussels sprouts that are firm and tightly closed for the best flavor and texture. Preheat Your Oven: Always preheat your oven to ensure even roasting and maximum caramelization. Experiment with Sweetness: Adjust the amount of maple syrup based on your personal taste; you can add a little more for a sweeter dish. Perfect Pecan Toasting: Toast your pecans in a dry skillet over medium heat for a few minutes for enhanced flavor before adding them to the dish. {{image_4}} You can use different types of maple syrup for this recipe. Light syrup has a mild flavor, while dark syrup is richer. Try both to see which one you like best. You can even mix different types for a unique taste. Just remember, the sweetness level may change, so adjust the amount in your recipe. Brussels sprouts are great, but you can add other veggies too. Carrots, sweet potatoes, or even cauliflower work well. Cut them into similar sizes for even cooking. Toss them in the same maple Dijon mix. This addition boosts flavor and makes the dish more colorful. Pecans add a nice crunch, but you can swap them out. Walnuts or almonds also provide great texture. If you prefer seeds, pumpkin or sunflower seeds are tasty choices too. Toast them lightly before adding for an extra crunch. This gives the dish a new twist while keeping it healthy. To keep your Maple Dijon Roasted Brussels fresh, first let them cool. Place the sprouts in an airtight container. Store in the fridge for up to 4 days. If you plan to eat them later, keep the pecans separate. This helps them stay crunchy. Reheat Brussels sprouts in the oven for best results. Preheat your oven to 350°F (175°C). Spread the sprouts on a baking sheet. Heat for about 10 minutes, until hot. You can also use the microwave. Heat in short bursts of 30 seconds. Stir between each burst to avoid sogginess. You can freeze Maple Dijon Roasted Brussels, but they may lose some texture. Cool the sprouts completely. Place them in a freezer-safe bag. Squeeze out air before sealing. They can last up to 3 months. When ready to eat, thaw in the fridge overnight. Reheat as mentioned above for best taste. Yes, you can use frozen Brussels sprouts. Just remember they may not roast as well as fresh ones. Frozen sprouts often contain more water, which can lead to less crispness. If you choose frozen, thaw them first and pat them dry to help them crisp up in the oven. To make this recipe vegan, replace the honey with more maple syrup. Ensure your Dijon mustard does not contain honey. All other ingredients are already vegan-friendly. This way, you keep the sweet and tangy flavor without any animal products. Maple Dijon Roasted Brussels sprouts pair great with many dishes. They work well with roasted chicken or turkey. You can serve them with mashed potatoes or a quinoa salad for a hearty meal. They also complement grilled meats or fish beautifully, adding a nice contrast to savory flavors. In this blog post, we explored how to make Maple Dijon Roasted Brussels Sprouts. We covered the ingredients, including substitutions and optional flavor boosters. Next, we discussed step-by-step cooking directions and tips for achieving crispy texture and rich flavor. We also featured variations you can try and provided storage methods for leftovers. Remember, these Brussels sprouts are not just a side dish; they can shine on your table. Use this guide to make a tasty dish anyone will love!

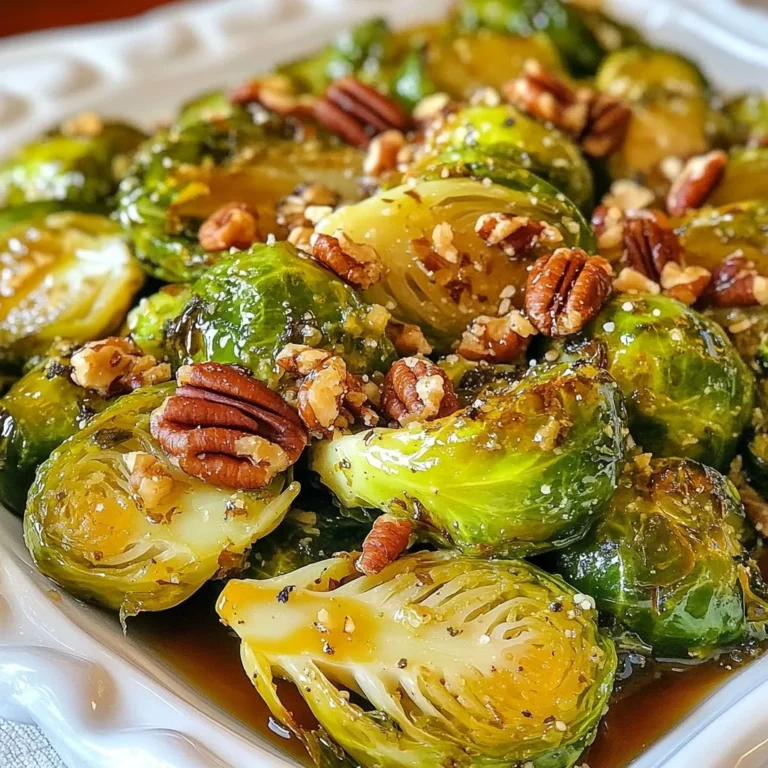
Maple Dijon Roasted Brussels Flavorful and Easy Recipe

To make Thai Peanut Chicken Noodles, you will need: - 200g rice noodles - 300g boneless chicken breast, sliced into thin strips - 1 tablespoon vegetable oil - 1 red bell pepper, cut into julienne strips - 1 cup broccoli florets (fresh or frozen) - 3 green onions, chopped (divided) - 2 cloves garlic, minced - 1 tablespoon fresh ginger, minced - 1/4 cup creamy peanut butter - 2 tablespoons soy sauce - 1 tablespoon freshly squeezed lime juice - 1 tablespoon honey - 1 teaspoon sriracha (optional) - Chopped peanuts (for garnish) - Fresh cilantro leaves (for garnish) You can add some fun garnishes to make this dish shine. Consider using: - Extra chopped peanuts for crunch - Fresh cilantro leaves for a burst of flavor - Lime wedges for a zesty touch If you need to swap some items, here are good options: - Use whole wheat noodles instead of rice noodles for more fiber. - Swap chicken with tofu for a plant-based version. - Try cashew butter if you prefer a different nut flavor. - Use tamari instead of soy sauce for a gluten-free option. - Replace broccoli with snap peas or carrots for a different crunch. These ingredients and options make the dish both tasty and versatile. Enjoy putting your personal spin on it! {{ingredient_image_2}} Start by boiling water in a large pot. Once it boils, add 200g of rice noodles. Cook them according to the package instructions. This usually takes about 4-6 minutes. Stir the noodles occasionally to prevent sticking. When they are soft, drain them in a colander. Rinse them with cold water to stop the cooking process. Set them aside to cool. Grab a large skillet or wok and heat 1 tablespoon of vegetable oil over medium-high heat. Once hot, add 300g of sliced boneless chicken breast. Cook the chicken for about 5-7 minutes. You want it to be golden brown and fully cooked. Once done, remove the chicken from the skillet and place it on a plate. In the same skillet, add 2 cloves of minced garlic and 1 tablespoon of minced fresh ginger. Sauté these for about 30 seconds. You will smell a lovely aroma. Next, add 1 red bell pepper, cut into julienne strips, and 1 cup of broccoli florets. Stir-fry these vegetables for 3-4 minutes. You want them tender but still crisp. In a small mixing bowl, combine 1/4 cup of creamy peanut butter, 2 tablespoons of soy sauce, 1 tablespoon of freshly squeezed lime juice, and 1 tablespoon of honey. If you like some heat, add 1 teaspoon of sriracha. Whisk these ingredients together until smooth. If the sauce is too thick, add a splash of warm water to thin it. Return the cooked chicken to the skillet with the sautéed vegetables. Add the drained rice noodles and pour the peanut sauce over everything. Toss all the ingredients together to coat them well. Heat for an additional 2-3 minutes until everything is warmed through. Once done, remove the skillet from heat. Gently mix in 3 chopped green onions, saving a few for garnish. Divide the Thai peanut chicken noodles into serving bowls. Top each bowl with chopped peanuts and fresh cilantro leaves. For a fresh touch, serve with a lime wedge on the side. To cook rice noodles just right, follow these steps: - Soak the noodles: Start by soaking the noodles in hot water for 5-10 minutes. - Check for doneness: They should be soft but still firm to bite. - Rinse with cold water: After cooking, rinse them quickly under cold water to stop the cooking. This keeps them from sticking together. To make your peanut sauce extra tasty, try these tips: - Add more flavors: Mix in a bit of soy sauce for saltiness and lime juice for zing. - Use fresh ingredients: Fresh ginger and garlic make a big difference. - Adjust thickness: If it's too thick, whisk in warm water a little at a time. Stir-frying is quick, so keep these tips in mind: - Use a hot skillet: Heat your pan before adding oil. This helps cook the chicken evenly. - Don’t overcrowd the pan: Cook in batches if needed. This keeps everything crisp. - Keep stirring: Move the ingredients around often. This ensures even cooking and great flavor. Pro Tips Prep Your Ingredients: Before you start cooking, make sure to chop all your vegetables and slice the chicken. This will make the cooking process smoother and quicker. Use Fresh Ingredients: For the best flavor, opt for fresh vegetables and herbs. Fresh cilantro and lime juice can elevate the dish significantly. Customize the Spice Level: If you enjoy spicy food, feel free to increase the amount of sriracha or add some red pepper flakes to the peanut sauce. Store Leftovers Properly: If you have any leftovers, store them in an airtight container in the fridge. Reheat gently to avoid overcooking the chicken and vegetables. {{image_4}} You can easily make this dish vegetarian or vegan. Instead of chicken, use firm tofu. Cut the tofu into cubes and sauté them until golden. For a vegan sauce, replace honey with maple syrup. This keeps the sweet taste without using animal products. If you want to switch up the protein, consider shrimp or beef. Shrimp cooks fast and adds a nice flavor. For beef, use thin strips of sirloin. Both options work well with the peanut sauce, so don't worry about taste. Boost the nutrition by adding more veggies. Try carrots, snap peas, or baby corn. You can also add mushrooms for extra flavor and texture. Just chop them up and stir-fry with the other vegetables. This way, your dish stays colorful and healthy. To store leftovers, let the Thai peanut chicken noodles cool first. Place them in an airtight container. Make sure to seal it tightly. Store the container in the fridge. Use the leftovers within three days for best taste. When you are ready to eat, take the noodles out of the fridge. You can reheat them in a skillet over medium heat. Add a splash of water or broth to keep them moist. Stir often for even heating, about 5-7 minutes. You can also use the microwave. Heat in short bursts, stirring in between until warm. For meal prep, cook the chicken and veggies ahead of time. Store them separately from the noodles and sauce. This keeps everything fresh and flavorful. You can mix and match portions for quick meals all week. Prepare the peanut sauce in advance and store it in the fridge. It lasts about a week. Yes, you can! While rice noodles work best, you can swap them for other noodles. Try using egg noodles or whole wheat pasta for a different taste and texture. Just cook them according to package instructions. To add more heat, use more sriracha or a pinch of chili flakes. You can also add sliced fresh chili peppers. For a smoky flavor, try adding chili paste or chili oil. This dish can be gluten-free if you choose gluten-free soy sauce. Rice noodles are usually gluten-free, but double-check the label. Make sure all other ingredients, like peanut butter, are gluten-free as well. It takes about 30 minutes from start to finish. This includes 15 minutes of prep time. With a bit of practice, you can make it even faster! Yes, you can. Make the peanut sauce a day ahead. Store it in an airtight container in the fridge. Just give it a good stir before using it, as it may thicken when chilled. You learned the key ingredients and steps for making tasty Thai Peanut Chicken Noodles. I shared tips to cook noodles and enhance flavors. You can create variations based on your diet, too. Remember to store leftovers properly and enjoy them later. With these insights, you can cook this dish with ease. Make it your own, and don’t hesitate to experiment. Cooking should be fun and rewarding! Keep these ideas handy, and happy cooking!

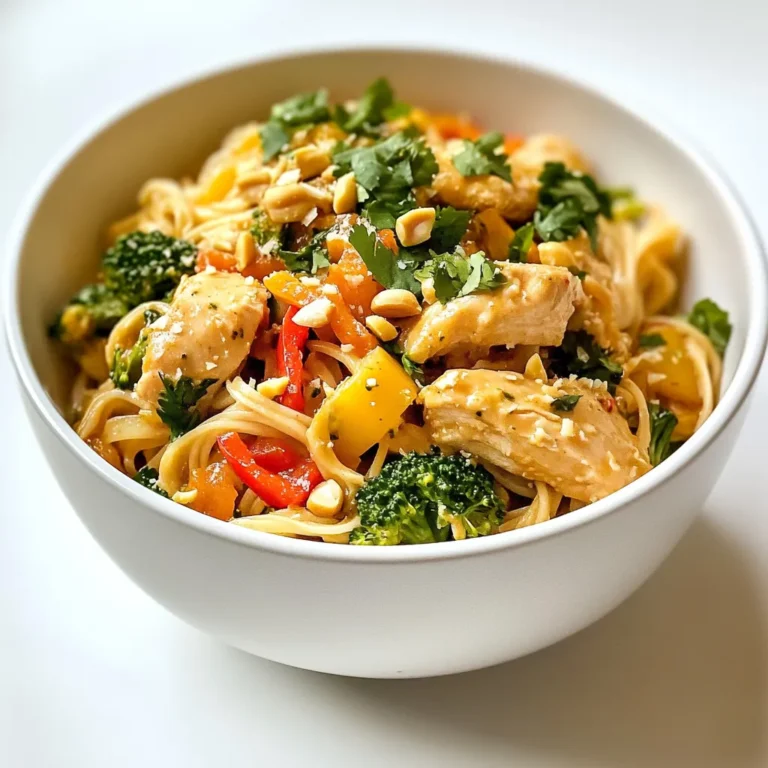
Thai Peanut Chicken Noodles Savory and Simple Dish

- 4 large bell peppers - 1 cup crumbled feta cheese - 1 cup cooked quinoa - 1 small red onion - 1 cup cherry tomatoes - 2 cloves garlic - Dried oregano and smoked paprika - Extra virgin olive oil - Salt and freshly ground black pepper - Fresh parsley for garnish For this baked feta stuffed peppers recipe, I love using a mix of colorful bell peppers. The colors make the dish fun and bright. You need four large bell peppers. They should be firm and fresh. Next, feta cheese adds a tangy flavor. I use one cup of crumbled feta cheese. It blends well with the other ingredients. Quinoa is a great base for the filling. Use one cup of cooked quinoa that has cooled. It gives the dish a nice texture and adds protein. Chop one small red onion finely. It gives a slight sweetness and crunch. You also need one cup of cherry tomatoes, cut in half. They add freshness and juiciness. Don't forget two cloves of garlic, minced. Garlic brings a strong, savory taste. Seasonings are key. Use dried oregano and smoked paprika to add depth. To bind everything together, use two tablespoons of extra virgin olive oil. It keeps the mixture moist and flavorful. Finally, salt and freshly ground black pepper are essential. They enhance all the flavors. For garnish, fresh parsley adds color and a fresh taste. It's the perfect finishing touch. Gather these ingredients, and you are ready to create a tasty meal. {{ingredient_image_2}} 1. Preheat the oven to 375°F (190°C). This warms the oven for even cooking. 2. Prepare the baking dish. Use a large dish that fits all four peppers. 3. Cut the tops off each bell pepper. Remove seeds and membranes inside. 4. Stand the peppers upright in the baking dish. This helps them stay stable while baking. 1. In a large bowl, combine the following: - 1 cup crumbled feta cheese - 1 cup cooked quinoa (make sure it’s cooled) - 1 small red onion, finely chopped - 1 cup halved cherry tomatoes - 2 cloves minced garlic 2. Add seasonings to the mixture: - 1 teaspoon dried oregano - 1 teaspoon smoked paprika - Salt and freshly ground black pepper to taste 3. Drizzle with 2 tablespoons of extra virgin olive oil. 4. Mix everything well until all ingredients are combined and coated. 1. Stuff each pepper with the feta mixture. Pack it in gently but fully. 2. Drizzle a bit more olive oil over the tops of the stuffed peppers for added flavor. 3. Cover the baking dish loosely with aluminum foil. This keeps the peppers moist. 4. Bake for 25-30 minutes. Check for fork-tender peppers. 5. Remove the foil and bake for an extra 10 minutes. This makes the tops golden and crispy. 6. Let the peppers cool for a few minutes after baking. This helps with serving. 7. Garnish with chopped parsley for a fresh touch before serving. How to choose the best bell peppers When picking bell peppers, look for firm ones. Select peppers with bright colors. Red, yellow, and green peppers all work well. Avoid any with soft spots or blemishes. These can affect taste and texture. Tips for cooking quinoa To cook quinoa perfectly, rinse it first. This removes any bitter taste. Use two cups of water for every cup of quinoa. Bring it to a boil, then reduce heat to low. Cover it and let it simmer for about 15 minutes. Once done, fluff it with a fork. Suggestions for extra seasonings You can add more spices for depth. Consider adding crushed red pepper for heat. Lemon zest can brighten up the flavors. A dash of cumin also adds warmth and earthiness. Ideas for adding textures or crunch To add crunch, sprinkle chopped nuts on top. Pine nuts or walnuts work great. You can also mix in some breadcrumbs before baking. This gives a nice crispy topping. Plating suggestions for serving Arrange the stuffed peppers upright on a large plate. A rustic wooden board adds charm. Drizzle extra olive oil around the peppers for a nice finish. Garnishing for visual appeal Sprinkle fresh parsley on top for color. You can also add thin slices of lemon. This makes the dish look bright and fresh. Pro Tips Choose Colorful Peppers: Using a mix of bell pepper colors not only enhances visual appeal but also adds a variety of flavors. Cool Quinoa Before Mixing: Ensure your cooked quinoa is cooled before combining it with other ingredients to prevent the feta from melting prematurely. Enhance Flavor with Fresh Herbs: Try adding fresh herbs like basil or mint to the stuffing for an extra layer of flavor and freshness. Experiment with Cheese: While feta is delicious, feel free to mix in other cheeses like goat cheese or mozzarella for a different taste experience. {{image_4}} You can change the flavors by swapping ingredients. Instead of quinoa, try rice or couscous. Mix in different veggies like zucchini or spinach for a fresh twist. For cheese, you can use goat cheese or mozzarella. Each option brings a new taste to your baked feta stuffed peppers. If you're gluten-free, just use quinoa or rice. Both are safe and tasty! For vegetarians, this dish is already perfect. To make it vegan, swap feta for a plant-based cheese. Cashew cheese works well, and it adds creaminess without dairy. Pair your peppers with a side salad or crusty bread. A drizzle of balsamic glaze can add a nice touch. For gatherings, arrange the peppers on a large platter. You can serve them with dips like tzatziki or hummus for extra flavor. To keep your Baked Feta Stuffed Peppers fresh, follow these tips: - Refrigeration: Place the leftovers in an airtight container. They will last up to 3 days in the fridge. Make sure they cool to room temperature before sealing. - Freezing: You can freeze the stuffed peppers. Wrap each one in plastic wrap, then place them in a freezer-safe bag. They can stay fresh for about 3 months. When it’s time to enjoy your leftovers, here’s how to reheat them properly: - Best Methods: The oven works best. Preheat it to 350°F (175°C). Place the peppers in a baking dish and cover with foil. Heat for about 20 minutes or until they are warm. - Maintain Texture: To keep the peppers tender, don’t microwave them. Microwaving can make them mushy. Always check the center to ensure it’s hot throughout. Can I make these ahead of time? Yes, you can prep the stuffed peppers ahead. Just prepare and stuff them, then cover and store in the fridge. Bake them when you're ready to eat. What can I substitute for feta cheese? You can use goat cheese or ricotta if you want a different taste. Both work well in this recipe. How long do stuffed peppers last in the refrigerator? Stuffed peppers last for about 3 to 5 days in the fridge. Just make sure you store them in an airtight container. Can I use other types of peppers or vegetables? Absolutely! You can use poblano or jalapeño peppers for a spicy kick. Zucchini or eggplant also work great as alternatives. Baked feta stuffed peppers unite fresh ingredients and simple steps. You learned how to prep the peppers, combine the stuffing, and bake them to perfection. With tips on swaps, dietary adjustments, and storage, you can make this dish your own. Feel free to experiment with flavors and presentation. Remember, it’s all about enjoying good food with family and friends. Dive in and savor every bite of this colorful dish!

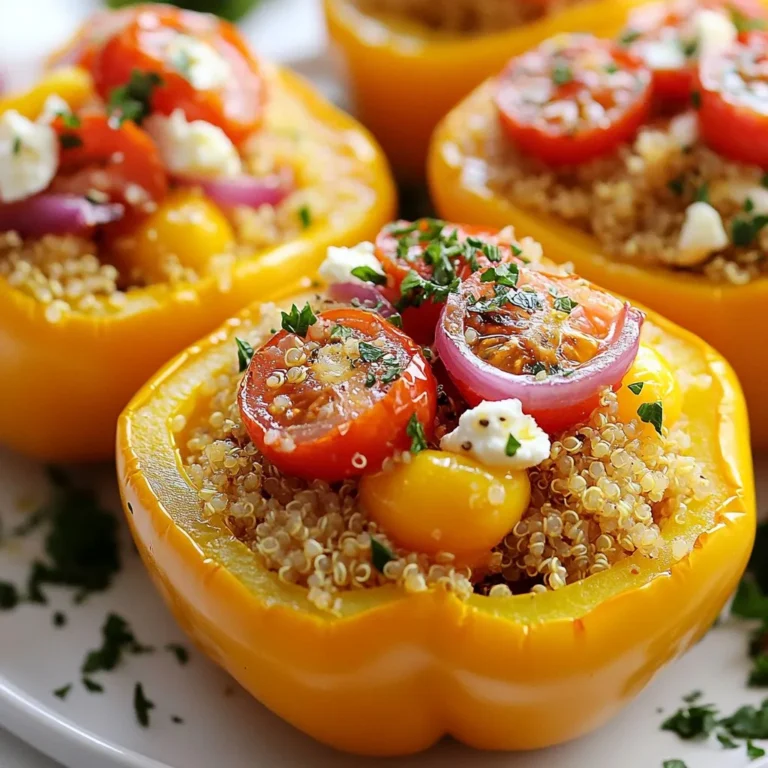
Baked Feta Stuffed Peppers Flavorful Dinner Delight

To make these delicious Raspberry Swirl Cheesecake Brownies, gather the following ingredients: - 1 cup unsalted butter (2 sticks) - 2 cups granulated sugar - 4 large eggs - 1 teaspoon pure vanilla extract - 1 cup all-purpose flour - 1 cup unsweetened cocoa powder - 1/2 teaspoon fine salt - 8 oz cream cheese, softened - 1/2 cup powdered sugar - 1/3 cup fresh raspberries (or raspberry puree) - Extra raspberries for garnish For a special touch, consider these optional garnishes: - Extra fresh raspberries on top - A light dusting of powdered sugar - Mint leaves for color You can easily swap some ingredients if needed: - Use coconut oil instead of butter for a dairy-free option. - Substitute maple syrup for granulated sugar for a healthier twist. - Replace cream cheese with silken tofu for a vegan choice. - Use almond flour instead of all-purpose flour for a gluten-free version. These adjustments help you tailor the recipe to your taste and dietary needs, making it even more enjoyable. {{ingredient_image_2}} First, set your oven to 350°F (175°C). This temperature helps the brownies bake evenly. Next, grab a 9x13 inch baking pan. Grease it lightly with butter or line it with parchment paper. This step makes it easy to lift the brownies out later. In a medium saucepan, melt 1 cup of unsalted butter over low heat. Once the butter is melted, take it off the heat. Mix in 2 cups of granulated sugar until it is smooth. Now, add 4 large eggs one at a time. Beat well after each egg. Pour in 1 teaspoon of pure vanilla extract and stir well. In another bowl, sift together 1 cup of all-purpose flour, 1 cup of unsweetened cocoa powder, and 1/2 teaspoon of fine salt. Gently fold this dry mix into your wet mix. Be careful not to overmix. This keeps your brownies soft and fudgy. In a mixing bowl, beat 8 oz of softened cream cheese until it is smooth. Gradually add 1/2 cup of powdered sugar, mixing until it is fully combined. Now, fold in 1/3 cup of fresh raspberries or raspberry puree. Swirl them gently, but don’t mix completely. You want to see those beautiful raspberry pieces. Pour two-thirds of the brownie batter into the pan. Spread it evenly using a spatula. Next, dollop the cheesecake mixture over the brownie layer. Use a butter knife or skewer to swirl the cheesecake into the brownies. This creates a lovely marbled look. Pour the rest of the brownie batter on top of the cheesecake layer. Spread it evenly as well. You can add more swirls on top if you like. Now, bake in the oven for about 30-35 minutes. The edges should set, and a toothpick should come out with a few moist crumbs. Let the brownies cool completely in the pan. If you used parchment paper, lift them out to cut into squares. Enjoy your delicious raspberry swirl cheesecake brownies! To get the best brownie texture, use fresh ingredients. This includes eggs, butter, and cocoa. Make sure your butter is at room temperature. It helps the sugar blend well. Mix the wet and dry ingredients gently. Overmixing can make them tough. For fudgy brownies, use less flour. This gives a rich, gooey center. For cake-like brownies, add a bit more flour. Swirling the cheesecake and brownie layers can be fun! Use a butter knife or skewer for this. Start at one corner and gently drag it through. Make figure-eight motions for lovely designs. Don't mix too much; you want to see the swirls. For a more vibrant look, use raspberry puree. It creates a striking contrast with the chocolate. One common mistake is baking too long. Check your brownies at 30 minutes. They should look set on the edges and soft in the middle. Another mistake is using cold cream cheese. It won’t mix smoothly. Always soften it first. Lastly, don’t skip the cooling step. Cutting them too soon can make a mess. Let them cool completely for clean squares. Pro Tips Use Room Temperature Ingredients: Ensure your cream cheese is at room temperature before mixing; this helps achieve a smooth cheesecake layer without lumps. Don’t Overmix the Batter: When combining the dry ingredients with the wet, mix just until incorporated to keep the brownies fudgy and soft. Check for Doneness: Use a toothpick to check the center; a few moist crumbs should cling to it, indicating the brownies are perfectly baked. Garnish with Fresh Raspberries: Adding fresh raspberries on top not only enhances the presentation but also boosts the flavor, making each bite a delightful experience. {{image_4}} You can change the fruit in the cheesecake layer. Try strawberries, blueberries, or blackberries. Each fruit gives a unique taste and color. If you use puree, it mixes well and makes a smooth swirl. Fresh fruit adds texture and more fun to each bite. Just mash the fruit or blend it for a smoother mix. If you need gluten-free brownies, swap out the all-purpose flour. Use a gluten-free flour blend instead. This works well and keeps the taste great. Just check that your cocoa powder is also gluten-free, as some brands may add fillers. These swaps let everyone enjoy this tasty treat without worry. For a crunch, you can add nuts like walnuts or pecans. Chop them into small pieces and fold them into the brownie batter. This gives a nice contrast to the creamy cheesecake. You can also mix in chocolate chips for extra sweetness. Dark, milk, or white chocolate chips work well. Both options make these brownies even more delicious! To keep your Raspberry Swirl Cheesecake Brownies fresh, store them in an airtight container. Place a piece of parchment paper between layers to stop sticking. You can keep them at room temperature for up to 3 days. If you want them to last longer, store them in the fridge for about a week. The chill can even enhance their rich flavor. If you want to save your brownies for later, freezing is a great option. First, let the brownies cool completely. Then, cut them into squares. Wrap each square tightly in plastic wrap. For extra protection, place the wrapped brownies in a freezer bag. They can stay frozen for up to 3 months. When you’re ready to eat, simply thaw them in the fridge overnight. When you want to enjoy your brownies warm, preheat your oven to 350°F. Place the brownies on a baking sheet. Heat them for about 10 minutes. This warms them through without drying them out. You can also microwave a brownie for about 15-20 seconds. Just be careful, as it can get hot quickly. Enjoy the gooey goodness! Yes, you can use frozen raspberries! They work well in the cheesecake swirl. Just thaw them first and drain any extra liquid. This will help keep your brownies from getting soggy. Frozen berries can have a great flavor, too! Check the edges of the brownies. They should look set and firm. Insert a toothpick into the center. If it comes out with a few moist crumbs, they are done. Don't worry if it’s not completely clean; a little gooey is good for brownies! Absolutely! You can make these brownies a day ahead. Just let them cool completely. Then, cover them and store at room temperature. They will taste great the next day. To cut brownies neatly, use a sharp knife. Run the knife under hot water for a few seconds. Wipe it dry and make your cuts. This helps the knife glide through the brownies. It gives you perfect squares every time! In this blog post, we covered how to make delicious cheesecake brownies. You learned about the key ingredients, prep steps, and baking tips. I shared ways to customize your brownies and how to store them properly. Remember, practice makes perfect. With these steps, you can create beautiful and tasty brownies that impress. Feel free to experiment with flavors and enjoy the process. Happy baking!

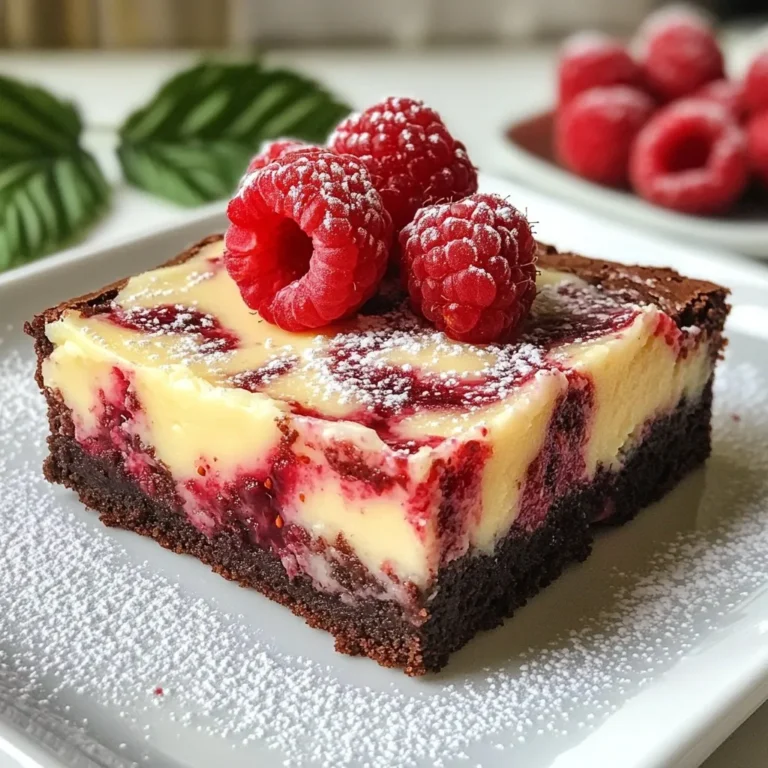
Raspberry Swirl Cheesecake Brownies Irresistible Delight

PREV 1 … 45 46 47 48 NEXT
purelyyumrecipes

explore

DessertsDinnerAppetizersDrinks

Our Policies

  • Cookie Policy
  • Copyright Policy
  • Disclaimer
  • GDPR Policy
  • Terms Of Use
Back to Top
  • About
  • Contact Us
  • Privacy Policy
© 2026 purelyyumrecipes