FREE DINNER EBOOK! Get your copy!
  • Cookie Policy
  • GDPR Policy
  • Disclaimer
  • Terms Of Use
  • Visit my other site: Fun Cookie Recipes
purelyyumrecipes
  • Home
  • Dinner
  • Desserts
  • Drinks
  • Appetizers
  • Contact
  • About
  • Privacy Policy
  • Home
  • Dinner
  • Desserts
  • Drinks
  • Appetizers
  • Contact
  • About
  • Privacy Policy
  • Cookie Policy
  • GDPR Policy
  • Disclaimer
  • Terms Of Use
Visit my other site: Fun Cookie Recipes

HOME / CATEGORIES /

Latest

To make Minute Honey Garlic Chicken Noodles, gather these key items: - 2 boneless, skinless chicken breasts, sliced thinly - 2 tablespoons honey - 3 tablespoons soy sauce - 3 cloves garlic, minced - 1 tablespoon olive oil - 200g egg noodles - 1 cup broccoli florets - 1 red bell pepper, thinly sliced - 2 green onions, chopped - Sesame seeds for garnish - Salt and pepper to taste You will need a few tools to make this dish: - Large pot for boiling noodles - Skillet or wok for cooking chicken - Mixing bowls for sauces and seasonings - Whisk for blending sauces - Cooking spoon for stirring If you need substitutes, here are some ideas: - Chicken: Use tofu or shrimp for a different protein. - Honey: Maple syrup works well for sweetness. - Soy sauce: Tamari is a gluten-free option. - Noodles: Rice noodles or zucchini noodles can replace egg noodles. - Vegetables: Feel free to use any veggies you have on hand. To start, grab a large pot and fill it with water. Set it on the stove over high heat. When the water boils, add a good amount of salt. This helps the noodles taste better. Now, toss in 200 grams of egg noodles. Cook them until they are al dente, which usually takes a few minutes. In the last two minutes, add one cup of broccoli florets. They will turn bright green and tender. After that, drain the noodles and broccoli. Set them aside for later. Next, let’s make the honey garlic sauce. In a small bowl, mix together two tablespoons of honey, three tablespoons of soy sauce, and three minced garlic cloves. Use a whisk to blend these ingredients. This sauce adds a sweet and savory touch to your dish. Now it’s time to cook the chicken. Take two boneless, skinless chicken breasts and slice them thinly. In a bowl, season the chicken with salt and pepper. Heat a large skillet or wok over medium-high heat. Add one tablespoon of olive oil to the skillet. When the oil shimmers, place the chicken slices in the pan. Sauté them for about five minutes. Flip them often until they turn golden brown and are fully cooked. Now you have perfectly cooked noodles, bright broccoli, a tasty sauce, and golden chicken ready for the next steps. To get the best noodles, use a large pot for boiling. Add plenty of salt to the water. This adds flavor. Cook the egg noodles until they are al dente. This means they should be firm, not mushy. Stir in the broccoli during the last two minutes. This keeps the broccoli bright and fresh. Drain everything well before mixing. The honey garlic sauce is simple but tasty. You can add a pinch of red pepper flakes for some heat. A splash of rice vinegar adds a nice tang. If you want a deeper flavor, try adding a bit of ginger. Fresh ginger can really brighten the dish. Don’t be shy about tasting the sauce as you go. Adjust it to your liking! If you have leftovers, let them cool down first. Store them in an airtight container. This keeps them fresh. You can keep them in the fridge for up to three days. For longer storage, freeze portions in a freezer-safe bag. When ready to eat, thaw and reheat on the stove. Add a splash of water or broth to keep them moist. {{image_4}} You can easily make this dish gluten-free. Just swap regular soy sauce for tamari. Tamari is a great option that has the same taste. It works well with the honey and garlic flavors. You can also use gluten-free noodles. Look for rice noodles or other gluten-free brands. They cook quickly and hold up well in this dish. Adding vegetables boosts the nutrition of this meal. You can toss in more fresh veggies like carrots, snap peas, or bell peppers. They add color and crunch. Try using mushrooms for a savory taste. You can even add leafy greens like spinach or kale. Just stir them in during the last few minutes of cooking. This way, they stay bright and fresh. If you want to change the protein, you have options. Tofu is a great choice for a plant-based meal. Use firm tofu and cook it the same way as chicken. Shrimp is another quick option that cooks fast. You can also use beef or pork, thinly sliced. Each protein will bring a different flavor to the dish. Adjust the cooking time as needed to keep everything tender and juicy. To keep your Minute Honey Garlic Chicken Noodles fresh, place them in an airtight container. Make sure to cool them down first. Store the container in the fridge. They will last for up to three days. When you're ready to enjoy leftovers, reheat them on the stove. Add a splash of water or broth to keep them moist. Heat on medium until warm, stirring often. You can also use the microwave. Cover the dish and heat for about two minutes, stirring halfway through. If you want to save some for later, freezing is an option. Place the noodles and chicken in a freezer-safe container. Make sure to leave some space for expansion. They will stay good for up to three months. To reheat, let them thaw in the fridge overnight, then follow the reheating instructions above. You can store Minute Honey Garlic Chicken Noodles in the fridge for up to three days. Ensure you place them in an airtight container. This keeps the flavors fresh and prevents odors from mixing. Before serving, check for any signs of spoilage. Yes, you can prepare Minute Honey Garlic Chicken Noodles in advance. Cook the chicken and sauce ahead of time, then store them separately from the noodles and veggies. When you are ready to eat, just reheat and combine everything. This saves time on busy weeknights. You can serve Minute Honey Garlic Chicken Noodles with a side of steamed vegetables. A light salad also pairs well. If you want something heartier, consider garlic bread or fried rice. These options enhance your meal and add variety. In this blog post, we explored how to make Minute Honey Garlic Chicken Noodles. We covered the ingredients, tools, and step-by-step instructions. I shared tips for cooking noodles and making a tasty garlic sauce. You also learned about flavor boosts and storage options. This dish is easy to make and fun to customize. Try different protein sources or veggies to fit your taste. Enjoy your cooking journey with the tasty noodles!

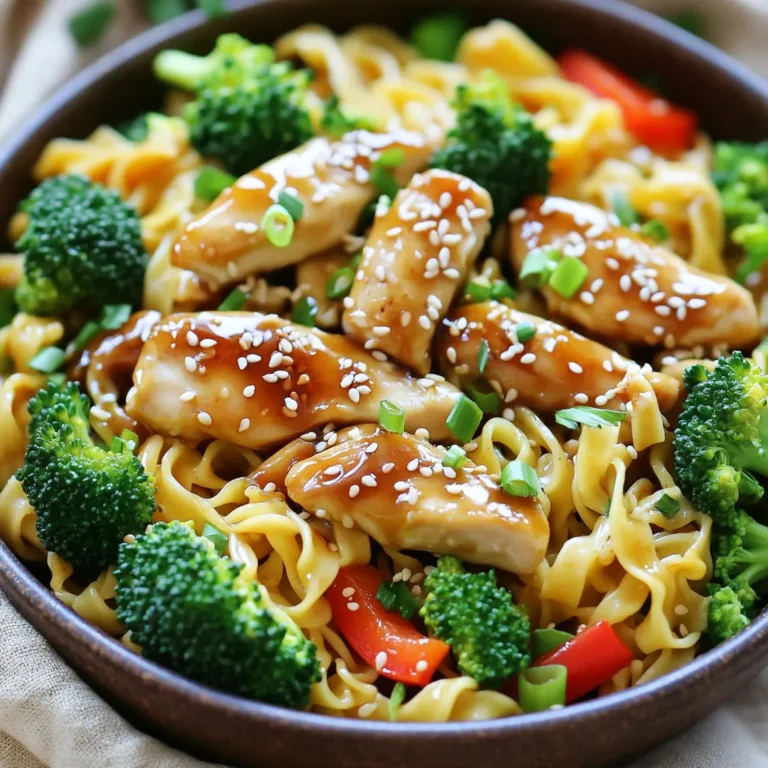
Minute Honey Garlic Chicken Noodles Tasty Weeknight Meal

- 2 cups all-purpose flour - 1 teaspoon baking powder - 1 teaspoon ground cinnamon - 1/2 teaspoon ground nutmeg - 1/2 teaspoon ground ginger - 1/4 teaspoon ground cloves - 1/2 teaspoon salt - 1/2 cup unsalted butter - 3/4 cup packed brown sugar - 2 large eggs - 1 teaspoon vanilla extract - 1/2 cup canned pumpkin puree - 1 cup white chocolate chips - 1/2 cup chopped pecans or walnuts (optional) Gathering the right ingredients is key for great pumpkin spice biscotti. Each item plays a part in the flavor and texture. Start with the flour, which forms the base. The baking powder helps the biscotti rise. Spices like cinnamon, nutmeg, ginger, and cloves create that cozy pumpkin spice flavor. Salt balances the sweetness of the brown sugar. The unsalted butter adds richness and softness. Eggs help bind everything together. Vanilla extract enhances the flavors. The pumpkin puree adds moisture and a lovely pumpkin taste. White chocolate chips give you a sweet finish. If you want a nutty crunch, add pecans or walnuts. Make sure all your ingredients are fresh for the best result. This mix of flavors will make your kitchen smell amazing while baking. Start by setting your oven to 350°F (175°C). This helps it heat up properly. Next, grab a baking sheet and line it with parchment paper. This step stops the biscotti from sticking. In a medium bowl, mix two cups of flour, one teaspoon of baking powder, and spices. Add one teaspoon of ground cinnamon, half a teaspoon of nutmeg, half a teaspoon of ginger, and a quarter teaspoon of cloves. Finally, add half a teaspoon of salt. Whisk these well and set them aside. Now, take a large mixing bowl. Cream half a cup of softened butter and three-quarters of a cup of brown sugar. Use an electric mixer on medium speed for about two to three minutes. You want this mixture to be light and fluffy. Add two large eggs to the butter and sugar mix. Add them one at a time, mixing well after each. Next, pour in one teaspoon of vanilla extract and half a cup of canned pumpkin puree. Mix until everything is just combined. Gradually add your dry mix to the wet mixture. Use low speed on your mixer to combine them. Be careful not to overmix. This keeps the texture just right for your biscotti. Transfer the dough onto your lined baking sheet. Shape it into a log about 12 inches long and 4 inches wide. Flatten the top slightly. Place the baking sheet in your preheated oven and bake for 25 to 30 minutes. The log should be golden brown and firm to the touch. After baking, let the log cool on the sheet for about 10 minutes. Use a serrated knife to slice it diagonally into half-inch thick pieces. Place the slices cut-side down back on the baking sheet. Bake these for another 10 to 15 minutes. The edges should be crisp and the biscotti golden. Let them cool completely on a wire rack before you enjoy them. To get the right texture, follow a few simple steps. First, do not overmix the dough. Mix the wet and dry ingredients until just combined. This keeps your biscotti light and crunchy. Second, shape your log evenly. A uniform log ensures even baking. Lastly, slice the biscotti when the log is warm, not hot. This helps you get clean edges. For smooth melted white chocolate, use low heat. You can melt it in a microwave or on a stovetop with a double boiler. If using a microwave, heat in short bursts. Stir after each burst to prevent burning. If using a double boiler, keep the water at a gentle simmer. Stir the chocolate until it is fully smooth. Presentation makes a big difference. Place the biscotti in a nice jar for a warm look. A rustic wooden board also works well. You may drizzle melted white chocolate over the biscotti for a sweet touch. Serve them alongside a warm drink like coffee or spiced tea. This adds to the cozy experience. Biscotti pairs well with many drinks. Try them with rich coffee for a perfect match. Herbal teas, like chamomile, can also complement their flavors. Hot chocolate is a fun option too. The sweetness of the chocolate enhances the spices in the biscotti. Enjoy experimenting with different pairings! {{image_4}} You can switch up the nuts in your biscotti. Pecans and walnuts are great, but you can try almonds or hazelnuts too. Each nut brings a different taste and crunch. Just chop them roughly and mix them in with the white chocolate chips. If you prefer dark chocolate, go for it! Dark chocolate adds a rich and bold flavor. Use the same amount as the white chocolate chips. The bitterness of dark chocolate pairs well with the sweet pumpkin spice. You’ll get a new twist on this classic treat. Feel free to get creative with flavors! Add a splash of maple syrup for extra sweetness. You can also mix in dried fruits like cranberries or cherries. If you want a spicy kick, try adding a pinch of cayenne pepper or chili powder. Each change can make your biscotti unique and fun! To keep your pumpkin spice biscotti fresh, store them in an airtight container. This will help retain their crisp texture. Place parchment paper between layers if stacking. Keep the container in a cool, dry place. Avoid storing them in the fridge; this can make them soggy. You can freeze biscotti for longer storage. First, let them cool completely. Then, wrap each piece in plastic wrap. Place the wrapped biscotti in a freezer-safe bag. Squeeze out as much air as possible. They can last up to three months in the freezer. To enjoy, thaw at room temperature or bake briefly at 350°F to crisp them up again. When stored properly, these biscotti last about two weeks at room temperature. If frozen, they remain fresh for three months. After that, their taste and texture may decline. Always check for any signs of spoilage before eating. This way, you can enjoy every bite of your pumpkin spice biscotti. Yes, you can use fresh pumpkin. Just cook and puree the pumpkin until smooth. Make sure it has the same consistency as canned pumpkin. Fresh pumpkin adds a nice flavor and is fun to use. If your biscotti is too hard, it may have baked too long. Try to bake it for less time next time. You can also dip the biscotti in coffee or tea to soften them up a bit. This adds flavor too! To soften biscotti the next day, place them in a sealed container with a slice of bread. The moisture from the bread helps soften the biscotti. Let them sit for a few hours, and they should be better. Yes, you can make gluten-free biscotti! Use a gluten-free flour blend instead of all-purpose flour. Ensure that all other ingredients are also gluten-free. They will taste just as good with a little testing. To melt white chocolate, use a double boiler or the microwave. If using the microwave, heat in short bursts of 30 seconds. Stir in between until smooth. Be careful not to overheat it, as it can burn easily. In this blog post, we covered how to make delicious pumpkin biscotti. We explored the key ingredients, step-by-step baking instructions, and some helpful tips. Remember the perfect biscotti needs the right mixing and baking methods. Feel free to get creative with nuts or chocolate types. Proper storage will keep your treats fresh. Enjoy each bite of your unique biscotti! Now, gather your ingredients and start baking your way to a tasty treat.

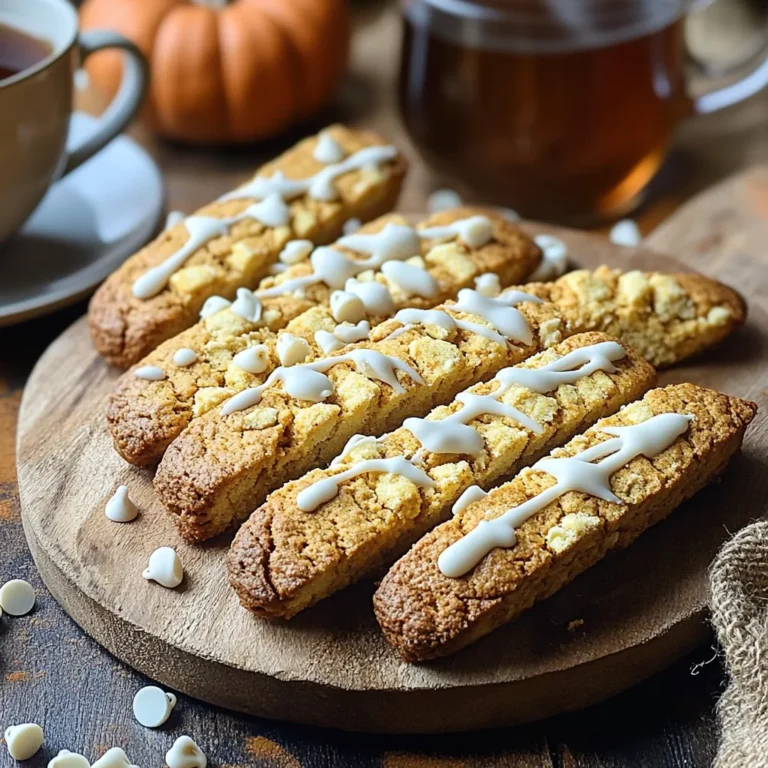
Pumpkin Spice Biscotti with White Chocolate Delight

- 2 cups all-purpose flour - 1 cup granulated sugar - 1/2 cup unsalted butter, softened - 1 cup buttermilk, at room temperature - 2 large eggs, at room temperature - 1 tablespoon baking powder - 1 teaspoon pure vanilla extract - 1/2 teaspoon baking soda - 1/4 teaspoon fine sea salt - 1 cup semi-sweet chocolate chips These key ingredients make up a rich and moist chocolate chip coffee cake. The butter gives it a lovely texture, while the buttermilk adds a slight tang. The chocolate chips are, of course, the star of the show! - 1/2 cup brown sugar (for the topping) - 1 tablespoon ground cinnamon (for the topping) - 1/2 cup chopped walnuts (optional) Using brown sugar adds depth to the cake’s sweetness. Cinnamon brings warmth to the flavor. Chopped walnuts can add a nice crunch, making each bite exciting. If you don’t have buttermilk, you can use regular milk mixed with a splash of vinegar or lemon juice. For a dairy-free version, try almond or oat milk with a similar acid. You can also swap all-purpose flour for a gluten-free blend if needed. Want less sugar? Reduce the granulated sugar by a third without losing much taste. 1. Preheat your oven to 350°F (175°C). 2. Grease and flour a 9x13-inch baking pan well. This step helps the cake not stick. 3. Gather all your ingredients. It makes the process smoother and quicker. 1. In a large bowl, cream the softened butter and granulated sugar. Use an electric mixer on medium speed for about 3-4 minutes. The mix should be light and fluffy. 2. Add the eggs, one at a time. Beat well after each egg to mix properly. Then, stir in the vanilla extract for flavor. 3. In another bowl, whisk the flour, baking powder, baking soda, and salt. Mix them well to ensure even baking. 4. Gradually add the flour mix to the wet mix, alternating with buttermilk. Start and end with the flour. Mix gently; stop as soon as it combines. 5. Fold in the chocolate chips carefully. Use a spatula to keep the batter light and airy. 1. Pour half the batter into your prepared pan. Spread it evenly using a spatula. 2. Sprinkle half of the brown sugar-cinnamon mix over the batter. This layer adds sweetness. 3. Spread the rest of the batter on top. Then, sprinkle the last of the topping mixture evenly. 4. Bake in the preheated oven for 30-35 minutes. Check with a toothpick; it should come out clean with some moist crumbs. 5. Let the cake cool in the pan for about 10 minutes. Then, transfer it to a wire rack to cool completely before cutting. To make your cake soft and fluffy, use room temperature ingredients. This helps the butter and sugar mix better. Cream the butter and sugar until it is light and fluffy. This should take about 3-4 minutes. When adding flour and buttermilk, mix gently. This keeps the cake tender. Overmixing can lead to a tough texture. One common mistake is not measuring ingredients correctly. Always use a scale or measuring cups for accuracy. Another mistake is opening the oven door too often. This lets heat escape, which can affect baking time. Also, ensure your oven is preheated. A cold oven can make your cake dense. Lastly, check for doneness using a toothpick. It should come out clean or with a few moist crumbs. To boost the flavor, try adding a splash of almond extract. It pairs well with chocolate. You can also mix in a little orange zest for a fresh twist. For added crunch, include chopped walnuts in the batter. Finally, serve the cake warm with a sprinkle of powdered sugar on top. This adds a nice touch to your presentation. {{image_4}} You can easily make this coffee cake nut-free. Simply skip the walnuts in the topping. This keeps the cake safe for those with nut allergies. If you want more texture, consider adding oats instead. This gives a nice chew without nuts. Chocolate chip coffee cake is great with various chocolate types. You can swap semi-sweet chocolate chips for milk chocolate for a sweeter taste. Dark chocolate adds a rich flavor if you prefer something less sweet. For a fun twist, try white chocolate chips for a creamy touch. Toppings can change your cake’s flavor. Instead of the brown sugar and cinnamon mix, try a layer of fruit. Sliced strawberries or peaches can add a fresh taste. You can also sprinkle shredded coconut for a tropical vibe. Crushed cookies or granola can offer a fun crunch. After baking, let your cake cool completely. Wrap it tightly in plastic wrap. You can also use aluminum foil. This keeps the cake fresh. Store it at room temperature if you eat it in a few days. For longer storage, move it to the fridge. The cool air helps keep it from going bad. If you want to keep your cake for a while, freezing is great. Cut the cake into slices. Wrap each slice in plastic wrap. Then, place them in a freezer-safe bag. Be sure to remove as much air as possible. You can freeze the cake for up to three months. When you're ready to eat it, just thaw it in the fridge overnight. To reheat your chocolate chip coffee cake, preheat your oven to 350°F (175°C). Place a slice on a baking sheet. Heat it for about 10-15 minutes. This warms it up nicely without drying it out. You can also use a microwave. Heat it for 15-30 seconds, but check it often. Enjoy your warm slice with a fresh cup of coffee! Yes, you can make this cake dairy-free. Use plant-based butter instead of unsalted butter. For the buttermilk, mix almond milk or soy milk with a bit of vinegar. This creates a great substitute. Chocolate chip coffee cake stays fresh for about 3 days at room temperature. Store it in an airtight container to keep it moist. You can also refrigerate it for up to a week. Just remember to let it warm up before serving. I love serving this cake warm. It tastes great with a dusting of powdered sugar. You can pair it with coffee or tea for breakfast or dessert. For a fun twist, add whipped cream or a scoop of ice cream on the side! You learned about the key ingredients and steps for making chocolate chip coffee cake. We explored tips to perfect texture and avoid mistakes. You discovered ways to modify the recipe, like making it nut-free or using different chocolate types. Plus, we covered storage methods to keep your cake fresh. Baking is a fun journey filled with flavors. Keep experimenting, and enjoy every bite!

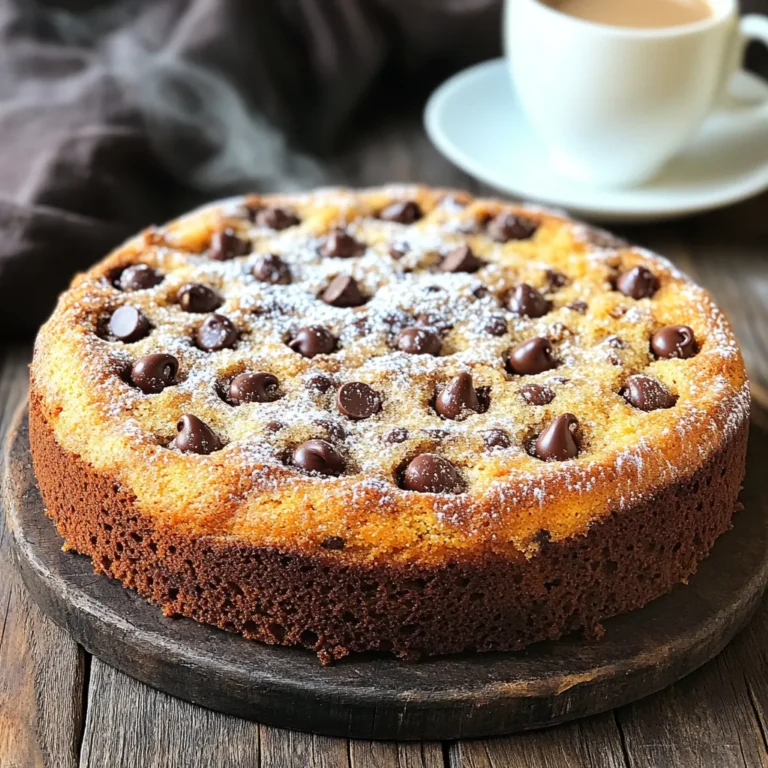
Chocolate Chip Coffee Cake Delightful and Easy Recipe

- 1 ½ cups graham cracker crumbs - ½ cup unsalted butter, melted - ¼ cup packed brown sugar - 1 teaspoon ground cinnamon - 16 oz cream cheese, softened to room temperature - ¾ cup granulated sugar - 2 large eggs, at room temperature - 1 teaspoon pure vanilla extract - 1 cup sour cream - 2 medium apples, peeled, cored, and diced - 2 tablespoons fresh lemon juice - ½ teaspoon ground cinnamon - ¼ cup packed brown sugar - ½ cup caramel sauce - ½ cup pecans, chopped For the crust, combine graham cracker crumbs, melted butter, brown sugar, and cinnamon. This mix gives a sweet and crunchy base. The cheesecake layer needs cream cheese, sugar, eggs, vanilla, and sour cream. This makes it rich and creamy. Next, prepare the apple topping with diced apples, lemon juice, cinnamon, and brown sugar. This adds a tasty, fresh layer. Lastly, grab caramel sauce and chopped pecans for the top. These make the bars extra special and crunchy! When you gather these ingredients, you set the stage for a treat everyone will love. - Preheat your oven to 350°F (175°C). This step is key for a good crust. - In a bowl, mix 1 ½ cups of graham cracker crumbs, ½ cup of melted butter, ¼ cup of brown sugar, and 1 teaspoon of ground cinnamon. Stir until it looks like wet sand. - Press this mixture firmly into the bottom of a greased 9x13 inch baking dish. - Bake for 10 minutes. Let it cool completely before adding the cheesecake layer. - In a large bowl, beat 16 ounces of softened cream cheese with ¾ cup of sugar. Use an electric mixer on medium speed for 2-3 minutes until smooth. - Add 2 eggs, one at a time. Mix well after each. Then stir in 1 teaspoon of vanilla extract and 1 cup of sour cream until smooth. - In a separate bowl, toss 2 diced apples with 2 tablespoons of lemon juice, ½ teaspoon of cinnamon, and ¼ cup of brown sugar. This helps the apples stay fresh and tasty. - Pour the cheesecake batter over the cooled crust. Use a spatula to spread it evenly. - Distribute the apple topping over the cheesecake layer. Press down gently to help the apples stick. - Drizzle ½ cup of caramel sauce over the top and sprinkle ½ cup of chopped pecans for texture. - Place the assembled bars in the oven and bake for 30-35 minutes. The center should have a slight jiggle, and the edges should look golden. - After baking, let the bars cool to room temperature. - Refrigerate for at least 4 hours, or overnight. This helps the flavors blend and the cheesecake set. - Cut into squares and serve. You can drizzle more caramel on top if you want extra sweetness. - To get a smooth cheesecake texture, start with softened cream cheese. Cold cream cheese will create lumps. - When adding eggs, mix just until blended. Overmixing can make the bars dense. - Soften cream cheese by leaving it out for 30 minutes. This helps it blend easily. - Choose a mix of tart and sweet apples. This adds depth to the flavor. - For a beautiful finish, drizzle extra caramel sauce on top right before serving. - Cut the bars into even squares for a neat look. Serve on a colorful plate for fun. {{image_4}} You can change the taste of your caramel apple pecan cheesecake bars. Try adding spices like nutmeg or allspice to the cheesecake layer. These spices bring warmth and depth to the flavor. If you want a nutty twist, swap pecans for walnuts or almonds. Each nut adds its unique taste and crunch. If you need a gluten-free option, use gluten-free graham cracker crumbs for the crust. This simple swap ensures everyone can enjoy the bars. For a vegan cheesecake, use plant-based cream cheese and substitute the eggs with flaxseed meal or applesauce. The bars will still taste great while meeting dietary needs. You can change up the fruit in the apple topping. Try using pears or cranberries for a different flavor. These fruits bring their own sweetness and tartness to the bars. You can also add holiday-inspired spices like cloves or ginger. This twist makes the bars perfect for festive gatherings. To keep your Caramel Apple Pecan Cheesecake Bars fresh, store them in the fridge. Use an airtight container to prevent them from drying out. You can also wrap the bars tightly in plastic wrap before placing them in the container. This helps keep the flavors intact and avoids any mixing with other fridge odors. If you want to save some bars for later, freezing is a great option. First, cut the bars into squares. Then, wrap each square in plastic wrap. Place the wrapped bars in a freezer-safe bag or container. Make sure to label it with the date. When you're ready to enjoy them, thaw the bars in the fridge overnight. This helps them retain their creamy texture. In the fridge, these bars last about five to seven days. You’ll know they are spoiling if you see mold or if they smell off. If the texture becomes grainy or watery, it’s best to toss them out. Always check before serving. Enjoy these delicious treats while they are fresh! You can tell when the bars are done by looking at the edges. They should be lightly golden. The center will have a slight jiggle. It is normal for it to wiggle a bit. This means it will set as it cools. Yes! These bars are perfect for making ahead. You can prepare them a day or two before serving. Just keep them in the fridge. This helps the flavors blend well and makes serving easier. To cut the bars neatly, use a sharp knife. Dip the knife in hot water, then wipe it dry. This helps the knife slide through smoothly. Cut the bars while they are cold from the fridge. This keeps the edges clean and neat. You can use flavored cream cheese, but it will change the taste. I recommend plain cream cheese for the best results. This allows the apple and caramel flavors to shine through. To make homemade caramel, you need sugar, butter, and cream. Start by melting sugar in a pan over low heat. Once melted, add butter and stir until smooth. Then, add cream slowly and mix well. Let it cool before drizzling over your bars. To sum up, we covered how to make delicious cheesecake bars. You learned about the crust, filling, apple topping, and caramel sauce. I shared step-by-step instructions to create perfect bars. Tips and tricks for success were also included. Experiment with flavors and dietary needs for fun twists. Remember to store them properly for freshness. Enjoy creating and sharing these tasty bars, perfect for any occasion!

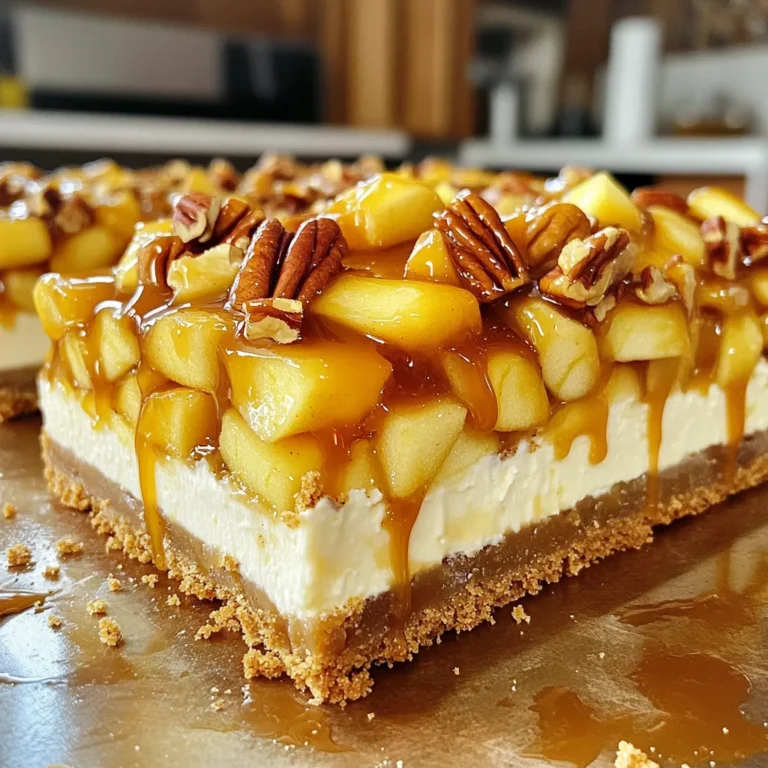
Caramel Apple Pecan Cheesecake Bars Delightful Treat

- 1 ½ cups graham cracker crumbs - ⅓ cup unsalted butter, melted - 1 cup chopped pecans - 1 cup softened cream cheese - 1 cup sour cream - ¾ cup granulated sugar - 3 large eggs, at room temperature - 1 teaspoon vanilla extract - 1 cup caramel sauce (store-bought or homemade) - 1 tablespoon all-purpose flour - A pinch of salt - Extra pecans and caramel sauce for garnish Gather these ingredients before you start. Each one plays a key role in making this dessert rich and creamy. The graham cracker crumbs form the crust that holds everything together. The melted butter binds them, giving the crust a nice texture. Chopped pecans add a delightful crunch. Next, you’ll need the cream cheese and sour cream for that creamy filling. Granulated sugar sweetens the mix, while eggs help set the cheesecake. Vanilla extract adds flavor, and a little flour helps keep it stable. Finally, the caramel sauce swirls through the cheesecake, making it extra special. Don’t forget the extra pecans and caramel for garnish; they make a beautiful finish. This blend of flavors and textures creates a truly memorable dessert. Enjoy gathering these ingredients and get ready for a delightful baking experience! - Set temperature to 325°F (160°C). - Combine 1 ½ cups graham cracker crumbs, ⅓ cup melted unsalted butter, and a pinch of salt in a bowl. - Press this mixture firmly into the bottom of a 9-inch springform pan. - Add 1 cup of chopped pecans evenly over the pressed crust. - In a large bowl, beat 1 cup of softened cream cheese and ¾ cup of granulated sugar until creamy. - Mix in 1 cup of sour cream until well blended. - Add 3 large eggs one at a time, mixing well after each addition. - Pour in 1 teaspoon of vanilla extract and sprinkle 1 tablespoon of all-purpose flour; mix until smooth. - Gently fold in 1 cup of caramel sauce with a spatula to create pretty swirls. - Pour the cheesecake filling over the crust and pecans. - Bake for 55-60 minutes until the edges are set, but the center jiggles slightly. - Let the cheesecake cool at room temperature for about 1 hour. - Cover it and refrigerate for at least 4 hours for the best flavor. - Carefully remove the sides of the springform pan. - Garnish with extra caramel sauce and pecans before serving. Using room temperature ingredients is key. Softened cream cheese blends better. It helps achieve a smooth filling with no lumps. It is crucial to avoid overmixing. Overmixing can whip in too much air. This can lead to cracks during baking. A water bath can help your cheesecake stay creamy. It adds moisture and prevents cracks. Monitor the cheesecake closely for doneness. The edges should be set, but the center needs a slight jiggle. This means it's baked just right. When slicing, use a sharp knife. Clean the knife between cuts for neat edges. For an added touch, drizzle extra caramel sauce over each slice. Sprinkle some chopped pecans on top. This makes each piece look beautiful and appetizing. {{image_4}} You can mix things up with flavors. Adding chocolate gives a rich twist. Just fold in melted chocolate with the caramel. You will love the combination of chocolate and caramel. Another fun idea is to add seasonal spices. Pumpkin spice or nutmeg adds warmth to the cheesecake. These spices work well, especially in the fall. If you want a new crust, try using Oreo cookies. Crush them up and mix with melted butter. This gives a sweet and chocolatey base. You can also make a gluten-free crust. Use almond flour or gluten-free cookie crumbs instead of graham crackers. This way, everyone can enjoy your cheesecake. Toppings can make your cheesecake even better. Fresh fruit like berries or bananas adds color and taste. You might also like whipped cream. A drizzle of chocolate sauce on top makes it look fancy. Mix and match these toppings to impress your guests. To keep your caramel pecan pie cheesecake fresh, refrigerate it right away. Use an airtight container or cover it well with plastic wrap. This helps keep its creamy texture and prevents it from drying out. If you want to store it for a longer time, freezing is a great option. Wrap the cheesecake tightly in plastic wrap and then in foil. This ensures it stays fresh and avoids freezer burn. In the fridge, your cheesecake will last about five days. Just make sure it stays covered. If you freeze it, it can last for up to three months. When you’re ready to enjoy it, move it to the fridge to thaw overnight. This keeps the texture smooth and creamy. After thawing, eat it within three days for the best flavor. Yes, you can use low-fat cream cheese. It may change the taste and texture. The cheesecake might be less rich and creamy. You may not get that same smoothness. If you try it, keep other ingredients the same for best results. To avoid cracks, use room temperature ingredients. Mix gently and don’t overbeat the eggs. Bake at a low temperature. A water bath can help keep moisture in. Monitor the baking time closely. Let the cheesecake cool slowly in the oven. If you don’t have pecans, use walnuts or almonds. Both add different flavors. You can also skip nuts for a smoother texture. Try adding chocolate chips for a sweet twist. Just remember to adjust the amount based on your taste. Absolutely! Making it a day ahead helps flavors blend. Chill it overnight in the fridge. This makes slicing easier too. Just remember to cover it well. Enjoy the rich taste the next day! This blog post covers a delicious cheesecake recipe, from ingredients to tips for perfecting it. Using simple steps, you can create the ideal balance of creamy and sweet flavors. Remember to use room temperature ingredients to avoid lumps, and try different toppings to make it your own. Store it properly for the best taste. Enjoy baking and sharing this treat! It’s a chance to impress friends and family with your skills. Happy cheesecake making!

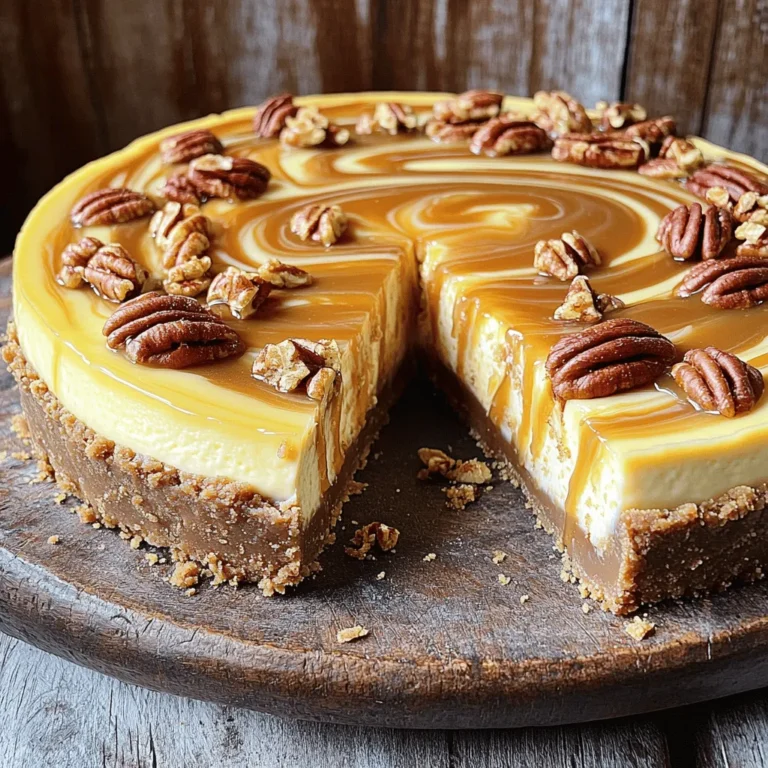
Caramel Pecan Pie Cheesecake Rich and Creamy Delight

To make the blueberry streusel loaf, gather these main ingredients: - 2 cups all-purpose flour - 1 teaspoon baking powder - 1/2 teaspoon baking soda - 1/2 teaspoon salt - 1/2 cup unsalted butter, softened - 1 cup granulated sugar - 2 large eggs - 1 teaspoon vanilla extract - 1 cup buttermilk - 1 cup fresh blueberries These ingredients work together to create a moist and fluffy loaf. The blueberries add a burst of flavor and color. You can swap fresh blueberries for frozen ones if needed. Just remember to thaw them first. For the delicious streusel topping, you will need: - 1/2 cup all-purpose flour - 1/4 cup packed brown sugar - 1/2 teaspoon ground cinnamon - 1/4 cup cold unsalted butter, cubed The streusel adds a crunchy texture and sweet contrast to the soft loaf. Mixing the cold butter with flour and sugar creates the perfect crumbly topping. When picking blueberries, look for these signs of freshness: - Color: Choose deep blue berries. Avoid those with red or green spots. - Firmness: Berries should feel firm when you press them. - Size: Larger blueberries are often sweeter, but size can vary. Fresh blueberries should smell sweet and fruity. If you can, buy them from local farms or markets for the best flavor. Store them in the fridge and wash them just before use to keep them fresh. First, set your oven to 350°F (175°C). Grab a 9x5-inch loaf pan. You can grease it with butter or line it with parchment paper. This makes it easy to remove the loaf later. In a small bowl, mix together 1/2 cup of flour, 1/4 cup packed brown sugar, and 1/2 teaspoon cinnamon. Add 1/4 cup of cold cubed butter. Use your fingers or a pastry cutter to mix until it looks like coarse crumbs. Set this aside for now. In a large bowl, whisk together the remaining flour, 1 teaspoon baking powder, 1/2 teaspoon baking soda, and 1/2 teaspoon salt. This is your dry mix. In another bowl, cream 1/2 cup softened butter with 1 cup granulated sugar using an electric mixer for 3-4 minutes. It should be light and fluffy. Add 2 large eggs one at a time, mixing well after each one. Stir in 1 teaspoon vanilla extract. Now, gently fold the dry mix into the creamed butter mixture, alternating with 1 cup of buttermilk. Start and end with the dry mix. Be careful not to overmix. Finally, fold in 1 cup of blueberries, taking care not to crush them. Pour the batter into the loaf pan. Smooth the top and sprinkle the streusel topping evenly over it. Bake in the oven for 55-65 minutes. To check if it's done, insert a toothpick in the center; it should come out clean. If the top browns too quickly, cover it with aluminum foil for the last 15 minutes. Once baked, let the loaf cool in the pan for 10 minutes. Then, transfer it to a wire rack to cool completely. To get a soft, fluffy loaf, use room temperature ingredients. This means butter, eggs, and buttermilk should all be at room temp. When mixing, cream the butter and sugar well. This step adds air, making the loaf light. Avoid overmixing when adding flour. Gentle folding keeps the texture nice. Many bakers forget to preheat the oven. This can lead to uneven baking. Always check your oven's temperature with a thermometer. Another mistake is skipping the cooling time. Letting the loaf cool in the pan helps it set. Finally, don’t open the oven door too often. This lets heat escape and can affect the rise. Here are some tools that make baking easier: - 9x5-inch loaf pan - Mixing bowls - Electric mixer - Rubber spatula - Measuring cups and spoons - Cooling rack - Parchment paper for easy removal Using these tools can help you bake with confidence. Happy baking! {{image_4}} You can easily adjust this recipe for dietary needs. For a gluten-free option, swap all-purpose flour with a gluten-free blend. Use almond milk or oat milk instead of buttermilk for a dairy-free loaf. If you need a lower sugar option, try using a sugar substitute. You can also cut the sugar in half, and it will still taste great! Feel free to add other fruits or nuts to the loaf. Chopped strawberries or raspberries work well in place of blueberries. You can mix in chopped nuts like walnuts or pecans for added crunch. Just keep in mind that adding too much may change the texture of the loaf. A half-cup of nuts or other fruits is a safe choice. Enhancing the flavor can elevate this dish. Adding citrus zest brightens the taste. Use lemon or orange zest for a fresh twist. A teaspoon will do the trick! You can also add a pinch of nutmeg for extra warmth. If you love spices, consider adding a dash of cardamom for a unique flavor profile. To keep your blueberry streusel loaf fresh, store it in an airtight container. This will help it stay moist and flavorful. If you plan to eat it within a few days, you can leave it at room temperature. Just make sure it is cool before sealing it up. Freezing is a great option if you want to save some loaf for later. Wrap the loaf tightly in plastic wrap, then place it in a freezer-safe bag. This helps prevent freezer burn. It can last up to three months in the freezer. When you're ready to enjoy it, let it thaw in the fridge overnight. To reheat the loaf, slice it into pieces for easier warming. Place slices on a plate and cover them with a paper towel. Heat them in the microwave for about 15 to 30 seconds. If you prefer a crispy crust, pop the slices in a toaster oven for a few minutes. Enjoy warm for the best taste! Yes, you can use frozen blueberries! Just make sure to add them straight from the freezer. Do not thaw them first. This helps keep the batter from turning blue. Frozen berries may release more juice, but they will still taste great! Check the loaf with a toothpick. Insert it in the center of the loaf. If it comes out clean or with a few crumbs, your loaf is ready. If it has wet batter on it, bake a bit longer. If the top is browning too fast, cover it with foil. This loaf pairs well with many things. You can serve it with a cup of tea or coffee. A dollop of whipped cream or a scoop of vanilla ice cream makes it a sweet treat. Fresh fruit or yogurt also complements the loaf nicely. You can keep the loaf at room temperature for up to three days. Wrap it in plastic wrap to keep it fresh. If you want to store it longer, consider freezing it. This keeps it tasty for up to three months. You now know how to make a delicious Blueberry Streusel Loaf. We covered key ingredients and tips for picking fresh blueberries. I shared a clear step-by-step guide for mixing and baking. Plus, I gave you tricks to avoid common baking mistakes. Remember, you can make this recipe your own. Use different fruits or add nuts for a twist. Store your loaf properly to keep it fresh. Enjoy baking and sharing this tasty treat!

Bakery Style Blueberry Streusel Loaf Delightfully Easy

- 1 cup canned chickpeas, drained and rinsed - 1 small onion, roughly chopped - 2 cloves garlic, minced - 1/4 cup fresh parsley, finely chopped - 1/4 cup fresh cilantro, finely chopped - 1 teaspoon ground cumin - 1 teaspoon ground coriander - 1/2 teaspoon baking powder - 2 tablespoons all-purpose flour (or chickpea flour for a gluten-free option) - Salt and pepper to taste - Olive oil spray - 4 pita breads - 1 cup diced tomatoes - 1 cup shredded lettuce - 1/2 cup tahini sauce (or yogurt sauce) for drizzling I love using chickpeas for falafel. They are rich in protein and fiber. You can use canned ones for ease. Just drain and rinse them well. A small onion adds sweetness and depth. Garlic gives a punch that I find essential in this dish. Fresh herbs like parsley and cilantro add brightness. I usually chop them finely for better flavor distribution. Cumin and coriander are my go-to spices. They bring warmth and earthiness to the falafel. Baking powder helps them puff up, making them light and crispy. For the binder, I use flour. You can opt for chickpea flour if you want a gluten-free dish. Add salt and pepper to taste; they enhance all the flavors. To finish, you need a light spray of olive oil. It helps achieve that golden, crispy crust in the air fryer without excess fat. Don't forget the pita bread! It holds everything together. I like to fill mine with fresh diced tomatoes and shredded lettuce. Finally, drizzle with tahini or yogurt sauce for creaminess. To start, gather your ingredients. You will need canned chickpeas, onion, garlic, fresh herbs, spices, baking powder, and flour. Next, add the drained chickpeas, chopped onion, minced garlic, parsley, cilantro, cumin, coriander, baking powder, and flour into a food processor. - Pulse the mixture until it is coarse and holds together. - Avoid making it too smooth; you want texture. Now, it's time to shape the falafel. Transfer your falafel mixture into a bowl. With clean hands, form small balls the size of golf balls. You should get around 12 to 15 balls. Before cooking, prep your air fryer. Preheat it to 375°F (190°C). Generously spray the air fryer basket with olive oil. This step helps keep the falafel from sticking. Now comes the fun part: cooking! Place the falafel balls in the air fryer basket. Make sure they are in a single layer and do not touch each other. This helps them cook evenly. Lightly spray the tops with more olive oil for extra crispiness. Air fry the falafel for 10 to 12 minutes. Flip them halfway through to ensure both sides get golden brown. You will know they are done when they look crispy and brown. While the falafel cooks, prepare your pita bread. Carefully cut each pita in half to make pockets. When the falafel is ready, let it cool for about a minute. Now, stuff each pita half with a few crispy falafel balls. Add diced tomatoes and shredded lettuce to each pocket. For the final touch, drizzle tahini sauce or yogurt sauce over the fillings. Enjoy your healthy and tasty Air Fryer Falafel Pita Pockets! To get crispy falafel, focus on the ingredient ratios. The right mix of chickpeas, herbs, and spices is key. Too much flour can make them dense. Keep the mix coarse, not smooth. This helps them hold their shape and allows air to flow in the air fryer. Using the right oil spray makes a big difference. I always opt for olive oil spray. A light coating on both sides of the falafel will help them brown nicely. It’s all about balance; too little oil means they may not crisp up. When it comes to flavor, pair falafel with fresh toppings. Diced tomatoes and shredded lettuce add crunch. You can also try sliced cucumbers or pickles for extra zing. Don’t forget to drizzle tahini or yogurt sauce on top. This adds creaminess and ties all the flavors together. For garnishes, consider fresh herbs like parsley or cilantro. They not only enhance the look but also boost flavor. Lemon wedges on the side are a must. A squeeze of lemon brightens each bite and makes the falafel taste even better. One big mistake is overmixing the falafel mixture. If you blend it too much, the falafel will lose their texture. Aim for a rough, chunky blend that still holds together. This ensures a lovely bite when you cook them. Another common error is crowding the air fryer basket. Give the falafel space to breathe. If they touch, they won’t cook evenly. Make sure you arrange them in a single layer. This way, they will get crispy all around. {{image_4}} You can easily make these falafel gluten-free by swapping all-purpose flour for chickpea flour. This change keeps the falafel light and tasty. Chickpea flour adds a nutty flavor that pairs well with the spices. It also helps bind the mixture without using gluten. Many people enjoy this option, especially those with gluten sensitivities. For a bolder taste, try adding extra spices or vegetables. You can mix in some paprika or chili powder for heat. Chopped bell peppers or carrots can also bring a nice crunch. Experiment with herbs like mint or dill to refresh the flavor. Using different spices and veggies makes the falafel unique each time. You can serve these falafel in many ways. Instead of pita bread, try using lettuce wraps for a low-carb option. Adding different sauces can elevate your meal. Besides tahini, you could use yogurt sauce, spicy harissa, or even hummus. Each sauce gives a new twist to the falafel, making it fun to explore. After making these tasty falafel, you may have some leftovers. Store them in an airtight container. Place the container in your fridge. This keeps them fresh for about 3 to 5 days. When you want to eat them, reheat the falafel in your air fryer. Set it to 350°F (175°C) for about 5 minutes. This helps restore their crispy texture. You can freeze falafel for later use. Shape the falafel balls and place them on a baking sheet. Make sure they do not touch each other. Freeze them for about 1 hour. Once frozen, transfer them to a freezer bag. Label the bag with the date. Frozen falafel can last up to 3 months. When you want to cook them, you can air fry them straight from the freezer. Just add a couple of extra minutes to the cooking time. To keep your falafel tasty and fresh, avoid storing them with moisture. If you want to store them with sauce, do so separately. This helps maintain their crunch. For extra flavor, reheat them in the air fryer instead of the microwave. This method keeps them crispy and delicious. If you don’t own an air fryer, you can still make falafel. Here are some great options: - Oven Baking: Preheat your oven to 400°F (200°C). Place the shaped falafel on a baking sheet lined with parchment paper. Bake for about 20-25 minutes, flipping halfway through for even cooking. - Pan-Frying: Heat oil in a skillet over medium heat. Add the falafel balls and cook until golden brown on all sides, about 5-7 minutes per side. - Deep Frying: Heat oil in a deep pot to 350°F (175°C). Carefully drop in the falafel and fry until golden brown, about 3-4 minutes. Each method brings out unique flavors and textures! Yes, you can prepare falafel in advance. Here are some handy tips: - Mix the Ingredients: You can blend the chickpeas and spices a day before. Store the mixture in the fridge, covered. - Shape and Refrigerate: Form the falafel balls and keep them in the fridge for a few hours or overnight. This helps them hold their shape better while cooking. - Freezing: If you want to make them even earlier, freeze the uncooked falafel. Spread them on a tray first, then transfer to a container once frozen. They can last for up to three months in the freezer. To tell if your falafel is done, look for these signs: - Color: They should be golden brown on the outside. - Texture: A crispy crust with a firm but tender inside. - Cooking Time: If air frying, cook for 10-12 minutes, flipping halfway. You can also cut one open to check if it’s hot throughout. Enjoy your tasty meal! You learned how to make falafel from scratch. We covered key ingredients like chickpeas, herbs, and spices. Then we dove into step-by-step instructions for mixing, shaping, and cooking. I shared tips for getting crispy falafel and avoiding common mistakes. Finally, you explored variations and storage options. Making falafel is fun and rewarding. With practice, you can create tasty meals that impress. Keep experimenting with flavors and techniques to find what you love most. Enjoy your homemade falafel in pita pockets or as a snack!

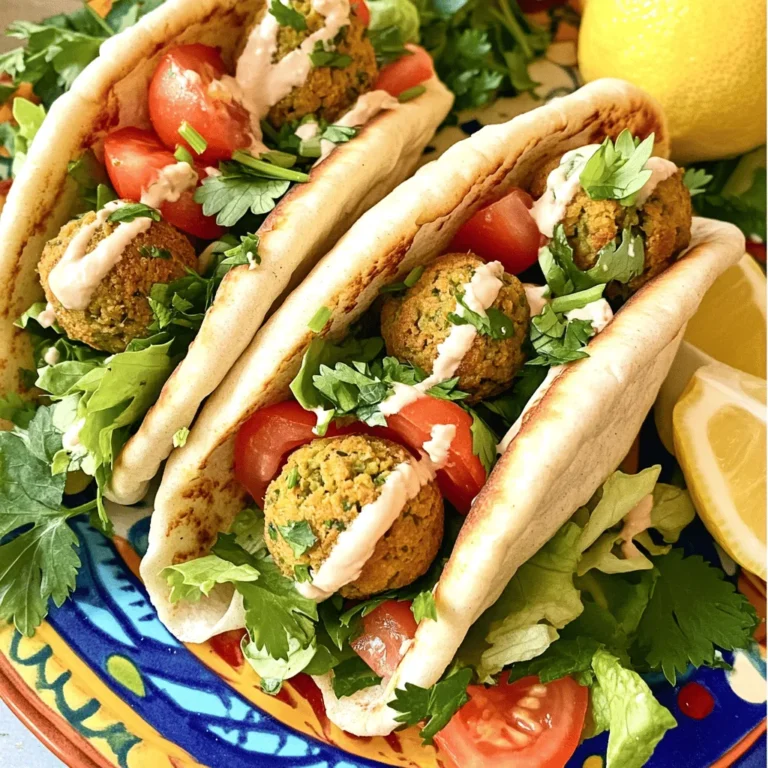
Air Fryer Falafel Pita Pockets Healthy and Tasty Meal

- 4 lobster tails - 1/2 cup unsalted butter - 4 cloves garlic, finely minced - 2 tablespoons fresh parsley, finely chopped - 1 tablespoon fresh lemon juice - 1/2 teaspoon smoked paprika (or regular paprika) - Salt and freshly ground black pepper to taste - Lemon wedges, for serving For this garlic butter lobster tails recipe, I choose fresh ingredients to make the dish shine. The lobster tails are the star, so look for ones that are bright in color and firm to the touch. The unsalted butter brings a rich flavor, while the garlic adds a warm, aromatic touch. Seasoning is just as important. Fresh parsley brightens the dish and adds color. The lemon juice gives a nice tang that cuts through the butter. The smoked paprika gives a subtle depth, making every bite more exciting. Don’t forget about salt and freshly ground black pepper! They help enhance all the flavors. I always like to serve my lobster tails with lemon wedges. They add a fresh pop and make the dish even more special. Each ingredient plays a role in creating a delightful coastal dish that you can enjoy at home. - Preheat the oven to 400°F (200°C). - Using kitchen shears, cut down the middle of each lobster tail shell. Stop just before the base to keep the meat attached. Gently pull the lobster meat upward, resting it on top of the shell. This helps the meat crisp and caramelize. - Melt 1/2 cup of unsalted butter in a small saucepan over low heat. Stir occasionally to prevent burning. - Once the butter melts, add 4 cloves of minced garlic. Stir for 1-2 minutes until fragrant. Avoid browning the garlic as it can taste bitter. - Arrange the lobster tails on a lined baking sheet. Brush the exposed meat generously with the garlic butter mix. Reserve some butter for later basting. - Bake the lobster for 12-15 minutes. The meat should turn opaque and be fully cooked. Halfway through, baste the meat with the reserved garlic butter to keep it moist and add flavor. - After baking, let the lobster tails rest for a couple of minutes. This helps the juices spread through the meat, making it tender and juicy. Cutting the lobster shell is key. Use kitchen shears to cut down the top. Stop before the base to keep the meat attached. This method makes it easy to pull the meat up. Gently lift the meat without breaking it. This helps it cook evenly and look great. Timing is crucial for perfect doneness. Bake the lobster tails for 12 to 15 minutes. Look for opaque meat as a sign they are ready. Halfway through, baste the meat with reserved garlic butter. This keeps the lobster moist and boosts flavor. Serve lobster tails on individual plates for style. You can also use a large platter for sharing. Add bright lemon wedges for color. A sprinkle of parsley adds a fresh touch. These small details make a big difference in how your dish looks. {{image_4}} You can change the taste of garlic butter lobster tails easily. Adding fresh herbs like thyme or basil gives a new flavor. You can also use spices. Try chili flakes for heat or cayenne for a kick. Adding citrus zest, like lemon or lime, brightens the dish. It adds freshness and balances the rich butter. You can grill garlic butter lobster tails for a smoky taste. Grilling adds a nice char and enhances flavor. Just brush them with garlic butter and place them on hot grill grates. Turn them halfway for even cooking. Broiling is another great method. It cooks quickly and gives a charred finish. Place the tails under a broiler for about 10 minutes. Keep an eye on them to prevent burning. Pairing sides with garlic butter lobster tails makes a perfect meal. Light salads with fresh greens and a lemon vinaigrette work well. Roasted vegetables, like asparagus or carrots, add color and texture. Garlic bread is also a great choice. It soaks up any extra garlic butter. For drinks, a crisp white wine or sparkling water complements the dish nicely. To keep your leftover lobster tails fresh, refrigerate them right away. Use an airtight container. Wrap each tail in plastic wrap before placing them in the container. This helps lock in moisture and flavor. When you reheat lobster tails, you want to keep them moist. The best way is to use the oven. Preheat it to 350°F (175°C). Place the tails in a baking dish with a splash of water or broth. Cover with foil to avoid drying out. Heat for about 10-15 minutes or until warm. Yes, you can freeze cooked lobster tails! First, let them cool completely. Next, wrap each tail tightly in plastic wrap. Then, place them in a freezer-safe bag or container. Be sure to remove as much air as possible. For best taste, use within three months. You can tell if lobster tails are cooked by checking their color and texture. Look for these signs: - The meat turns opaque and white. - The flesh pulls away from the shell. - The internal temperature reaches 140°F (60°C). These signs mean your lobster tails are ready to enjoy! Cooking them too long can make them tough. Yes, frozen lobster tails work well in this recipe. Here are some tips: - Thaw them in the fridge overnight for best results. - If you’re short on time, place them in cold water for about 30 minutes. - Pat them dry before cooking to ensure a nice finish. Fresh lobster has a slight edge in flavor, but frozen can still be delicious. Garlic butter lobster tails pair well with many sides. Here are some popular options: - Garlic mashed potatoes - Steamed asparagus or green beans - A fresh garden salad - Rice pilaf or couscous For drinks, try a chilled white wine like Chardonnay or Sauvignon Blanc. These choices complement the rich flavors of the lobster perfectly! You’ve learned how to make delicious garlic butter lobster tails from start to finish. We covered ingredients, steps, cooking tips, and even variations. Remember, the key is to prepare the tails well and use the garlic butter for flavor. This dish impresses at any meal and is easier than you think. Enjoy serving it with your favorite sides. You’ll love how it tastes and looks on your table!

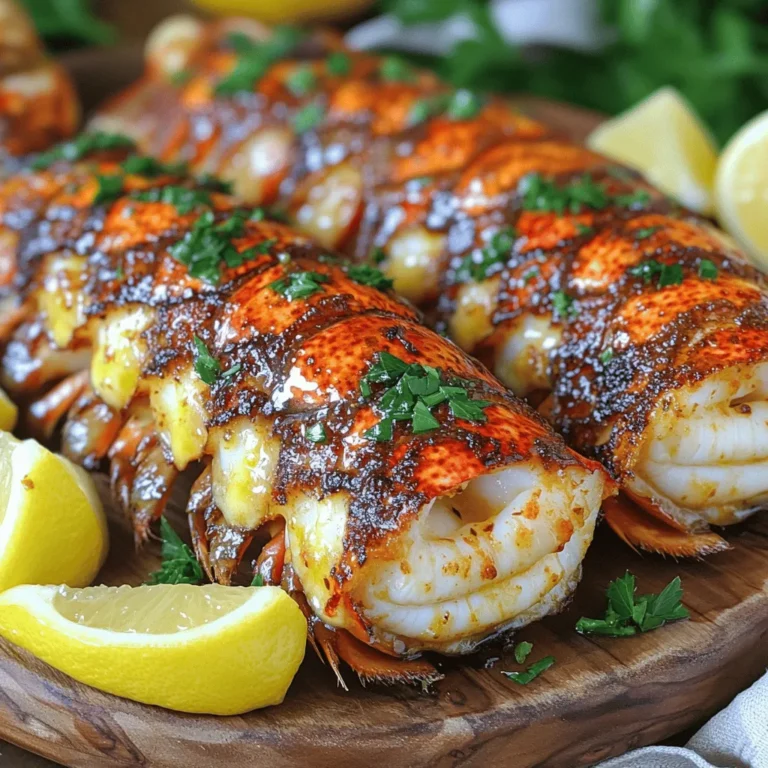
Garlic Butter Lobster Tails Delightful Coastal Dish

- 1 cup unsalted butter - 2 cups granulated sugar - 4 large eggs - 1 teaspoon pure vanilla extract - 1 cup all-purpose flour - 1 cup unsweetened cocoa powder - 1 teaspoon baking powder - 1/2 teaspoon salt - 1 cup crushed pretzel sticks - 1 cup semi-sweet chocolate chips - 1/2 cup caramel sauce - Flaky sea salt The base of these brownies is rich and fudgy. I start with unsalted butter, which gives me control over the salt level. Granulated sugar adds sweetness and helps create a soft texture. Eggs add moisture and lift to the batter. Vanilla extract enhances the flavors. Next, I add dry ingredients. All-purpose flour gives structure, while unsweetened cocoa powder brings a deep chocolate taste. Baking powder helps the brownies rise, and salt balances the sweetness. For texture, I crush pretzel sticks. They add a salty crunch that contrasts with the sweetness. Semi-sweet chocolate chips melt into the batter, enriching the chocolate flavor. Lastly, I drizzle in caramel sauce, which adds a gooey sweetness. Flaky sea salt on top finishes these brownies perfectly. - If you need alternatives for unsalted butter, use coconut oil or margarine. - For sugar substitutes, try brown sugar or coconut sugar for a different flavor. - If you want egg replacements, use 1/4 cup applesauce or a flax egg per egg needed. These swaps still keep the brownies tasty and fun to eat. They allow you to adjust the recipe to fit your needs. Whether you avoid dairy or need a different sweetness, you can still enjoy these brownies. {{ingredient_image_2}} Preparing the Oven Set your oven to 350°F (175°C). This step is key for even baking. Preparing the Baking Pan Use a 9x13 inch baking pan. Grease it well or line it with parchment paper. This helps with easy removal after baking. Melting Butter In a medium saucepan, melt 1 cup of unsalted butter over low heat. Keep stirring until it’s smooth. Incorporating Sugar Once melted, add 2 cups of granulated sugar. Stir until the mix is smooth and mixed well. Adding Eggs Add 4 large eggs, one at a time. Mix well after each egg. Finally, add 1 teaspoon of pure vanilla extract and stir until combined. Mixing Dry Ingredients In a separate bowl, whisk together 1 cup of all-purpose flour, 1 cup of unsweetened cocoa powder, 1 teaspoon of baking powder, and 1/2 teaspoon of salt. Folding in Pretzels and Chocolate Chips Gently fold the dry mix into the wet mix. Avoid overmixing. Then, add 1 cup of crushed pretzel sticks and 1 cup of semi-sweet chocolate chips. Fold until evenly mixed. Spreading the Brownie Batter Pour half of the brownie batter into the prepared baking pan. Use a spatula to spread it evenly. Drizzling Caramel Sauce Drizzle half of the caramel sauce over the first layer of batter. This adds a tasty surprise! Swirling and Baking Time Pour the rest of the brownie batter on top. Drizzle the remaining caramel sauce over this layer. Use a toothpick to swirl the caramel through the batter. Bake for 30-35 minutes. Importance of Cooling Let the brownies cool in the pan for at least 30 minutes. This helps them set and makes cutting easier. Sprinkling Sea Salt Before cutting, sprinkle flaky sea salt on top. This will enhance the sweet and salty flavor. To avoid dry brownies, do not overbake. Check them a few minutes early. If a toothpick comes out with a few moist crumbs, they are done. Always use fresh eggs and good quality butter. This helps in getting that rich taste. For extra fudginess, consider using more chocolate chips. You can replace some flour with chocolate for a denser result. You can add nuts or extra caramel to boost flavor. Chopped walnuts or pecans give a nice crunch. A swirl of extra caramel adds sweetness and richness. Brownies pair well with vanilla ice cream. The coolness of the ice cream contrasts perfectly with warm brownies. For serving, place the brownies on a rustic wooden platter. This makes them look inviting. You can also garnish with whole pretzels for a fun touch. A light drizzle of caramel sauce on top adds flair. Consider using colorful plates for a pop of color. Pro Tips Use Room Temperature Eggs: Allow your eggs to come to room temperature before adding them to the batter. This helps create a smoother mixture, leading to better texture in your brownies. Don’t Overmix the Batter: Gently fold the dry ingredients into the wet mixture until just combined. Overmixing can lead to tough brownies instead of the desired fudgy texture. Check for Doneness Early: Ovens can vary, so start checking your brownies at the 25-minute mark. Remove them when a toothpick comes out with a few moist crumbs for the perfect fudgy consistency. Let Them Cool: Allow the brownies to cool completely in the pan before cutting. This helps them set properly and makes slicing easier for clean, beautiful squares. {{image_4}} If you want gluten-free brownies, you can use alternative flours. Almond flour or coconut flour works well. Both add unique flavors and keep the brownies moist. You may need to adjust the amount slightly. Start with a cup and see how the batter looks. To make these brownies vegan, substitute eggs and butter. Use flax eggs or applesauce in place of eggs. For butter, use coconut oil or a vegan butter spread. These swaps keep the brownies rich and tasty without any animal products. Add extra flavors to your brownies for fun twists. Peppermint extract gives a cool kick. Just a teaspoon can change the whole taste. For coffee lovers, add a tablespoon of espresso powder. It enhances the chocolate flavor and adds depth. To keep your salted caramel pretzel brownies fresh, store them properly. I recommend placing them in an airtight container. This will keep them moist and tasty. You can also layer them with parchment paper to avoid sticking. If you want to keep them extra fresh, refrigerate them. Just remember to let them warm up a bit before serving. Freezing these brownies is simple. First, let them cool completely. Then, cut them into squares. Wrap each square tightly in plastic wrap. Next, place the wrapped brownies in a freezer bag or container. This helps to prevent freezer burn. When you want to enjoy them, thaw them in the fridge overnight. You can also microwave them for a few seconds to warm them up. These brownies last quite a while when stored correctly. At room temperature, they stay fresh for about 3 to 5 days. If you store them in the fridge, they can last up to a week. When frozen, they keep well for about 2 to 3 months. Just be sure to check for any signs of freezer burn before enjoying! You can tell when brownies are done by using a toothpick. Insert it into the center of the brownies. If it comes out with a few moist crumbs, they are ready. Don’t worry if it’s not clean; you want that fudgy texture. Bake them for about 30-35 minutes. Keep an eye on them near the end. Yes, you can use different types of pretzels. You can try mini pretzels, chocolate-covered pretzels, or even flavored ones. Each type will add a unique twist to your brownies. Just make sure they are crushed lightly to mix well with the batter. These brownies pair well with many treats. You can serve them with vanilla ice cream for a classic combo. Whipped cream or chocolate sauce also works great. You might even add fresh berries for a fruity touch. Making homemade caramel sauce is simple. You need sugar, butter, and cream. Start by melting sugar in a pan until it’s golden brown. Then, mix in butter and add cream slowly. Stir until smooth. Let it cool before using it in your brownies. Yes, you can make these brownies in advance. They last well when stored properly. Keep them in an airtight container at room temperature. If you want them to last longer, you can freeze them. Just wrap them tightly and thaw when needed. These salted caramel pretzel brownies are easy and fun to make. We covered every ingredient, step, and tip for baking. You can tweak the recipe to fit your needs, whether gluten-free or vegan. Remember to cool the brownies before serving for the best taste. Store extras properly to enjoy later. With these tips, you can impress friends and family. Happy baking!

Salted Caramel Pretzel Brownies Irresistible Treat

- 2 pounds chicken wings - 1/2 cup sweet chili sauce - 1 tablespoon soy sauce - 1 tablespoon sesame oil - 1 teaspoon garlic powder - 1 teaspoon onion powder - 1/2 teaspoon freshly ground black pepper - 1/2 teaspoon salt - 1 tablespoon cornstarch (for an extra crispy finish) - 1 green onion, finely sliced (for garnish) - Sesame seeds (for garnish) When it comes to making air fryer sweet chili chicken wings, I always start with fresh, high-quality chicken wings. You want wings that are meaty and plump. The marinade is the star here. The sweet chili sauce adds a delicious kick, while soy sauce and sesame oil bring depth. Garlic and onion powder help build flavor without being overpowering. Cornstarch is the secret for that extra crunch. It coats the wings and helps achieve that crispy texture we all love. For garnishes, I like to keep it simple. Green onions add color and freshness, while sesame seeds give a nice crunch and a bit of flair. These ingredients work together to create wings that are not just easy to make but also packed with flavor. Rinse the chicken wings under cold water. This step cleans off any dirt. After rinsing, use paper towels to dry them well. Dry wings crisp up better in the air fryer. In a large bowl, mix the sweet chili sauce, soy sauce, sesame oil, garlic powder, onion powder, black pepper, and salt. Whisk these ingredients until they blend into a smooth sauce. This marinade gives the wings their tasty flavor. Add the cleaned wings to the marinade. Toss them well using a spatula or your hands. Make sure each wing is coated evenly. Cover the bowl with plastic wrap. Place it in the fridge for at least 30 minutes. For even more flavor, let them marinate for a few hours. Set your air fryer to preheat at 380°F (193°C). Let it preheat for about 5 minutes. This step helps the wings start cooking right away. After marinating, take the wings out of the fridge. Transfer them to a clean bowl. Sprinkle cornstarch over the wings. Toss them gently until each wing is coated. The cornstarch adds a nice crunch. Place the wings in a single layer in the air fryer basket. Do not overcrowd them. If your air fryer is small, cook in batches. Air fry the wings at 380°F (193°C) for 25 to 30 minutes. Shake the basket halfway through. This helps them brown evenly. When the wings turn golden brown, transfer them to a bowl. Drizzle the remaining sweet chili sauce over the wings. Toss them gently to coat with the sauce. This adds even more flavor. Garnish the wings with sliced green onions and sesame seeds. This adds a nice touch before serving. Enjoy your crispy and flavorful sweet chili chicken wings! To get crispy wings, start by drying them well. Use paper towels to remove all moisture. Wet wings will not crisp up nicely. After drying, coat them with cornstarch. This adds a layer that helps achieve that perfect crunch. Shake off any extra cornstarch before air frying. Marinating your wings is key for flavor. I suggest marinating for at least 30 minutes. If you have time, try to marinate for a few hours or overnight. The longer the wings sit in the marinade, the more flavor they absorb. Just remember to keep them covered in the fridge. Make sure you preheat your air fryer. Set it to 380°F (193°C) for about five minutes. This helps the wings cook evenly. Arrange them in a single layer to allow hot air to circulate. If your air fryer is small, cook in batches. Shake the basket halfway through cooking for even crispiness. {{image_4}} For those who crave heat, try spicy chili chicken wings. Simply add sriracha or red pepper flakes to your marinade. You can adjust the spice level based on your taste. The sweet heat will pair perfectly with the crispy texture. Enjoy the kick with each bite! For a sweeter twist, make honey garlic chicken wings. Replace sweet chili sauce with a mix of honey and soy sauce. Add minced garlic for flavor. This variation brings a sticky, sweet glaze that’s sure to please. It’s a great option for those who love a sweeter wing. If you want a zesty option, try lemon pepper chicken wings. Use lemon juice and zest in your marinade. Add black pepper for a nice kick. The citrus flavor brightens up the dish, making it refreshing. These wings are perfect for a summer party or a light appetizer. After enjoying your wings, let them cool. Place the wings in an airtight container. They will stay fresh in the fridge for up to three days. Make sure to separate any leftover sauce in a different container. This helps keep the wings crispy when you reheat them. To reheat your wings, set your air fryer to 375°F (190°C). Place the wings in the basket in a single layer. Heat them for about 5 to 7 minutes. This method helps restore their crispiness. If you prefer, you can use an oven. Just bake at 350°F (175°C) for about 10 to 15 minutes. If you want to save some wings for later, freezing is a great option. First, let the wings cool completely. Next, arrange them in a single layer on a baking sheet. Freeze for about an hour. After they are frozen, transfer the wings to a freezer bag. They will last for up to three months in the freezer. To reheat, cook from frozen in the air fryer, adding a few extra minutes to the cooking time. Yes, you can cook frozen wings in the air fryer. Just add a few extra minutes to the cooking time. It’s best to cook them at 400°F for 30 to 35 minutes. Make sure to shake the basket halfway through. This helps the wings cook evenly and get crispy. Cook the chicken wings at 380°F for 25 to 30 minutes. Shake the basket halfway through. This ensures they cook evenly and get that perfect crunch. If you like them extra crispy, add a few more minutes. Sweet chili chicken wings pair well with various sides. Some great options include: - Celery sticks - Carrot sticks - Ranch dressing - Blue cheese dressing - Rice or fried rice - Asian slaw These sides balance the sweet and spicy flavors of the wings. Absolutely! You can switch up the sauce for many flavors. Try buffalo sauce for a spicy kick or honey garlic for a sweet twist. Even barbecue sauce works great. Just adjust the cook time as needed. Always let your taste guide you! You learned how to make tasty air fryer chicken wings. We covered key steps, such as marinating, cooking, and serving. Remember to try different sauces and garnishes for fun. Use the tips to get crispy wings every time. Store leftovers properly and enjoy them later. With this guide, you can impress friends and family. Happy cooking! Enjoy your wings!

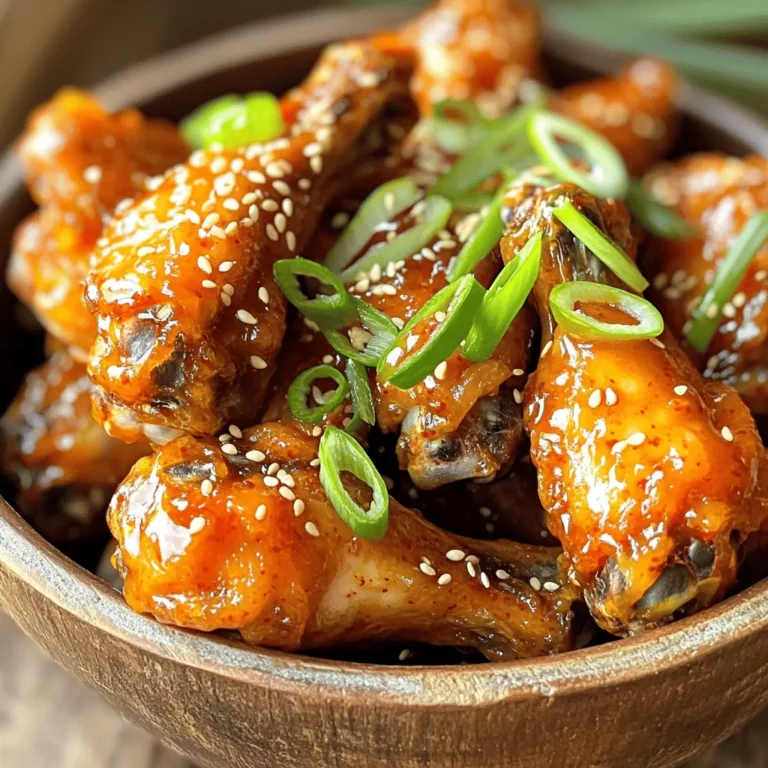
Air Fryer Sweet Chili Chicken Wings Easy and Flavorful

PREV 1 … 4 5 6 … 20 NEXT
purelyyumrecipes

explore

DessertsDinnerAppetizersDrinks

Our Policies

  • Cookie Policy
  • Copyright Policy
  • Disclaimer
  • GDPR Policy
  • Terms Of Use
Back to Top
  • About
  • Contact Us
  • Privacy Policy
© 2025 purelyyumrecipes