FREE DINNER EBOOK! Get your copy!
  • Cookie Policy
  • GDPR Policy
  • Disclaimer
  • Terms Of Use
  • Visit my other site: Fun Cookie Recipes
purelyyumrecipes
  • Home
  • Dinner
  • Desserts
  • Drinks
  • Appetizers
  • Contact
  • About
  • Privacy Policy
  • Home
  • Dinner
  • Desserts
  • Drinks
  • Appetizers
  • Contact
  • About
  • Privacy Policy
  • Cookie Policy
  • GDPR Policy
  • Disclaimer
  • Terms Of Use
Visit my other site: Fun Cookie Recipes

HOME / CATEGORIES /

Latest

To make Caramel Apple Energy Balls, you need some simple and healthy ingredients. Here’s what you will need: - 1 cup rolled oats - 1/2 cup almond butter (or your preferred nut butter) - 1/2 cup unsweetened applesauce - 1/4 cup honey or maple syrup (adjust for sweetness preference) - 1 teaspoon pure vanilla extract - 1 teaspoon ground cinnamon - 1/4 cup dried apples, finely chopped - 1/4 cup mini chocolate chips (optional) - A pinch of sea salt Each ingredient plays a key role in flavor and texture. The rolled oats provide a good base. They add fiber and heartiness. Almond butter or any nut butter gives a creamy richness. Unsweetened applesauce adds moisture and sweetness without extra sugar. Honey or maple syrup brings natural sweetness. Pure vanilla extract enhances the overall flavor. Ground cinnamon adds warmth and spice, making these bites comforting. Dried apples give chewy texture and fruity notes. You can add mini chocolate chips for a bit of fun sweetness. Finally, don’t forget the sea salt! It balances all the flavors perfectly. Feel free to mix and match with your favorite nut butter. You can try peanut butter or sunflower seed butter too. This recipe is flexible, so have fun with it! In a large mixing bowl, you will combine the main ingredients. Start with 1 cup of rolled oats. Add in 1/2 cup of almond butter. Next, pour in 1/2 cup of unsweetened applesauce. You can choose 1/4 cup of honey or maple syrup for sweetness. Don’t forget 1 teaspoon of pure vanilla extract and 1 teaspoon of ground cinnamon. Use a sturdy spoon or spatula to mix everything well. Your goal is to ensure all ingredients blend together smoothly. Now, let's make the mixture more exciting. Add in 1/4 cup of finely chopped dried apples. If you love chocolate, include 1/4 cup of mini chocolate chips. Stir gently to mix these in. This ensures you get bites of apple and chocolate in every ball. Then, add a pinch of sea salt. This will enhance the flavors. Give it another stir to combine everything well. Next, we need to chill the mixture. Cover the bowl with plastic wrap or a lid. Place it in the fridge for about 30 minutes. This helps the mixture firm up. Once chilled, it’s time to shape the balls. Scoop out about 1 tablespoon of the mixture. Use your hands to roll it into smooth balls. Keep going until you've made all the balls. Finally, store them in an airtight container in the fridge. They will stay fresh for up to a week. You can easily change this recipe to suit your taste. - Swapping nut butters: Try peanut butter, cashew butter, or sunflower seed butter. Each brings a unique flavor. - Adding nuts or seeds: Chopped walnuts, almonds, or pumpkin seeds add nice crunch and nutrition. Make your energy balls look even more appealing. - Decorative serving suggestions: Use a colorful platter to show off your energy balls. Arrange them with care for a beautiful display. - Drizzling honey or maple syrup: A light drizzle on top adds sweetness and a glossy finish. You can also sprinkle a bit of cinnamon for a pop of color. Caramel Apple Energy Balls are not just tasty; they are good for you too. - Nutritional advantages: These energy balls offer a great mix of fiber, protein, and healthy fats. They provide a quick energy boost without the sugar crash. - Overview of vitamins and minerals: Ingredients like oats and applesauce are rich in vitamins. They contain B vitamins and antioxidants that support your health. {{image_4}} You can change up the caramel apple energy balls for fun. Try caramel apple pie energy balls. Just add a bit of nutmeg and more cinnamon to the mix. This gives it that warm pie flavor. You can also use seasonal fruits. Think of pears in the fall or berries in summer. Simply swap the dried apples with your favorite dried fruit. It gives a new taste while keeping the same healthy base. If you're looking for gluten-free modifications, use gluten-free oats. This keeps the texture and taste while making it safe for anyone with gluten allergies. For vegan-friendly options, replace honey with maple syrup. This makes the recipe fully plant-based. You can also check for nut butter that’s vegan. This way, you can enjoy a sweet treat that fits your diet. Store your Caramel Apple Energy Balls in an airtight container. This helps keep them fresh. You can use glass or plastic containers with tight lids. It’s best to layer parchment paper between the balls. This prevents them from sticking together. For optimal freshness, place the container in the refrigerator. The cool temperature keeps the flavors strong. These energy balls stay fresh in the fridge for up to a week. After that, their taste may change. Look out for any signs of spoilage. If they smell off or the texture changes, it’s best to throw them away. Always trust your senses when checking food freshness. Yes, you can freeze these energy balls. Store them in a freezer-safe bag or container. They freeze well for up to three months. Just thaw them in the fridge before eating. This helps keep them fresh and ready for a quick snack. You can keep Caramel Apple Energy Balls in the fridge for about one week. After that, they may lose their taste and texture. Check for any signs of spoilage, like an off smell or mold. If you don’t have almond butter, you can use any nut butter. Peanut butter works great too. You can also try sunflower seed butter for a nut-free option. Just make sure to pick a smooth version for best results. Yes, be mindful of nut allergies. If someone has a nut allergy, use sunflower seed butter instead. Also, check for gluten if using oats. Some brands may contain gluten. Always read labels to ensure safety for those with allergies. In this blog post, we explored how to make delicious Caramel Apple Energy Balls. We covered essential ingredients, step-by-step instructions, and customization tips. These energy balls are not just tasty; they also offer health benefits. Remember to store them properly for long-lasting freshness. Whether you want to swap ingredients or try new flavors, the choices are endless. Enjoy your healthy snacks and get creative in the kitchen!

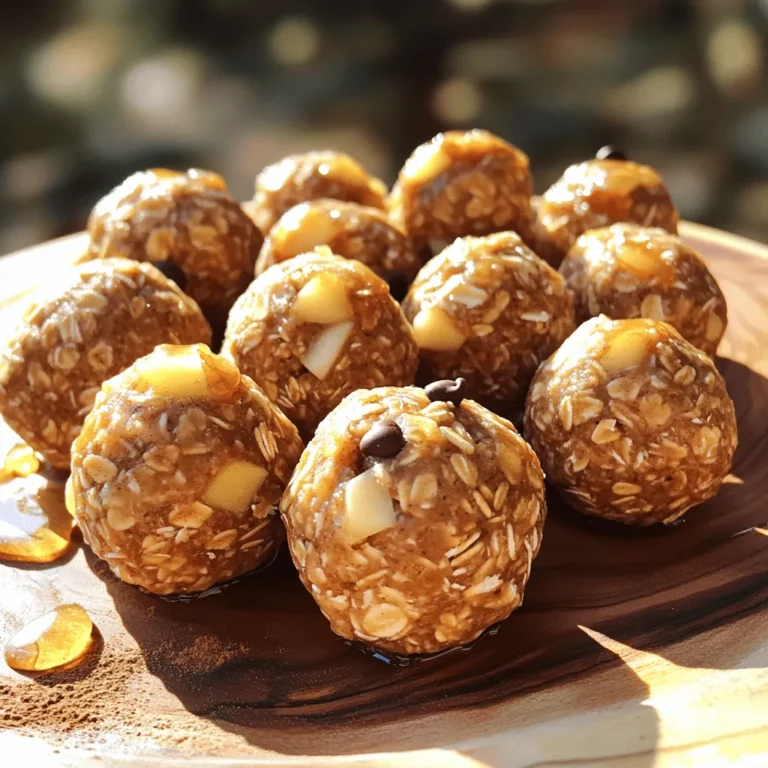
Caramel Apple Energy Balls Tasty and Healthy Snack

- 6 ripe bananas, sliced into rounds - 12 slices of day-old brioche or challah bread, cut into 1-inch cubes - 6 large eggs - 2 cups whole milk - 1 cup heavy cream - 1/2 cup packed brown sugar (divided) - 1 teaspoon pure vanilla extract - 1 teaspoon ground cinnamon - 1/4 teaspoon ground nutmeg - Pinch of sea salt Ripe bananas are the star of this dish. They must be sweet and soft. The day-old brioche or challah bread adds a rich texture. The bread soaks up the custard well. Six large eggs make the base creamy and fluffy. The dairy ingredients play a key role. Whole milk adds a nice richness. Heavy cream gives a smooth, velvety feel. The combo creates a delicious custard that binds everything. Now, let’s talk about flavor. Brown sugar brings a deep sweetness. It pairs perfectly with bananas. Vanilla extract adds warmth and depth. Ground cinnamon and nutmeg bring cozy spice notes. A pinch of sea salt raises the flavor. It balances sweetness and adds complexity. These ingredients create a delightful balance. Each bite offers a mix of sweet, creamy, and spiced goodness. You are sure to love this casserole! - Preheat the oven to 350°F (175°C). - Grease a 9x13 inch baking dish with butter or cooking spray. - Melt 1 tablespoon of unsalted butter in a large skillet over medium heat. - Add 6 sliced bananas and sprinkle with 1 tablespoon of brown sugar. - Cook for about 3-4 minutes, stirring gently until golden brown. - In a large bowl, whisk together 6 large eggs, 2 cups of whole milk, and 1 cup of heavy cream. - Add ½ cup of brown sugar, 1 teaspoon of vanilla extract, 1 teaspoon of ground cinnamon, ¼ teaspoon of nutmeg, and a pinch of sea salt. - Make sure the mixture is smooth and well combined. - Incorporate 12 slices of day-old brioche or challah bread, cut into 1-inch cubes. - Gently fold in the caramelized bananas into the bread mixture. - Transfer the entire mixture to the prepared baking dish, spreading it evenly. - Cover the baking dish with aluminum foil. - Bake in the preheated oven for 30 minutes. - After 30 minutes, remove the foil and bake for an additional 15-20 minutes. - The top should be golden-brown, and the center must be set. - Once baked, let the casserole cool for about 10 minutes before slicing. - Serve warm, drizzled with maple syrup for a sweet touch. - Use ripe bananas with brown spots. They are sweeter and softer. - Heat the skillet to medium. This helps the bananas caramelize evenly. - Stir gently and often to avoid burning. You want them golden, not black. - Soak the bread until fully moist. This gives a rich, creamy custard. - Bake covered for the first half. This keeps the inside soft and fluffy. - Remove the foil for the last part to get a golden crust on top. - Serve slices on plates with extra caramelized banana slices on top. - Dust with powdered sugar for a nice look. It makes it feel special. - Add a small pitcher of warm maple syrup for guests to use. {{image_4}} You can add fun mix-ins to make this dish your own. Nuts bring a nice crunch. Try walnuts or pecans for added flavor. They pair well with the soft bananas. Chocolate chips also work great for a sweet touch. Just sprinkle them on top before baking. Want to change the flavors? Different spices can make a big impact. Cardamom adds a warm, unique taste. You can also swap the bread. Use cinnamon raisin bread for a sweet twist. Sourdough can give a tangy flavor. You can serve this casserole in many ways. Fresh fruits like berries add a nice burst of flavor. Whipped cream makes it feel extra special. This dish can even work as a dessert. Just drizzle with caramel sauce for a sweet finish. To keep your Caramelized Banana French Toast Casserole fresh, store leftovers in the fridge. Place the casserole in a container with a tight lid. This helps prevent drying out. You can also cover it with plastic wrap. Use it within three to four days for the best taste. When it’s time to enjoy leftovers, you can use a microwave or oven. For the microwave, cut a portion and heat it for 30 seconds. Check if it’s warm enough. If not, heat in 15-second bursts. For the oven, preheat to 350°F. Place the casserole in an oven-safe dish. Cover it with foil and heat for about 15-20 minutes. This keeps the texture nice and soft. You can freeze the casserole for later use. Cut it into squares and wrap each piece in plastic wrap. Then, place them in a freezer bag. Make sure to remove as much air as possible. This helps prevent freezer burn. It can last up to three months in the freezer. When ready to eat, thaw overnight in the fridge. Reheat as mentioned above. This way, you can enjoy the deliciousness anytime! You can use fresh bananas, but ripe ones work best. Ripe bananas are sweeter and softer. They caramelize nicely, adding a rich flavor. Fresh bananas will not caramelize as well. This change can affect both taste and texture. This casserole can be stored in the fridge for up to three days. Keep it in an airtight container. If you want to keep it longer, consider freezing it. Frozen, it can last up to three months. Just remember to thaw it in the fridge before reheating. Yes, you can prepare this casserole a day in advance. Follow the recipe, then cover it and place it in the fridge overnight. When you’re ready to bake, just pop it in the oven. You may need to add a few extra minutes to the baking time. This recipe is great for meal prep! You can portion it into individual servings. It’s easy to reheat and enjoy throughout the week. Consider adding different toppings like nuts or fruits for variety. Enjoy your delicious meals all week long! This post covered the ingredients, step-by-step instructions, and helpful tips for making a banana bread casserole. Remember to caramelize your bananas for the best taste. Don't forget about variations like nuts or chocolate chips to make it your own. Proper storage ensures your leftovers stay fresh. Lastly, this dish serves as a delicious dessert or breakfast option. Enjoy your baking and the joy it brings to your table. You’ll love sharing this easy and tasty recipe with others.

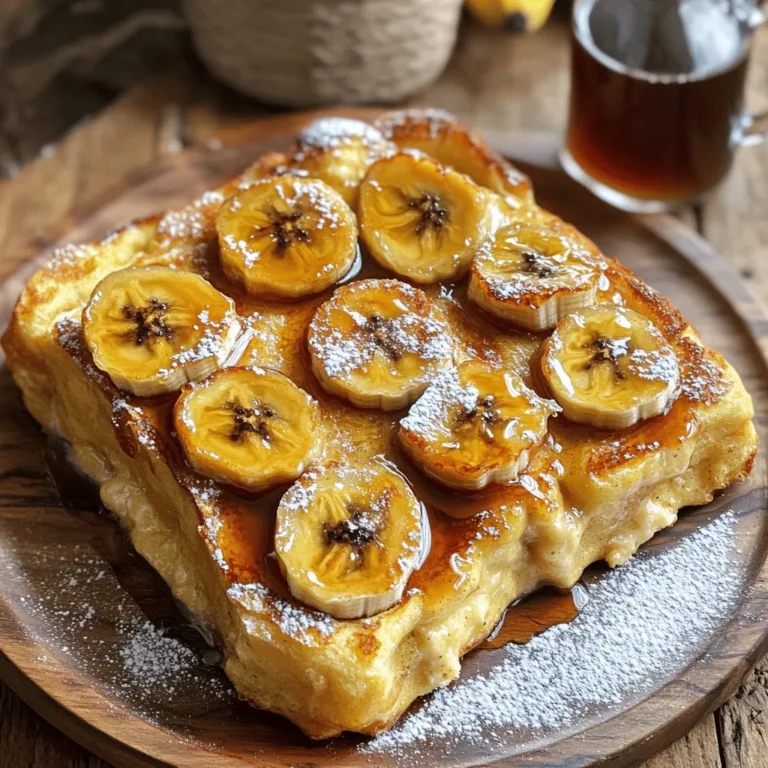
Caramelized Banana French Toast Casserole Delight

- 1 lb (450g) potato gnocchi - 1 cup fresh basil pesto - 1 cup heavy cream - 1 cup cherry tomatoes, halved - 1 cup fresh spinach leaves - 1 cup mozzarella cheese, shredded - 1/2 cup grated Parmesan cheese - 2 tablespoons olive oil - 2 cloves garlic, minced - Salt and pepper, to taste - Fresh basil leaves for garnish These ingredients make the Creamy Pesto Gnocchi Bake truly special. The potato gnocchi serves as a soft and pillowy base. Fresh basil pesto brings vibrant flavor and a lovely green hue. Heavy cream adds richness, creating a creamy texture that envelops the gnocchi. I love adding cherry tomatoes because they burst with sweetness when cooked. Fresh spinach not only adds color but provides nutrients too. The mozzarella and Parmesan cheeses melt beautifully, giving a cheesy, gooey topping that is hard to resist. Don't forget the olive oil and garlic! They enhance the dish's aroma and flavor. Finally, season with salt and pepper to make each bite pop. Fresh basil leaves on top add a lovely touch, both in taste and presentation. With these ingredients ready, you are set for a delightful cooking adventure! Set your oven temperature to 400°F (200°C). This step is key for a crispy top. Boil a large pot of salted water. Add your gnocchi and cook until they float, about 2-3 minutes. Once they float, they are ready! Drain the gnocchi and set them aside for later. In a large skillet, heat 2 tablespoons of olive oil over medium heat. Add 2 cloves of minced garlic and cook for about 1 minute. You want it fragrant, not browned. Next, toss in 1 cup of halved cherry tomatoes and 1 cup of fresh spinach leaves. Cook for about 3-4 minutes until the spinach wilts and the tomatoes soften. In a mixing bowl, combine 1 cup of fresh basil pesto with 1 cup of heavy cream. Stir until smooth and creamy. This sauce will add rich flavor to your dish. Gently add the drained gnocchi into the skillet with the cooked veggies. Pour the creamy pesto sauce over everything. Stir carefully to coat the gnocchi well. Season with salt and pepper to your taste. Transfer the gnocchi mixture into a greased baking dish. Spread it out evenly. Top with 1 cup of shredded mozzarella cheese and 1/2 cup of grated Parmesan cheese. Place the dish in the preheated oven. Bake for 20-25 minutes, until the cheese is bubbling and golden brown. Once done, let it cool for a few minutes before serving. Enjoy your creamy, flavorful bake! To get that perfect cheese melt and browning, keep an eye on the oven. Bake your gnocchi for 20 to 25 minutes. You want the cheese to bubble and turn golden brown. If you like a crispier top, broil it for a few minutes after baking. Just watch closely to avoid burning. If you run out of ingredients, don’t worry! You can swap the heavy cream for half-and-half or a dairy-free cream. For the pesto, try sun-dried tomato pesto or even a homemade spinach pesto. If you need a cheese swap, use gouda or feta instead of mozzarella. Each change brings a new twist to the dish. This creamy pesto gnocchi bake pairs well with a simple side salad or garlic bread. A light white wine, like Pinot Grigio, complements the flavors nicely. For a fun twist, try adding some crusty bread to soak up that creamy sauce. Enjoy your meal with friends for a delightful evening! {{image_4}} You can easily add more veggies to this dish. Try using bell peppers, zucchini, or mushrooms. Broccoli also works well. Just chop them into small pieces. Sauté them with garlic before adding to the gnocchi. This adds texture and flavor. It also makes the dish more colorful. Mixing in different vegetables boosts nutrients too. Want to make this dish heartier? Add some protein! Cooked chicken, shrimp, or sausage are great options. Simply sauté them until cooked, and then mix them in with the gnocchi. You can use rotisserie chicken for ease. Shrimp cooks quickly and adds a nice touch. Sausage brings a savory flavor that pairs well with pesto. If you need a gluten-free meal, don't worry! You can swap regular gnocchi for gluten-free gnocchi. Look for brands made from rice or corn. These options still taste great in the bake. You can also use spiralized veggies like zucchini as a base. This keeps the dish light and healthy. Enjoy your creamy pesto gnocchi bake without worry! To keep your creamy pesto gnocchi bake fresh, store it in an airtight container. Let it cool to room temperature first. This helps prevent condensation from forming, which can make your dish soggy. It will last up to three days in the fridge. When ready to enjoy again, simply pull it out and get ready to reheat. If you want to save some for later, freezing is a great option. First, let the dish cool completely. Then, slice it into portions and wrap each piece tightly in plastic wrap. Place the wrapped pieces in a freezer-safe bag or container. Label the bag with the date. The gnocchi bake can stay in the freezer for up to three months. When you crave it, just thaw it in the fridge overnight before reheating. To reheat your gnocchi bake, preheat your oven to 350°F (175°C). Place the dish in an oven-safe container if it’s not already. Cover it with foil to keep it moist. Bake for about 20-25 minutes or until it’s hot throughout. You can also use a microwave, but be careful not to overcook it. Heat in short bursts, stirring in between, until warm. Enjoy your creamy pesto gnocchi bake just like the first time! Yes, you can prepare this dish ahead of time. Cook the gnocchi and sauté the veggies. Mix everything in a baking dish but do not bake it yet. Cover the dish and place it in the fridge. When you're ready, just pop it into the oven. This saves time and makes dinner easy. If you don’t have gnocchi, you can use other pasta types. Small pasta shapes like fusilli or penne work well. You can also try using grains like quinoa or farro. These options still give you a tasty dish. You can keep the Creamy Pesto Gnocchi Bake in the fridge for about 3-5 days. Make sure it is in an airtight container. If it smells off or looks strange, it’s best to throw it away. Always prioritize safety when it comes to food. Using store-bought pesto is a great option. It saves time and still tastes good. However, some brands can be too salty or lack that fresh flavor. If you can, taste it before adding it to your dish. You can always add some extra herbs or nuts if needed. This blog post covered a simple and tasty recipe for Creamy Pesto Gnocchi Bake. You learned about the key ingredients, the step-by-step cooking process, and useful tips to enhance your dish. Remember, cooking can be fun and easy. Don't hesitate to adjust the recipe with your favorite veggies or proteins. Storing leftovers properly will keep your meal fresh for later. Enjoy creating this delicious dish with loved ones—it’s sure to impress!

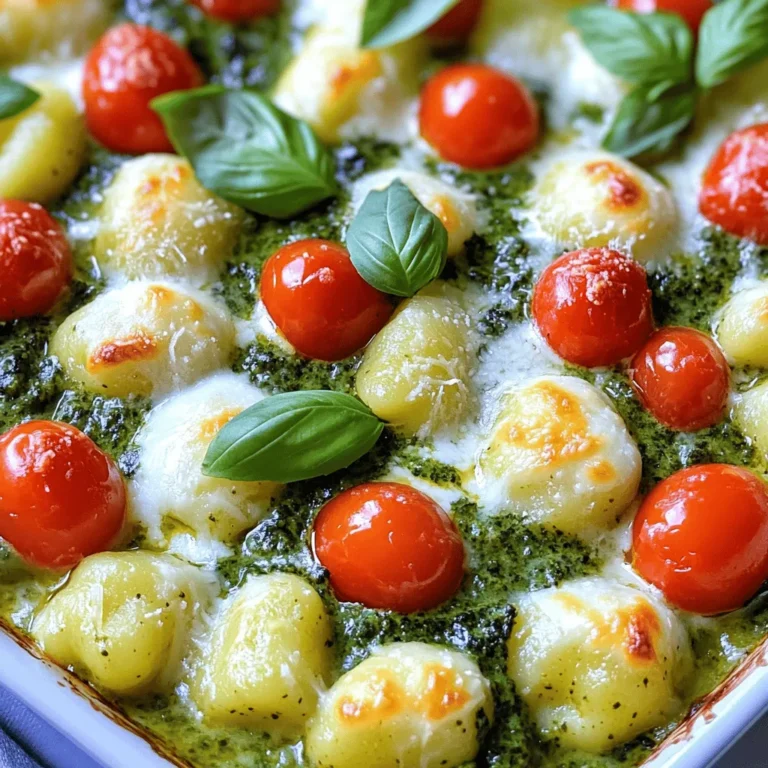
Creamy Pesto Gnocchi Bake Easy and Flavorful Dish

- 1 cup all-purpose flour - 1 tablespoon baking powder - 1 teaspoon ground cinnamon - 1/2 teaspoon ground nutmeg - 1/4 teaspoon ground ginger - 1/4 teaspoon salt - 1 cup canned pumpkin puree - 2 large eggs - 1/2 cup milk (can use dairy or non-dairy alternatives) - 1/4 cup pure maple syrup (plus extra for serving) - 1 teaspoon vanilla extract - 2 tablespoons melted butter (or coconut oil for a dairy-free option) - Additional maple syrup - Powdered sugar - Whipped cream or vanilla ice cream Gathering the right ingredients is key for these pancakes. Start with the dry ingredients. You will need all-purpose flour, baking powder, cinnamon, nutmeg, ginger, and salt. These spices bring warmth and flavor to each bite. Next, focus on the wet ingredients. Canned pumpkin puree is a must. It gives the pancakes moisture and sweetness. Eggs add structure, while milk, maple syrup, and vanilla extract enhance the taste. Melted butter or coconut oil makes these pancakes rich and tender. For a touch of fun, consider optional toppings. You can drizzle more maple syrup over your pancakes. A light dusting of powdered sugar adds sweetness. Whipped cream or vanilla ice cream can make your meal feel special. Each topping can elevate this dish to new heights. With these ingredients, you are set to create a delightful breakfast that captures the essence of fall. In a large mixing bowl, I whisk together the following dry ingredients: - 1 cup all-purpose flour - 1 tablespoon baking powder - 1 teaspoon ground cinnamon - 1/2 teaspoon ground nutmeg - 1/4 teaspoon ground ginger - 1/4 teaspoon salt Whisking these items together ensures the flavors blend well. The baking powder helps the pancakes rise, while the spices add warmth. Next, I grab another bowl to combine the wet ingredients. Here’s what I use: - 1 cup canned pumpkin puree - 2 large eggs - 1/2 cup milk (you can choose dairy or non-dairy) - 1/4 cup pure maple syrup - 1 teaspoon vanilla extract - 2 tablespoons melted butter (or coconut oil) I whisk these together until smooth. This step builds a rich base for the pancakes. Now, it's time to cook! I preheat a non-stick skillet over medium heat and lightly grease it. For each pancake, I pour about 1/4 cup of batter onto the skillet. I let them cook for about 2-3 minutes. Bubbles will form on the surface when they are ready to flip. After that, I carefully turn each pancake and cook for another 2-3 minutes until golden brown. While the pancakes cook, I prepare the syrup. In a small saucepan, I heat: - 1/2 cup maple syrup - A sprinkle of cinnamon I stir this mixture over low heat until warm. This step brings out the cinnamon's rich flavor. As I finish cooking the pancakes, I keep them warm. I place them in a low-temperature oven. When ready to serve, I stack the pancakes on a plate and drizzle the warm cinnamon syrup over them. For extra fun, I offer additional toppings like whipped cream or powdered sugar. This adds a festive touch to each plate! To make the best pancakes, avoid over-mixing your batter. When you combine the wet and dry ingredients, stir gently. A few lumps are okay. They help keep the pancakes fluffy. If you mix too much, your pancakes could turn out dense. You want them light and airy. You can add fun twists to your pancakes. Chocolate chips make a sweet treat. Nuts like walnuts or pecans add a nice crunch. Experimenting with spices is also exciting. Try adding a pinch of allspice or cardamom for a unique flavor. Each change can make the pancakes special. If you want to go dairy-free, use almond milk or coconut milk instead of regular milk. You can swap melted butter for coconut oil. For gluten-free pancakes, try almond flour or oat flour. These options keep the taste yummy while meeting different dietary needs. {{image_4}} Store any leftover pancakes in an airtight container. Place a piece of parchment paper between each pancake to prevent sticking. You can keep them in the fridge for up to three days. If you want to save them longer, freeze them! Just stack them with parchment and put them in a freezer bag. They can last for up to two months in the freezer. To reheat pancakes, the best method is using a toaster. Just pop them in until warm. You can also use a skillet over low heat. This way, they stay soft. If you're in a hurry, the microwave works too! Heat them for about 30 seconds, but be careful not to dry them out. Store any leftover cinnamon syrup in a sealed jar. Keep it in the fridge for up to two weeks. When you're ready to use it, just reheat it in a small saucepan over low heat. Stir it well before serving. If it thickens too much, add a splash of water or maple syrup to loosen it up. Each serving of these Maple Pumpkin Pancakes packs a delightful punch. Here’s the basic breakdown: - Calories: Approximately 220 - Fat: 8 grams - Protein: 6 grams - Carbs: 32 grams This means you can enjoy these pancakes without too much guilt! Pumpkin and maple syrup not only taste great, but they also offer health perks. - Pumpkin: This ingredient is rich in vitamins A and C. It also contains fiber, which helps digestion and keeps you full longer. - Maple Syrup: It’s a natural sweetener. It provides antioxidants and has minerals like manganese and zinc. These nutrients support your immune system. Both ingredients are tasty ways to boost your health while enjoying breakfast. To make your meal even better, consider these pairings: - Fresh Fruit: Slices of banana or berries add vitamins and freshness. - Yogurt: A dollop of Greek yogurt gives protein and creaminess. - Beverages: Serve with a warm cup of chai tea or a smoothie for extra nutrition and flavor. These sides round out your meal and make it more satisfying! Yes, you can use fresh pumpkin. Start by selecting a small sugar pumpkin. Cut it in half, remove the seeds, and roast it at 350°F for about 45 minutes. Once it's soft, scoop out the flesh and puree it in a blender or food processor. This fresh pumpkin adds a rich taste to your pancakes. Make sure to measure one cup of pureed pumpkin for the recipe. If you don't have maple syrup, you have options. Honey or agave syrup works well. You can also make a simple syrup by mixing equal parts sugar and water. Heat it until the sugar dissolves. This gives you a sweet topping for your pancakes. You might want to add a pinch of cinnamon for extra flavor. To make your pancakes fluffier, don't over-mix the batter. Mix until you see a few lumps; this keeps air in the batter. Using fresh baking powder also helps. Make sure your skillet is hot before pouring the batter. This creates steam, which makes the pancakes rise. Try letting the batter rest for about 5 minutes before cooking. You learned how to make delicious pumpkin pancakes from start to finish. We covered ingredients, cooking steps, and tips for the best texture. Remember to try different toppings and variations for extra fun. Don’t forget about storage and reheating so you can enjoy leftovers. These pancakes are easy, tasty, and perfect for any meal. Enjoy creating this warm treat, and share it with friends and family! Your new favorite recipe awaits.

Maple Pumpkin Pancakes with Cinnamon Syrup Delight

- 1 cup rolled oats - 1/2 cup natural peanut butter - 1/4 cup honey or maple syrup - 1/2 cup dark chocolate chips - 1/4 cup chia seeds - 1/4 teaspoon sea salt - 1 teaspoon vanilla extract - 1/4 cup protein powder (optional) Each ingredient in these chocolate peanut butter energy bars offers great health benefits. - Rolled oats: Oats provide fiber and help keep you full. They also support heart health. - Natural peanut butter: This nut butter is rich in protein and healthy fats. It gives you energy and can help build muscle. - Honey or maple syrup: Both are natural sweeteners that add flavor and energy. They also contain antioxidants. - Dark chocolate chips: Dark chocolate has antioxidants and can improve mood. It adds a tasty touch to your bars. - Chia seeds: These tiny seeds are packed with fiber, omega-3s, and protein. They help with digestion and can boost heart health. - Sea salt: A pinch of sea salt adds flavor and helps balance electrolytes. - Vanilla extract: This adds a warm flavor and can enhance sweetness. - Protein powder: Optional but beneficial, this boosts protein content for muscle recovery. You can mix and match ingredients for your energy bars. Here are some ideas: - Rolled oats: Try quick oats or gluten-free oats if needed. - Natural peanut butter: Almond butter or sunflower seed butter works well too. - Honey or maple syrup: Use agave syrup or brown rice syrup for a different taste. - Dark chocolate chips: Swap with milk chocolate or white chocolate chips. - Chia seeds: Flaxseeds can be a good alternative. - Protein powder: If you prefer not to use it, you can skip it entirely. Feel free to get creative and make these bars your own! 1. Combine Dry Ingredients: Start with a large bowl. Add 1 cup of rolled oats, 1/4 cup of chia seeds, 1/4 teaspoon of sea salt, and 1/4 cup of protein powder, if you want. Mix these dry items well. This step is key for even flavor. 2. Mix Wet Ingredients: In a second bowl, mix 1/2 cup of natural peanut butter, 1/4 cup of honey or maple syrup, and 1 teaspoon of vanilla extract. Whisk until it’s smooth. If the peanut butter feels thick, warm it for 15-20 seconds in the microwave. 3. Combine Wet and Dry Mixtures: Pour the smooth peanut butter mix into the bowl with dry ingredients. Use a spatula or wooden spoon to blend until it’s thick and well mixed. 4. Add Chocolate Chips: Gently fold in 1/2 cup of dark chocolate chips. Make sure they spread out well for that yummy chocolate taste in each bite. 5. Prepare the Baking Dish: Line an 8x8 inch baking dish with parchment paper. Let some paper hang over the edges for easy lifting later. 6. Press Mixture into Dish: Transfer the energy bar mix into the lined dish. Use a spatula or your hands to press it down firmly and evenly. This step makes sure the bars hold together. 7. Chill to Set: Place the dish in the fridge. Let it chill for at least 1 hour. This helps the bars firm up nicely. 8. Cut into Bars: After chilling, lift the slab out using the parchment paper. Place it on a cutting board. Cut it into squares or rectangles, based on what you like. 9. Storage Recommendations: Keep the bars in an airtight container in the fridge for up to 1 week. If you want them to last longer, freeze them. They’ll be fresh and ready when you need a quick snack. - Make sure to mix the dry ingredients really well before adding the wet ones. This helps avoid clumps. - When mixing the wet ingredients, whisk until no lumps remain. A smooth mix leads to better bars. - Don’t over-mix once you combine the wet and dry. Just blend until you see no dry bits. Chilling helps the bars set properly. When they cool, the peanut butter firms up. This makes the bars easier to cut and eat. If you skip chilling, your bars may crumble. Chilling also helps the flavors meld together, giving a richer taste. 1. Use Fresh Ingredients: Always check the freshness of your oats and peanut butter. Old ingredients can affect taste. 2. Measure Accurately: Use a kitchen scale for precise measurements. This helps create the perfect texture. 3. Mix Well: Ensure all ingredients blend together nicely. A good mix leads to even flavor. 4. Press Firmly: When putting the mixture in the dish, press it down firmly. This helps the bars hold their shape. 5. Chill Long Enough: Allow the bars to chill for at least one hour. This helps them set properly. - Not Chilling Long Enough: Skipping chilling time can lead to crumbly bars. - Overmixing: Mixing too much can make the bars tough. Mix just until combined. - Skipping Salt: Forgetting the sea salt can result in a bland taste. Always include it for flavor. - Using Too Much Sweetener: Adding extra honey or syrup can make bars too sticky. Stick to the recipe for balance. - Not Lining the Dish: Failing to line your baking dish can make removing the bars difficult. Always use parchment paper. - Add Nuts: Chopped almonds or walnuts give a nice crunch. - Use Dried Fruits: Adding raisins or cranberries can introduce sweetness and chewiness. - Try Flavored Protein Powder: Vanilla or chocolate protein powder can enhance the flavor. - Drizzle with Chocolate: Melted chocolate on top adds a rich touch. - Experiment with Spices: A pinch of cinnamon or nutmeg can add warmth and depth. {{image_4}} You can make these energy bars even better with fun add-ins. Try adding nuts like almonds or walnuts for crunch. Dried fruits, like cranberries or raisins, add sweetness and chewiness. You can also mix in seeds like sunflower or pumpkin for extra nutrition. Each add-in brings a new flavor and texture. Feel free to get creative and tailor them to your taste! If you want to change up the sweetness, there are great options. Instead of honey, you can use agave syrup or brown rice syrup. Both give a nice sweetness and work well in the recipe. Maple syrup is another tasty choice. Each sweetener adds its own unique flavor, so pick what you like best. Just keep the amount the same for the best results. Adding protein powder boosts the energy bars and helps keep you full. You can choose whey protein, soy protein, or plant-based protein. Each type works well, so use what you have at home. If you prefer no protein powder, just leave it out. The bars will still taste great and be a healthy snack! To keep your chocolate peanut butter energy bars fresh, store them in an airtight container. Place the container in the refrigerator. This helps prevent the bars from drying out. The cool temperature also keeps the flavors vibrant. Make sure to layer parchment between bars if you stack them. This way, they won’t stick together. If you want to save the bars for later, freezing is a great option. First, cut the bars into squares. Wrap each square tightly in plastic wrap. Then, place them in a freezer-safe bag or container. When you’re ready to eat, simply take out what you need. Let them thaw in the fridge or at room temperature. They can stay good in the freezer for up to three months. Your energy bars can last up to one week in the fridge. Check for any changes in smell or texture. If they feel dry or hard, it’s time to toss them. A fresh bar should feel soft and moist. If the chocolate chips begin to look dull, that’s a sign they may not taste as good. Always trust your senses when checking for freshness. Yes, you can make these bars vegan. Just swap honey for maple syrup. Use dark chocolate chips that are dairy-free. These changes keep the yummy taste while making it vegan. To check if your bars are set, they should feel firm to the touch. After chilling for one hour, remove them from the fridge. If they hold their shape when cut, they are ready. If not, chill them a bit longer. You can find ready-made bars at health food stores and some supermarkets. Look for brands that focus on natural ingredients. Online shops also offer a wide range of options. Yes, these energy bars are great for kids! They are tasty and packed with good nutrients. Just be sure to cut them into smaller pieces for little hands. We explored the ingredients, step-by-step instructions, and tips for making energy bars. Each ingredient offers health benefits, and substitutions can help you tailor the bars to your taste. Following the preparation steps closely ensures the right texture. Remember to chill the mixture for better results. I shared pro tips, common mistakes, and ideas for flavor variations to enhance your bars. Store them properly for freshness, and refer to FAQs for any questions. Energy bars can be a fun, tasty snack for everyone. Enjoy making your own!

Chocolate Peanut Butter Energy Bars Healthy Snack Idea

- Cauliflower florets - Honey - Soy sauce (low sodium preferred) - Extra virgin olive oil - Garlic and ginger - Sesame oil - Seasoning (salt and pepper) - Garnishes (sesame seeds and green onions) Gather your ingredients before you start cooking. Here’s what you need: 1. Cauliflower florets: Use one head of cauliflower, cut into bite-sized pieces. This helps them cook evenly. 2. Honey: This adds a sweet touch. I recommend three tablespoons for the right balance. 3. Soy sauce: Choose low sodium soy sauce. Two tablespoons will bring umami flavors. 4. Extra virgin olive oil: Use two tablespoons. It adds richness and helps with crisping. 5. Garlic and ginger: Three cloves of garlic, minced, and one teaspoon of freshly grated ginger give a nice kick. 6. Sesame oil: Just one teaspoon. It adds depth and a nutty flavor. 7. Seasoning: Add salt and pepper to taste. This enhances all the flavors. 8. Garnishes: Finish with one tablespoon of sesame seeds and two tablespoons of chopped green onions for a colorful touch. Make sure all your ingredients are ready. This helps you move quickly and keep the cooking fun! - Rinse and cut the cauliflower into florets. - Pat them dry to keep them crispy. First, you need to rinse the cauliflower under cold water. This helps remove dirt. After rinsing, cut the cauliflower into small florets. Make sure the pieces are similar in size. This helps them cook evenly. Then, use a kitchen towel to gently pat the florets dry. Removing moisture is key for that perfect crispiness. - Combine ingredients in a bowl. - Whisk until honey is dissolved. Next, let's make the marinade. In a large bowl, mix the honey, soy sauce, olive oil, minced garlic, and grated ginger. Don’t forget the sesame oil, salt, and pepper. Use a whisk to blend everything together. Whisk until the honey fully dissolves and you have a smooth mixture. - Toss florets in the marinade. - Let sit for 10-15 minutes. Now it's time to coat the cauliflower. Add the dry florets to the bowl with the marinade. Toss them gently until every piece is covered. This is where the magic happens! Let the coated cauliflower sit for about 10 to 15 minutes. This helps the flavors soak in. - Preheat air fryer. - Cook cauliflower in batches. - Shake halfway for even cooking. Preheat your air fryer to 375°F (190°C). Let it heat for about 5 minutes. Once hot, place the marinated cauliflower in the air fryer basket. Make sure to arrange them in a single layer. If you have a lot, cook in batches. Cook for 12 to 15 minutes and shake the basket halfway. This ensures even cooking and a crisp finish. - Drizzle more honey. - Add garnishes. After cooking, carefully take the cauliflower out of the air fryer. For a sweet finish, drizzle some more honey over the hot florets. Then, sprinkle sesame seeds and chopped green onions on top. This not only adds flavor but also makes it look great. Enjoy your tasty snack! To get a crispy texture, drying the florets is key. Moisture can make them soggy. After washing the cauliflower, I pat it dry with a towel. This small step helps the florets crisp up well in the air fryer. Cooking in batches is also important. If you crowd the air fryer, the cauliflower will steam instead of fry. I recommend filling the basket with just a single layer of florets. This way, each piece cooks evenly and becomes crispy. For better flavor, marinate the cauliflower for at least 10-15 minutes. This allows the honey and soy sauce to soak in deeply. You can adjust the marinade to suit your taste. If you like it sweeter, add more honey. For a saltier kick, increase the soy sauce a bit. This dish goes well with many sides. Try pairing it with a fresh salad or some rice. It also makes a great snack on its own. For dipping sauces, I suggest a spicy sriracha mayo or a tangy yogurt dip. These add a nice contrast to the sweet and savory flavors of the cauliflower. {{image_4}} You can change the recipe to suit your taste. Use maple syrup instead of honey for a different sweet note. The flavor will be rich, and it works well in this dish. If you're low on olive oil, try another oil like avocado oil. It has a high smoke point and adds a nice flavor. Want more heat? Add red pepper flakes to the marinade. Start with a pinch and adjust to your taste. You can also try other herbs and spices. Garlic powder or smoked paprika can add a nice twist. Experiment with what you have at home for fun flavors. If you're vegan, swapping honey for agave syrup is an easy fix. Agave gives a similar sweetness without any animal products. This makes the dish suitable for all diets while keeping it tasty. Enjoy your honey garlic cauliflower without worry! To keep your leftovers fresh, use an airtight container. Glass or plastic containers work well. Make sure the cauliflower is cool before sealing. Store in the refrigerator for up to three days. This way, you can enjoy your tasty snack later! The best way to reheat honey garlic cauliflower is in the air fryer. Preheat the air fryer to 350°F (175°C). Place the cauliflower in the basket for about 5-7 minutes. This helps keep it crispy. You can also use a microwave, but it may get a bit soggy. If using the microwave, heat in short bursts and check often. Yes, you can freeze honey garlic cauliflower! Place the cooled florets in a single layer on a baking sheet. Freeze for 1-2 hours until solid. Then, transfer them to a freezer-safe bag. They can last up to three months in the freezer. When ready to eat, thaw in the fridge overnight and reheat as mentioned above. You should cook cauliflower in the air fryer for 12 to 15 minutes. This time allows the cauliflower to become tender while developing a nice crisp on the edges. Remember to shake the basket halfway through to ensure even cooking. Yes, you can use frozen cauliflower. However, it is best to thaw it first. Drain any excess water to help achieve that crispy texture after cooking. Cooking time may vary, so check for tenderness. To add spice, you can mix in red pepper flakes with the marinade. You can also use spicy soy sauce or add sriracha for a kick. Adjust the amount based on your heat preference. Cauliflower is low in calories and high in fiber. It contains vitamins C and K, which help boost your immune system. Cauliflower is also a good source of antioxidants, which help fight free radicals in your body. Yes, you can prepare the cauliflower and marinate it ahead of time. Store it in the fridge for up to 24 hours before cooking. Just remember to shake off excess marinade before placing it in the air fryer. This blog post covered a simple and tasty air fryer cauliflower recipe. We explored each step from the ingredients to cooking tips. You learned how to achieve crispy texture and enhance flavors with easy swaps. Remember, you can customize this dish to fit your taste. Whether you want a spicy kick or a vegan option, it’s all up to you. Try it out, and enjoy your flavorful, healthy cauliflower!

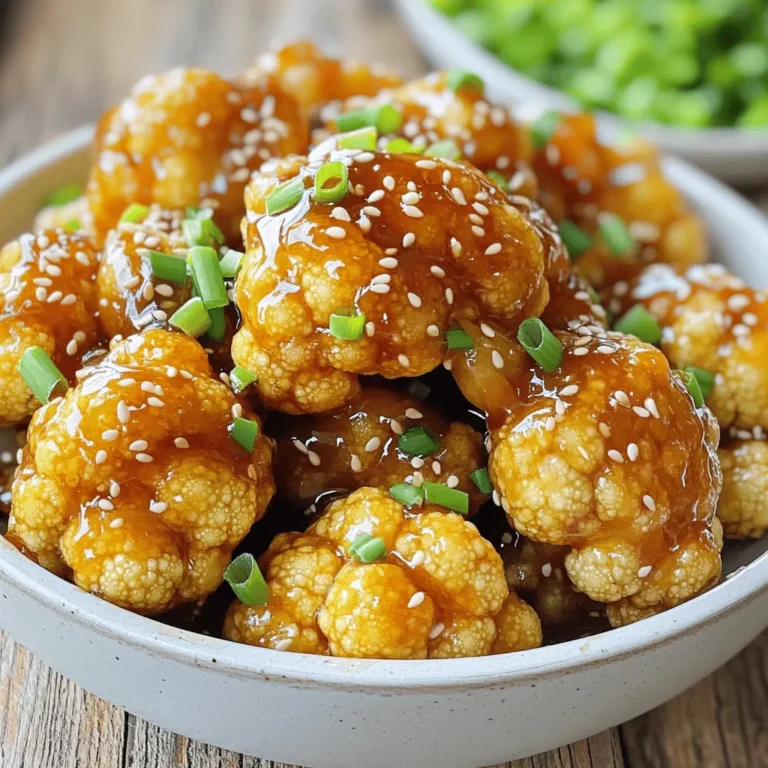
Air Fryer Honey Garlic Cauliflower Tasty Healthy Snack

- 1 pound flank steak, cut into evenly sized bite-sized cubes - 8 ounces baby bella mushrooms, halved for optimal cooking - 4 tablespoons unsalted butter, softened for easier melting - 4 cloves garlic, minced finely for maximum flavor - 1 tablespoon fresh thyme leaves (or 1 teaspoon dried thyme if fresh is unavailable) - Salt and freshly cracked pepper to taste - Olive oil, for drizzling - Fresh parsley, chopped for garnish When I make Garlic Butter Steak Bites with Mushrooms, I keep it simple yet rich in flavor. The flank steak is my favorite. It cooks quickly and stays juicy. I cut it into small cubes for easy eating. The baby bella mushrooms add a nice texture and earthiness to the dish. I use unsalted butter because I can control the saltiness. It melts beautifully and merges with garlic, creating a rich sauce. I also add garlic for a punch of flavor. Fresh thyme brings a lovely herbal note. Salt and pepper are key for seasoning. I sprinkle them generously on the steak cubes to enhance their taste. A drizzle of olive oil helps everything cook evenly. Finally, I add fresh parsley for a pop of color and freshness. These ingredients work together to make a quick, tasty meal. They are easy to find and simple to prepare. Enjoying this dish on a weeknight feels like a treat! First, you need to prepare your skillet. Pour a drizzle of olive oil into a large skillet. Set it over medium-high heat. Wait until the oil shimmers. This tells you it’s ready for cooking. While the pan heats, season the flank steak cubes. Use salt and freshly cracked pepper. Be generous with the seasoning. Once the pan is hot, add the steak in a single layer. Avoid overcrowding the pan. Sear the steak for about 2-3 minutes on each side. You want it beautifully browned. After cooking, transfer the steak to a plate and set it aside. In the same skillet, add the halved baby bella mushrooms. Let them cook for about 5-7 minutes. Stir occasionally until they turn golden brown. They will release moisture while cooking. After that, reduce the heat to medium. Now, add the softened butter and minced garlic. Stir until the butter melts and the garlic smells great. This should take about 1 minute. Next, return the seared steak bites to the skillet. Sprinkle in the fresh thyme. Toss the steak and mushrooms in the garlic butter sauce. Let them cook together for an extra 1-2 minutes. This helps all the flavors meld together. Finally, taste the dish. Adjust the seasoning with more salt and pepper if needed. To get the best sear on your steak bites, time is key. Sear each side for about 2-3 minutes. This gives the meat a nice brown color. For doneness, use a meat thermometer. Aim for 130°F for medium-rare or 145°F for medium. If you prefer it well-done, go for 160°F. Remember, letting the steak rest for a few minutes after cooking helps keep it juicy. Adding more flavor is easy. Try using smoked paprika or cayenne for a spicy kick. You can also mix in some Worcestershire sauce for depth. For garlic butter variations, swap out thyme for rosemary or add a splash of lemon juice. These changes can make your dish unique and fun. How you serve your meal matters. Use a large platter to display the steak and mushrooms. Drizzle any remaining garlic butter sauce over the top. This adds shine and flavor. For garnishing, sprinkle fresh parsley on top. It adds color and freshness. You can even add lemon wedges for a pop of brightness. These small touches make your dish look and taste amazing. {{image_4}} You can switch out the flank steak for other proteins. Chicken works well here. Cut chicken breast into small pieces. Cook it the same way you do the steak. Shrimp is another great choice. Just make sure to adjust your cooking time. Shrimp cooks faster than steak. For a vegetarian option, try using tofu or tempeh. Press the tofu to remove excess water first. Then, cube it and sauté it just like the steak. You’ll still get a rich flavor from the garlic butter. Mushrooms add great flavor. Baby bella mushrooms are excellent, but you can try other types. Cremini mushrooms have a nice taste too. Portobello mushrooms can work well in larger pieces. Just slice them thick and enjoy their meaty texture. You can also add other vegetables. Bell peppers or zucchini can boost the dish. Slice them thin and cook them with the mushrooms. This adds color and nutrients, making your meal even better. Pair your garlic butter steak bites with tasty sides. Rice or mashed potatoes absorb the garlic butter sauce well. A fresh salad adds crunch and brightness. You can also serve it with crusty bread to soak up the sauce. When it comes to sauces, a simple chimichurri adds zest. You can also try a creamy dipping sauce for extra flavor. Experiment with what you like best. Enjoying this dish your way is part of the fun! To store leftovers, let the steak bites and mushrooms cool completely. Place them in an airtight container. This keeps them fresh. You can store them in the fridge for up to three days. The cooked steak bites will taste best when eaten soon. The longer they sit, the more flavor they lose. For reheating, the best method is to use a skillet. Heat the skillet over medium heat. Add a splash of water or broth to keep the meat moist. Stir the steak bites and mushrooms for about five minutes. This keeps the texture nice and the flavor intact. You can also microwave them, but this may make the steak a bit tough. Always cover the dish with a lid or plastic wrap to keep moisture in. To make garlic butter steak bites, follow these key steps: 1. Heat the Skillet: Drizzle olive oil in a large skillet and heat it over medium-high heat. Wait until it shimmers. 2. Season the Steak: Generously season the flank steak cubes with salt and pepper. 3. Sear the Steak: In the hot skillet, add the steak in a single layer. Sear for 2-3 minutes on each side until browned. Remove and set aside. 4. Cook the Mushrooms: In the same skillet, add halved baby bella mushrooms. Cook for 5-7 minutes until golden brown. 5. Make the Sauce: Lower the heat and add softened butter and minced garlic. Stir until the butter melts and garlic smells great. 6. Combine: Return the steak to the skillet and add fresh thyme. Toss for 1-2 minutes to mix flavors. 7. Taste and Garnish: Adjust seasoning, then garnish with chopped parsley before serving. Yes, you can use other cuts of steak. Recommended cuts for similar results include: - Ribeye - Sirloin - New York strip These cuts offer great flavor and tenderness. Just ensure they are in bite-sized pieces for even cooking. Garlic butter steak bites pair well with these popular side dishes: - Creamy mashed potatoes - Steamed green beans - Garlic bread - A fresh garden salad Each option adds great flavor and balance to your meal. You can prep some parts of this recipe ahead of time. Here are some tips: - Steak: Cut and season the steak cubes a few hours before cooking. - Mushrooms: Clean and halve the mushrooms in advance. - Butter Mixture: Mix the softened butter, minced garlic, and thyme ahead of time. Keep these items in the fridge until you are ready to cook. This way, your meal will be quick and easy. In this blog post, we explored making delicious garlic butter steak bites. We covered the main ingredients, cooking steps, and helpful tips for the best results. You learned about optional variations and how to store your leftovers. Remember, cooking is all about enjoying the process. Don't be afraid to try new things! Whether you stick to the classic recipe or experiment, great flavors await you. Happy cooking!

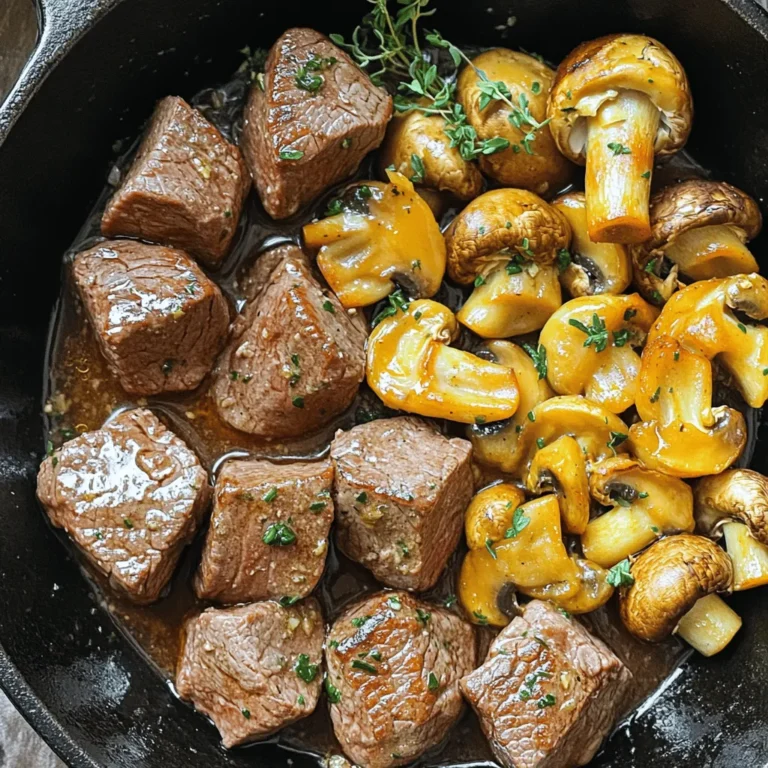
Garlic Butter Steak Bites Mushrooms Easy Weeknight Meal

- 1 pound Brussels sprouts, trimmed and halved - 3 tablespoons extra virgin olive oil - 3 tablespoons pure maple syrup - 1 teaspoon garlic powder - 1 teaspoon onion powder - Sea salt and freshly ground black pepper, to taste - Optional: 1/4 cup pecans, roughly chopped - Optional: 1/4 cup dried cranberries, roughly chopped I love these ingredients because they blend perfectly. The Brussels sprouts bring a nice crunch. Olive oil adds richness, while maple syrup gives a sweet finish. The garlic and onion powders add depth to the flavor. You can easily find these items at your local store. Fresh Brussels sprouts are key. Look for green, compact ones. The added pecans and cranberries can give your dish an extra layer of flavor and texture. These simple ingredients create a dish that is both tasty and easy to make. Enjoy the process of gathering them and preparing this delightful meal! {{ingredient_image_2}} - Preheat your oven to 400°F (200°C). - Line a large baking sheet with parchment paper. This helps with easy cleanup. - In a big mixing bowl, add 1 pound of halved Brussels sprouts. - Pour in 3 tablespoons of extra virgin olive oil. - Add 3 tablespoons of pure maple syrup. - Sprinkle in 1 teaspoon of garlic powder and 1 teaspoon of onion powder. - Season with sea salt and freshly ground black pepper to taste. - Toss everything together until the Brussels sprouts are well coated. - Spread the coated Brussels sprouts on the baking sheet in a single layer. - Make sure the cut sides are facing down for better crispiness. - Roast in the oven for 20-25 minutes. - Flip the Brussels sprouts halfway through for even cooking. - Look for firm, compact sprouts. They should feel heavy for their size. - Check for vibrant green color. Avoid any yellow or brown leaves. When you pick fresh Brussels sprouts, their taste will shine. The right choice makes a big difference. Firmness shows freshness. A bright green hue means they are ripe and ready. - Try adding a pinch of smoked paprika for extra depth. - A sprinkle of red pepper flakes brings some heat. To enhance the flavor, you can mix in different spices. Garlic powder and onion powder give a nice base. Roasting at the right temperature brings out their sweetness. Make sure to spread them evenly for the best caramelization. - Serve in a rustic bowl for a cozy feel. - Garnish with whole cranberries and pecans on top. For visual appeal, presentation matters. A colorful dish looks appetizing. Use a nice bowl to make it pop. Adding garnishes creates a festive touch that draws attention. Pro Tips Choose Fresh Sprouts: Select Brussels sprouts that are firm and vibrant green for the best flavor and texture. Maple Syrup Alternatives: If you want a lower-calorie option, consider using agave nectar or honey as a substitute for maple syrup. Experiment with Spices: Feel free to add your favorite spices like smoked paprika or cayenne pepper for an extra kick of flavor. Storage Tips: Store any leftovers in an airtight container in the fridge for up to three days. Reheat in the oven for best results! {{image_4}} You can easily adapt this dish for different diets. For a vegan option, simply use pure maple syrup. It adds sweetness without any animal products. This makes the dish perfect for everyone. If you have gluten concerns, you’re in luck! All the ingredients are naturally gluten-free. Just ensure your maple syrup is pure, as some brands may include additives that contain gluten. Want to mix things up? Adding different nuts or fruits can enhance the flavor. Pecans add a nice crunch, while dried cranberries give a sweet pop. You can also try walnuts or hazelnuts for variety. Fresh fruits like sliced apples or pears can brighten the dish, too. Incorporating spices or herbs will take your Brussels sprouts to the next level. Try adding a pinch of cayenne pepper for heat or rosemary for an earthy touch. Thyme is another great option that pairs well with maple syrup. Experiment and find your favorite combo! To store leftover maple roasted Brussels sprouts, let them cool first. Place the sprouts in an airtight container. Keep them in the fridge for up to four days. If they smell off or have a strange color, toss them out. When it's time to enjoy your leftovers, preheat your oven to 350°F (175°C). Spread the Brussels sprouts on a baking sheet. Heat them for about 10-15 minutes. This helps keep them crispy. You can also use the microwave, but they may not be as crunchy. Heat in short bursts, checking often. If you want to freeze the Brussels sprouts, first let them cool completely. Place them in a single layer on a baking sheet. Freeze for about an hour until firm. Then, transfer them to a freezer-safe bag. They will last up to three months. When ready to eat, thaw them in the fridge overnight. Reheat as mentioned above for best results. To keep your Brussels sprouts crispy, follow these tips: - Dry them well: After washing, pat them dry with a towel. Moisture leads to sogginess. - Cut evenly: Halve the sprouts so they roast evenly. - Use enough oil: Olive oil helps crisp the sprouts and adds flavor. - Single layer: Spread them out on the baking sheet. Avoid crowding. - Flip halfway: Turning them halfway through cooking helps brown all sides. These steps will give you that nice, crunchy texture you want! Yes, you can prep Brussels sprouts ahead of time. Here are the best practices: - Trim and halve: You can do this a day in advance. Store in the fridge. - Seasoning: Toss them with oil and spices the night before. Cover and refrigerate. - Roasting: It’s best to roast them fresh. If you must, you can roast them and store leftovers. This way, you will save time and still enjoy a great dish! These Brussels sprouts go well with many dishes. Here are some ideas: - Grilled chicken: The savory flavor pairs well with the sweetness of the sprouts. - Roasted pork: The rich taste of pork complements the maple flavor. - Quinoa salad: A light salad offers a fresh contrast to the roasted sprouts. - Stuffed turkey: Perfect for holiday meals, turkey and Brussels sprouts match nicely. Mix and match to create a hearty meal! Roasting Brussels sprouts is simple and rewarding. You start with fresh sprouts, olive oil, and seasonings. Next, you roast them until they are golden and crisp. You can even add nuts or fruits for extra flavor. Remember to store and reheat leftovers properly. In closing, these roasted Brussels sprouts will impress anyone at your table. Enjoy experimenting with the tips and variations. Happy cooking!

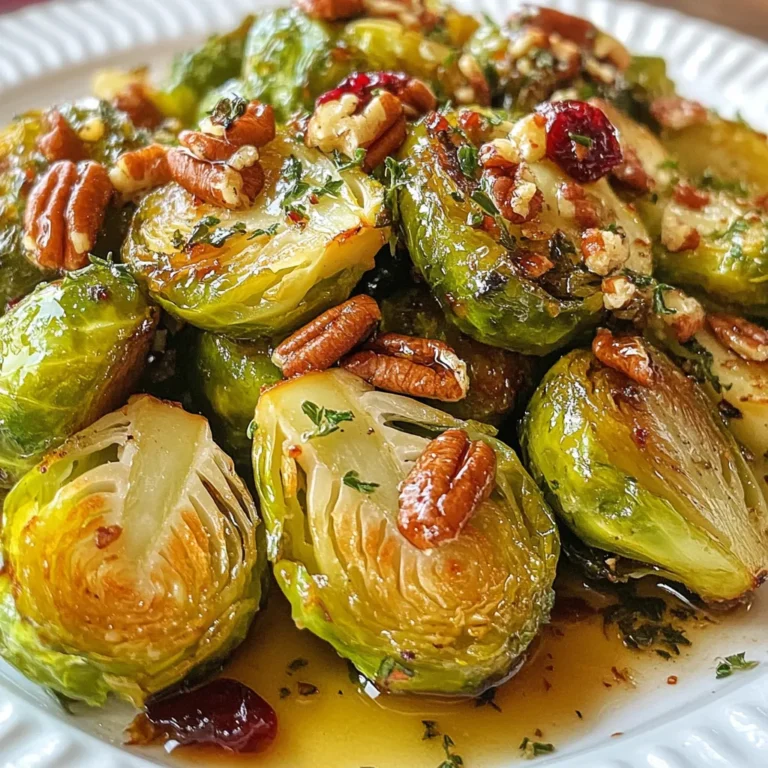
Maple Roasted Brussels Sprouts Flavorful and Easy Dish

To make Creamy Cajun Shrimp Alfredo, you need: - 8 oz fettuccine pasta - 1 lb shrimp, peeled and deveined - 2 tablespoons Cajun seasoning - 2 tablespoons olive oil - 3 cloves garlic, minced - 1 cup heavy cream - 1 cup grated Parmesan cheese - 2 tablespoons butter - Salt and pepper to taste - Fresh parsley, chopped (for garnish) You can swap some ingredients for a twist: - Use whole wheat pasta for a healthier option. - Try shrimp substitutes like scallops or chicken. - Replace heavy cream with half-and-half for a lighter sauce. - Use nutritional yeast instead of Parmesan for a vegan option. For the best flavors, I suggest these brands: - For pasta, Barilla is a reliable choice. - Choose Wild American Shrimp for fresh shrimp. - McCormick offers great Cajun seasoning. - For cheese, Kraft's grated Parmesan melts well. - Use extra virgin olive oil from Pompeian for quality taste. These ingredients and brands can help you create a standout meal! To start, boil a large pot of water with salt. Once it bubbles, add 8 oz of fettuccine pasta. Cook it according to the package instructions until it is al dente. Drain the pasta in a colander and set it aside. Let any extra water drip off. Next, get 1 lb of peeled and deveined shrimp. Place it in a bowl. Sprinkle 2 tablespoons of Cajun seasoning over the shrimp. Toss gently to coat each shrimp with the spices. Heat 2 tablespoons of olive oil in a large skillet over medium-high heat. Once hot, add the seasoned shrimp. Sauté for 2-3 minutes on each side. Look for the shrimp to turn pink and cook through. Once done, take the shrimp out and set them aside. In the same skillet, lower the heat to medium. Add 2 tablespoons of butter and let it melt. Once melted, add 3 cloves of minced garlic. Sauté for about 1 minute until the garlic smells good and turns lightly golden. Be careful not to burn it! Slowly pour in 1 cup of heavy cream while stirring. Bring it to a gentle simmer. This lets all the flavors mix well. Gradually add 1 cup of grated Parmesan cheese, stirring until it melts. Taste the sauce and add salt and pepper as needed. Now, combine the drained fettuccine with the creamy sauce in the skillet. Toss gently to coat the pasta. Finally, return the cooked shrimp to the skillet. Stir everything together until it is well mixed and heated through. Let it simmer for 2-3 more minutes to blend the flavors. Serve the creamy Cajun shrimp Alfredo on plates, garnished with fresh chopped parsley for a nice touch. To get a rich and creamy sauce, use heavy cream. This cream gives the sauce its smoothness. Stir the cream in slowly. This helps it blend well with the other ingredients. Keep the heat low when adding the cheese. This prevents the cheese from clumping. If the sauce is too thick, add a splash of pasta water. This keeps your sauce silky and light. Shrimp cook quickly. To avoid overcooking, watch them closely. Cook shrimp for just 2-3 minutes on each side. They are done when they turn pink. Overcooked shrimp can become tough. If you are unsure, remove them from the heat sooner. They will cook a bit more in the sauce. Use fresh garlic for the best taste. It adds a nice depth to your sauce. Cajun seasoning brings a great kick. Feel free to adjust the amount to your liking. You can also add a squeeze of lemon juice at the end. This brightens the dish and adds freshness. Lastly, sprinkle fresh parsley on top before serving. It makes the dish look beautiful and adds a fresh flavor. {{image_4}} You can swap regular pasta for whole wheat pasta. Whole wheat pasta adds fiber and nutrients. This small change makes the dish healthier without losing flavor. It still pairs well with the creamy sauce. If you want a vegetarian dish, use mushrooms instead of shrimp. Mushrooms add a nice texture and flavor. Simply sauté them like shrimp. This change keeps the dish full of flavor and satisfying. You can adjust the spice level to fit your taste. If you like it mild, use less Cajun seasoning. For more heat, add extra seasoning or a pinch of cayenne pepper. Spice is all about your preference, so feel free to experiment! After making creamy Cajun shrimp Alfredo, let it cool down. Then, place it in an airtight container. This helps keep the flavors fresh and tasty. Store it in the fridge for up to three days. When you want to enjoy it again, just reheat it gently. You can freeze creamy Cajun shrimp Alfredo for later meals. Use a freezer-safe container or bag. Seal it tightly to avoid freezer burn. It can stay in the freezer for up to three months. To reheat, thaw it overnight in the fridge. Warm it slowly on the stove or in the microwave. Stir in a bit of cream if it seems too thick. Leftovers of creamy Cajun shrimp Alfredo last about three days in the fridge. If you see any changes in color or smell, toss it out. Always check for freshness before eating. Enjoying your meal within this time ensures you savor the best flavors. You can thicken your Alfredo sauce by adding more cheese. Use extra Parmesan cheese, as it melts well. Another method is to simmer the sauce longer. This reduces liquid and makes it thicker. You can also mix a little cornstarch with cold water and stir it in. Cook until the sauce thickens to your liking. Yes, you can use frozen shrimp. Just remember to thaw them first. Place the shrimp in cold water for about 15-20 minutes. This helps them defrost evenly. Once thawed, peel and devein the shrimp. Then, coat them with Cajun seasoning and cook as directed in the recipe. This dish pairs well with a fresh green salad. A simple mix of greens, tomatoes, and vinaigrette works great. You might also enjoy garlic bread or crusty baguette. They are perfect for soaking up the creamy sauce. For a veggie boost, serve with steamed broccoli or sautéed spinach. This blog post covered the main ingredients and easy steps for a Creamy Cajun Shrimp Alfredo. I shared tips for perfecting the dish, including how to avoid overcooking shrimp. You can also explore variations to suit your taste and health needs. Lastly, I outlined storage tips and answered common questions. Whether you’re cooking for family or friends, this dish is sure to impress. Enjoy creating your own version, and remember: practice is key to perfecting your skills in the kitchen!

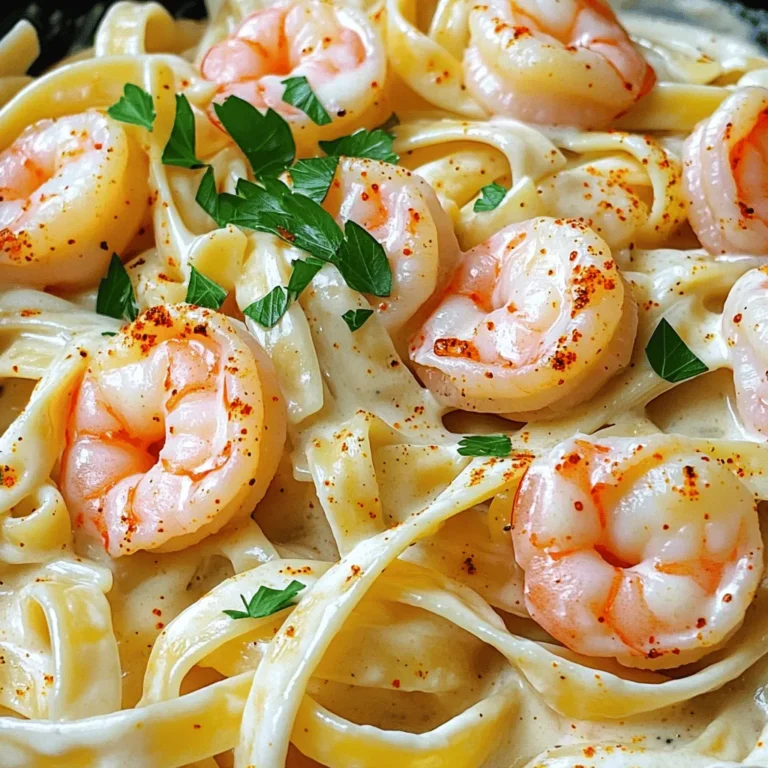
Creamy Cajun Shrimp Alfredo Delightful Weeknight Meal

- 1 ½ cups all-purpose flour - 1 teaspoon baking powder - 1 teaspoon baking soda - ½ teaspoon salt - 1 tablespoon ground cinnamon - ½ teaspoon ground nutmeg - 1 cup canned pumpkin puree - ¾ cup granulated sugar - ½ cup packed brown sugar - ½ cup vegetable oil - 2 large eggs - 1 teaspoon vanilla extract - 1 cup chopped walnuts - ½ cup all-purpose flour - ⅓ cup packed brown sugar - 1 teaspoon ground cinnamon - ¼ cup cold butter, cubed I love the mix of flavors in these muffins. The dry ingredients set the base. The flour gives the muffins structure. Baking powder and baking soda help them rise, while salt enhances flavor. Cinnamon and nutmeg add warmth and depth. The wet ingredients bring a soft, moist texture. Canned pumpkin puree not only gives flavor but also keeps muffins tender. Granulated and brown sugars sweeten the mix, giving a lovely caramel note. Vegetable oil keeps them rich and moist. Eggs add structure, while vanilla adds a sweet hint. For a crunchy twist, I often add walnuts. They bring a nice bite. The streusel topping is the star. It’s easy to make and adds a sweet crunch. The flour, brown sugar, and cinnamon blend well. Cold butter gives it that crumbly texture. These ingredients come together to create a muffin that’s not just tasty but comforting. Every bite offers a balance of sweetness and spice. I can’t wait for you to try them! Set your oven to 350°F (175°C). This makes sure your muffins bake evenly. Prepare your muffin tin by lining it with paper liners or spraying it with non-stick cooking spray. This helps with easy removal. In a medium bowl, combine the dry ingredients. Use 1 ½ cups of all-purpose flour, 1 teaspoon of baking powder, 1 teaspoon of baking soda, ½ teaspoon of salt, 1 tablespoon of ground cinnamon, and ½ teaspoon of ground nutmeg. Whisk them together until they blend well. Take a large bowl and mix your wet ingredients. Add 1 cup of pumpkin puree, ¾ cup of granulated sugar, ½ cup of packed brown sugar, ½ cup of vegetable oil, 2 large eggs, and 1 teaspoon of vanilla extract. Stir these ingredients until the mix is smooth and all together. Now, gently fold the dry mix into the wet mix. Be careful not to overmix; it’s okay if a few lumps remain. If you want, add 1 cup of chopped walnuts here for a nice crunch. In a small bowl, prepare the streusel. Mix together ½ cup of flour, ⅓ cup of packed brown sugar, and 1 teaspoon of ground cinnamon. Cut in ¼ cup of cold, cubed butter using a fork until the mix looks crumbly. Spoon the batter into the prepared muffin tin. Fill each cup about ¾ full. Then, sprinkle the streusel topping generously over each muffin for added flavor and texture. Place the muffin tin in the preheated oven. Bake for about 18-20 minutes. To check for doneness, insert a toothpick into the center of a muffin. It should come out clean when they’re ready. After baking, let the muffins cool in the pan for about 5 minutes. Then, transfer them to a wire rack to cool completely. Enjoy these muffins warm for a real treat! - Ensure accurate measurements for best results. - Use room temperature ingredients for better blending. When you bake, precision is key. Use a kitchen scale or measuring cups. This way, your muffins will rise perfectly. Room temperature ingredients mix more easily. They create a smoother batter. - Avoid overmixing to keep muffins fluffy. - Use a toothpick to check for doneness. Mix your batter gently. Overmixing can lead to tough muffins. You want them light and airy. Check if they are done by inserting a toothpick. If it comes out clean, your muffins are ready. - Add cream cheese frosting for extra flavor. - Pair with coffee or tea for a complete treat. A dollop of cream cheese frosting makes these muffins even better. It adds a rich, creamy taste. Enjoy them with a warm cup of coffee or tea. This pairing is perfect for breakfast or a snack. {{image_4}} You can make your muffins even better with different add-ins. If you want a nutty crunch, use pecans instead of walnuts. You can also swap walnuts for chocolate chips for a sweet surprise. Both options will add flavor and texture to your muffins. Change up the spices for a new taste. Add ginger or allspice to the mix for extra warmth. You can also try adding cranberries. They bring a nice tartness that balances the sweetness of the pumpkin and sugar. These small changes can make a big difference in flavor. If you want a vegan treat, you can easily substitute eggs with flaxseed meal. Mix 1 tablespoon of flaxseed meal with 3 tablespoons of water for one egg. This will help bind your muffins. For those who need gluten-free options, just use gluten-free flour instead of all-purpose flour. This way, everyone can enjoy these tasty muffins. You can store your muffins at room temperature. Use an airtight container. They will stay fresh for up to 2 days. This way, they remain soft and tasty. If you want to keep them longer, refrigerate the muffins. They will stay good for up to one week. Just make sure to keep them covered to avoid drying out. Freezing is a great option for long-term storage. You can freeze the muffins for up to 3 months. When you are ready to eat them, just reheat before serving. This keeps them warm and delicious. Yes, but make sure it's puréed and cooked properly. Fresh pumpkin gives a lovely taste. It may take more time to prepare. You can roast or steam the pumpkin until soft. Then blend it into a smooth purée. Use whole wheat flour and reduce the sugar. Whole wheat flour adds fiber and nutrients. You can also swap some sugar for natural sweeteners like applesauce or mashed bananas. This keeps the muffins moist and adds flavor. They pair well with coffee, tea, or a side of yogurt. A warm drink enhances the cozy flavors. Yogurt adds creaminess and protein, making it a balanced snack. You can also enjoy them with honey or jam for extra sweetness. It's best to bake the muffins fresh for optimal texture. However, you can refrigerate the batter for up to 24 hours. Just cover it well to keep it from drying out. When ready, bake them as usual for a warm treat. These cinnamon pumpkin streusel muffins bring joy and flavor to your kitchen. You learned about essential dry and wet ingredients, which create a delicious base. The streusel topping adds a delightful crunch. I shared tips to perfect your baking, along with fun variations and storage advice. Enjoy creating these treats with family and friends. Remember, small changes can enhance flavor and health. Trust these steps to guide your baking journey. Happy baking!

Cinnamon Pumpkin Streusel Muffins Flavorful Delight

PREV 1 … 5 6 7 … 20 NEXT
purelyyumrecipes

explore

DessertsDinnerAppetizersDrinks

Our Policies

  • Cookie Policy
  • Copyright Policy
  • Disclaimer
  • GDPR Policy
  • Terms Of Use
Back to Top
  • About
  • Contact Us
  • Privacy Policy
© 2025 purelyyumrecipes