FREE DINNER EBOOK! Get your copy!
  • Cookie Policy
  • GDPR Policy
  • Disclaimer
  • Terms Of Use
  • Visit my other site: Fun Cookie Recipes
purelyyumrecipes
  • Home
  • Dinner
  • Desserts
  • Drinks
  • Appetizers
  • Contact
  • About
  • Privacy Policy
  • Home
  • Dinner
  • Desserts
  • Drinks
  • Appetizers
  • Contact
  • About
  • Privacy Policy
  • Cookie Policy
  • GDPR Policy
  • Disclaimer
  • Terms Of Use
Visit my other site: Fun Cookie Recipes

HOME / CATEGORIES /

Latest

- 1 cup apple cider - 2 cups all-purpose flour - 1 teaspoon baking powder - 1/2 teaspoon baking soda - 1 teaspoon ground cinnamon - 1/2 teaspoon ground nutmeg - 1/2 teaspoon ground allspice - 1/4 teaspoon salt - 1/2 cup granulated sugar - 1/4 cup packed brown sugar - 2 large eggs - 1/2 cup unsweetened applesauce - 1/2 cup vegetable oil - 1 teaspoon vanilla extract - Additional spices (cloves, ginger) - Toppings (chocolate glaze, caramel drizzle) When making spiced apple cider donut muffins, each ingredient brings its own charm. The apple cider adds a rich fruity flavor. It also keeps the muffin moist. Flour gives structure, while baking powder and baking soda help it rise. Spices like cinnamon, nutmeg, and allspice create warmth and depth. They make these muffins feel cozy and inviting. A pinch of salt balances the sweetness, enhancing the flavor. Granulated sugar and brown sugar add sweetness and a slight caramel note. Eggs act as a binder and provide richness. Applesauce replaces some fat while keeping the muffins tender. Vegetable oil ensures a light texture. Finally, vanilla extract gives a lovely aroma that draws you in. If you want to boost the flavor even more, consider adding cloves or ginger. You can also top the muffins with chocolate glaze or caramel drizzle for a sweet finish. These extras can turn a simple muffin into a delightful treat. - Preheat your oven to 350°F (175°C). - Prepare your muffin tin by lining it with paper liners or greasing it. This helps the muffins come out easily. - Pour 1 cup of apple cider into a small saucepan. Heat it over medium-high heat until it boils. - Once boiling, reduce the heat and let it simmer. Stir it occasionally for about 10-15 minutes. - The cider should reduce to about 1/2 cup. Remove it from heat and let it cool for a few minutes. - In a large mixing bowl, add 2 cups of all-purpose flour, 1 teaspoon of baking powder, 1/2 teaspoon of baking soda, 1 teaspoon of ground cinnamon, 1/2 teaspoon of ground nutmeg, 1/2 teaspoon of ground allspice, and 1/4 teaspoon of salt. Whisk these dry ingredients well. - In another bowl, combine 1/2 cup of granulated sugar, 1/4 cup of brown sugar, 2 large eggs, 1/2 cup of unsweetened applesauce, 1/2 cup of vegetable oil, and 1 teaspoon of vanilla extract. Whisk until smooth. - Slowly pour the cooled apple cider into the wet mixture. Stir gently until everything is mixed well. - Add the dry ingredients to the wet mixture. Use a spatula to fold the mixture until just combined. It's okay if there are a few lumps; don’t overmix. - Spoon the batter into the prepared muffin tin. Fill each cup about three-quarters full. - Place the muffin tin in the oven and bake for 18-20 minutes. - To check if they are done, insert a toothpick into the center of a muffin. It should come out clean. - Let the muffins cool in the tin for about 5 minutes, then transfer them to a wire rack to cool completely. To make the best spiced apple cider donut muffins, avoid overmixing the batter. Overmixing can make your muffins tough. Mix until the dry and wet ingredients just come together. A few lumps are okay! Next, ensure your oven is at the right temperature. Preheat it to 350°F (175°C) before baking. An oven thermometer can help you check this. If the temperature is off, your muffins might bake unevenly. For a lovely presentation, serve your muffins on a rustic wooden platter. This gives a warm, cozy feel. Lightly dust the tops with extra cinnamon-sugar for a nice touch. You can also add fresh apple slices around the muffins. This not only looks great but adds a fresh crunch. Pair these muffins with warm tea or coffee. The flavors blend so well together, making a perfect afternoon treat. Your friends and family will love this cozy pairing. You can adjust the spices in your muffins to match your taste. If you like it spicier, add a pinch of cloves or ginger. These spices can add a unique twist to the flavor. If you want to change the sweetness, try using honey or maple syrup instead of sugar. This can make your muffins taste different while still being delicious. Just remember, if you use liquid sweeteners, reduce the amount of other liquids in your recipe slightly. {{image_4}} You can play with flavors in your spiced apple cider donut muffins. One fun idea is a pumpkin spice version. Just swap some spices for pumpkin pie spice. This change brings a warm, cozy taste, perfect for fall. Another great option is to use different fruits. Pears add sweetness and a soft texture. Cranberries give a nice tartness that balances the sweetness. Both options keep the muffins fresh and exciting. If you or someone you know has gluten issues, try using gluten-free flour. Many brands offer great options that work well in muffins. Just make sure to check the package for measurements. For those who follow a vegan diet, you can make easy swaps. Use flaxseed meal mixed with water instead of eggs. Replace the vegetable oil with a plant-based option like coconut oil. These changes keep the muffins tasty and fit for everyone. To keep your spiced apple cider donut muffins fresh, store them at room temperature. Place them in an airtight container. This helps maintain their soft texture and flavor. They will stay good for about 2-3 days. If you prefer, you can also store them in the refrigerator. This can extend their freshness for up to a week. Just make sure to wrap them well to avoid drying out. For long-term storage, freezing is a great option. First, let the muffins cool completely. Then, wrap each muffin in plastic wrap. Place the wrapped muffins in a freezer-safe bag or container. They can last up to 3 months in the freezer. When you’re ready to enjoy them, thaw the muffins at room temperature. You can also warm them in the oven at 350°F (175°C) for about 10-15 minutes. This method gives the best results, keeping them soft and tasty. How do I know when the muffins are done? To check if the muffins are done, insert a toothpick into the center. If it comes out clean, they are ready. You can also lightly press the tops; they should spring back. Can I use fresh apple juice instead of apple cider? Yes, you can use fresh apple juice. However, apple cider adds a richer flavor. Consider reducing the juice to concentrate the taste, just like you would with cider. Why did my muffins turn out dense? Dense muffins often result from overmixing the batter. Mix just until the dry ingredients are combined. Also, ensure you measure the flour correctly; too much can lead to density. What can I do if my muffins are too sweet? If your muffins are too sweet, try cutting back on sugar next time. You can also balance it by adding more spices like cinnamon or nutmeg. Adding a pinch of salt can help too. Can I make mini versions of these muffins? Absolutely! Use a mini muffin tin and reduce the baking time. Start checking for doneness around 10-12 minutes. Mini muffins are cute and perfect for snacking! What can I add to make these muffins more savory? To add a savory touch, try mixing in grated cheese or chopped herbs like rosemary. You could also add cooked bacon bits for a delicious twist. This article covered how to make delicious apple cider muffins. We explored the key ingredients, from apple cider to spices. I shared step-by-step instructions for preparation and baking. You also learned helpful tips for perfecting your muffins and variations to try for different seasons. Remember to store these muffins properly for the best taste. Whether enjoying plain or with toppings, these muffins offer great flavor. Experiment and make these recipes your own to delight your friends and family. Enjoy your baking journey and the tasty results that follow!

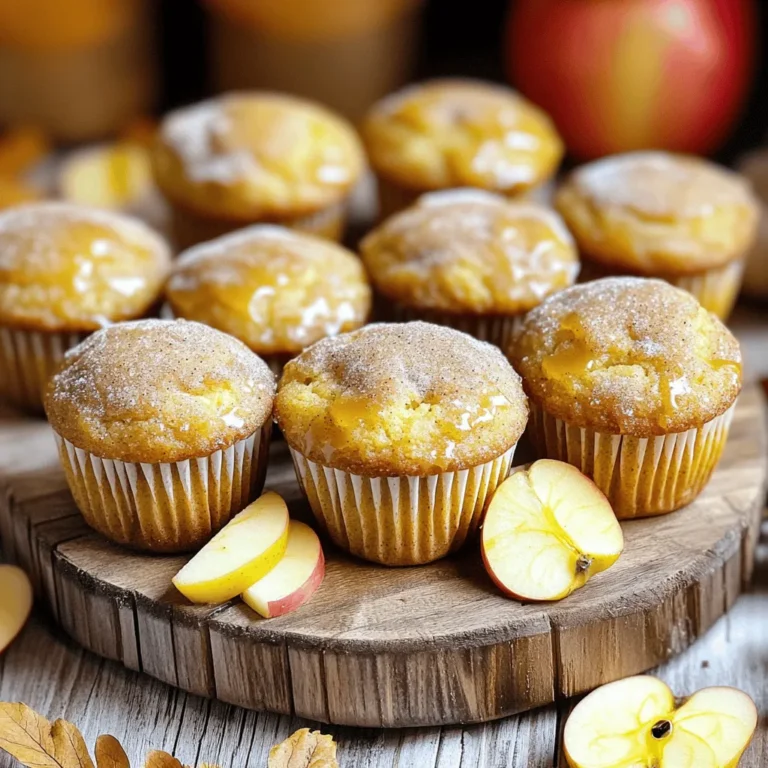
Spiced Apple Cider Donut Muffins Irresistible Treat

- 1 lb sirloin steak, cut into 1-inch cubes - 1 lb baby potatoes, halved - 4 tablespoons unsalted butter The main ingredients are key for flavor. Sirloin steak offers tenderness and rich taste. Baby potatoes add a creamy texture when cooked. Unsalted butter forms the base for the garlic butter sauce. - 1 teaspoon fresh rosemary, finely chopped - 1 teaspoon fresh thyme leaves - ½ teaspoon smoked paprika Herbs and seasonings elevate this dish. Fresh rosemary brings a pine-like aroma. Fresh thyme adds a subtle earthiness. Smoked paprika gives a warm, smoky flavor that rounds out the taste. - 4 cloves garlic, minced - 2 tablespoons extra virgin olive oil - Salt and black pepper to taste - Fresh parsley, chopped for garnish Garlic forms the heart of the garlic butter. Extra virgin olive oil helps season the potatoes. Salt and black pepper enhance all flavors. Fresh parsley adds color and freshness when served. Preheating your oven is key to great cooking. It ensures the heat is even. This helps your steak and potatoes cook properly. Set your oven to 425°F (220°C) and let it warm up. A hot oven makes sure your food roasts well and gets a nice brown color. Making the garlic butter is simple but important. In a small pan, melt four tablespoons of unsalted butter over medium heat. Once it's melted, add four minced garlic cloves, one teaspoon of chopped rosemary, and one teaspoon of thyme leaves. Stir in half a teaspoon of smoked paprika, salt, and black pepper. Cook for about one to two minutes. This step fills your kitchen with a wonderful aroma. Next, we will prep the potatoes. Take one pound of halved baby potatoes and place them in a large bowl. Drizzle two tablespoons of extra virgin olive oil over them. Add salt and black pepper to taste. Toss everything together. Make sure each potato is coated well. This adds flavor and helps them roast nicely. Now, it’s time to roast. Spread the seasoned potatoes on a parchment-lined baking sheet. Make sure they have enough space. This helps them cook evenly. Place the sheet in the preheated oven and roast for 15 minutes. Stir the potatoes halfway through. This keeps them from sticking and helps them brown. While the potatoes roast, season your steak. Take one pound of sirloin steak, cut into one-inch cubes. Sprinkle salt and black pepper all over the cubes. After 15 minutes, take the baking sheet out of the oven. Scatter the steak cubes over the potatoes. Drizzle the garlic butter mixture over both the steak and potatoes. This adds rich flavor. After roasting for another 10 to 12 minutes, check your food. The steak should be cooked to your liking, while the potatoes should be golden and tender. Remove the baking sheet from the oven and let it rest for a few minutes. Before serving, sprinkle fresh chopped parsley on top. This adds a colorful touch and fresh flavor. To get the best steak, know your doneness preferences. Here are some helpful tips: - Rare: Cook to 125°F (52°C). The center stays red and cool. - Medium Rare: Aim for 135°F (57°C). The center is warm and pink. - Medium: Target 145°F (63°C). The steak is mostly pink, with a bit of red. - Medium Well: Cook to 150°F (66°C). It has a slight hint of pink. - Well Done: Go for 160°F (71°C) or higher. The steak is fully cooked with no pink. Use a meat thermometer for accuracy. Check the steak as it cooks. This method helps you get the doneness you want. Want to boost the flavor? Try adding these extra seasonings: - Crushed red pepper flakes: Adds heat and spice. - Lemon zest: Brings a fresh and bright flavor. - Cumin: Adds a warm, earthy tone. - Bay leaves: Infuse a subtle herbal taste. You can mix these seasonings into the garlic butter. This will give the dish an extra kick. Experiment with flavors to find your favorite mix. Ovens can vary in temperature. Here are some adjustments to keep in mind: - Convection ovens: Lower the temperature by 25°F (14°C). This helps the food cook evenly. - Older ovens: Use an oven thermometer. These may not heat accurately. - High altitude: Increase cooking time slightly. This can change how food cooks. Keep an eye on your dish. If the potatoes look golden and the steak is sizzling, you're on the right track. Adjust times based on your oven's performance for the best results. {{image_4}} You can switch up the protein in this dish. Instead of sirloin steak, try flank steak or ribeye. Both cuts give great flavor. For a lighter option, use chicken breast or thighs. Pork tenderloin also works well. If you prefer plant-based proteins, consider marinated tofu or tempeh. Each choice brings new tastes to the dish. Feel free to add more veggies to your sheet pan. Carrots and bell peppers add color and sweetness. Zucchini or asparagus can give a fresh crunch. Broccoli florets are also a great addition for their nutrition. Just make sure to cut them to similar sizes for even cooking. Mixing in different veggies makes the meal more vibrant and tasty. Experiment with different herbs and spices to change the flavor. Try using oregano or basil for a Mediterranean twist. Cumin or chili powder can add a nice kick. For a citrusy hint, use lemon zest or a splash of lime juice. Don’t be afraid to mix and match seasonings. Each swap can give you a whole new dish! Store leftovers in an airtight container. This keeps them fresh. Place the container in the fridge after they cool. Use the leftovers within three days for the best taste. If you have more than you can eat, consider freezing some. To reheat, use the oven or a skillet. Preheat your oven to 350°F (175°C). Place the steak and potatoes on a baking sheet. Cover with foil to prevent drying out. Heat for about 15 minutes or until warm. In a skillet, add a little olive oil. Heat over medium heat and add the leftovers. Stir until everything is warm. You can freeze this dish, but it’s best to freeze the steak and potatoes separately. Allow them to cool completely. Wrap them tightly in plastic wrap, then foil. This keeps out air and moisture. They can last for up to three months in the freezer. To thaw, place in the fridge overnight. Then, reheat as mentioned above. Yes, you can use other cuts of steak. Cuts like ribeye or flank steak work well. They have great flavor and tenderness. Just make sure to cut them into cubes like the sirloin. Each cut gives a unique taste and texture. This dish takes about 40 minutes total. You will spend 10 minutes prepping and 30 minutes cooking. First, the potatoes roast for 15 minutes. Then, you add the steak and roast for another 10-12 minutes. Easy and quick! This dish pairs well with fresh veggies or a light salad. You might try steamed green beans or a simple arugula salad. These sides add color and balance to your meal. They also enhance the flavors of the steak and potatoes. Absolutely! You can prep the potatoes and garlic butter in advance. Store them in the fridge until you are ready to cook. Just remember to season the steak right before roasting. This keeps the meat flavorful and juicy. This article covered making a tasty sheet pan garlic butter steak and potatoes. We explored the ingredients, from sirloin steak to fresh herbs. I shared step-by-step instructions, helpful tips, and flavorful variations. Remember, cooking is fun, so play with flavors and try new things. Keep these tips in mind for perfect results. Enjoy your delicious meal and share it with others. Cooking doesn’t have to be hard when you have the right guidance! Keep experimenting and enjoy every bite.

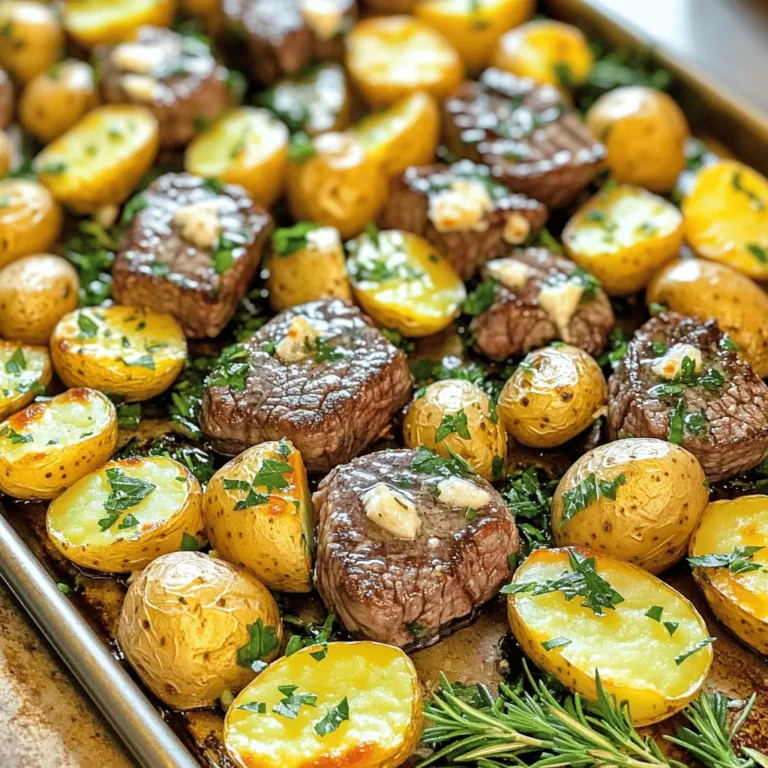
Savory Sheet Pan Garlic Butter Steak & Potatoes Recipe

- 1 cup low-fat cottage cheese - 1 ripe banana, sliced - 2 tablespoons natural peanut butter - 1 tablespoon honey (or maple syrup for a vegan option) - 1 cup unsweetened almond milk (or any preferred milk) - 1 tablespoon chia seeds - 1/2 teaspoon vanilla extract - A pinch of salt - Ice cubes (optional, for added thickness) 1. Cottage Cheese: 1 cup provides a creamy base and protein. 2. Banana: 1 ripe banana adds natural sweetness and texture. 3. Peanut Butter: 2 tablespoons give flavor and healthy fats. 4. Honey or Maple Syrup: 1 tablespoon sweetens the mix. 5. Almond Milk: 1 cup helps blend the ingredients. 6. Chia Seeds: 1 tablespoon adds fiber and omega-3s. 7. Vanilla Extract: 1/2 teaspoon enhances the flavor. 8. Salt: A pinch balances the sweetness. 9. Ice Cubes: Optional for thickness and chill. This smoothie packs a protein punch! - Cottage Cheese: 1 cup offers about 28 grams of protein. - Peanut Butter: 2 tablespoons add around 8 grams of protein. - Chia Seeds: 1 tablespoon gives about 2 grams of protein. In total, you can enjoy approximately 38 grams of protein in one serving. This makes it ideal for muscle recovery or a filling snack. Plus, it’s rich in vitamins and minerals that support your health. Start by gathering all your ingredients. You need low-fat cottage cheese, a ripe banana, natural peanut butter, honey, almond milk, chia seeds, vanilla extract, salt, and ice cubes if you want a thicker smoothie. Begin by adding the cottage cheese and sliced banana into your blender. This creamy base is key for a smooth texture. Next, add the peanut butter for that rich flavor. Spoon in the honey or maple syrup to sweeten your smoothie. Pour in the almond milk to help blend everything smoothly. Sprinkle in chia seeds for added nutrition, and don’t forget the vanilla extract for a nice touch. Finally, add a pinch of salt to bring out the sweetness. Now, it’s time to blend! Start your blender on low to mix the ingredients. Gradually increase to high speed. This helps break down any lumps quickly. Blend for about 30 to 60 seconds. The goal is to achieve a creamy, lump-free texture. If you notice it’s too thick, add a little more almond milk and blend again. After blending, taste your smoothie. If you want it sweeter, add more honey or maple syrup. Blend again for a few seconds to mix it well. If you like a thicker smoothie, toss in a few ice cubes before blending one last time. Once it’s just right, pour it into a tall glass. You can garnish it with chia seeds or a banana slice for a nice look. Enjoy! To get a smooth blend, always add the wet ingredients first. Start with the cottage cheese and almond milk. This helps the blades move freely. Next, add the banana and peanut butter. If you want it creamier, blend longer. Use a high-speed setting to avoid lumps. You can mix things up easily. Try adding frozen berries for a fruity twist. Spinach adds green goodness without changing the taste much. Want more protein? Use Greek yogurt or your favorite protein powder. You can even swap the peanut butter for almond butter for a new flavor. Presentation matters! Pour your smoothie into a tall glass. Top it with a sprinkle of chia seeds for crunch. Add a banana slice on the rim for a pop of color. A colorful straw makes it fun. Serve with a smile, and enjoy your tasty creation! {{image_4}} If you want a vegan option, swap honey for maple syrup. Maple syrup adds a sweet touch and keeps it plant-based. Use dairy-free milk like almond or oat milk instead of regular milk. This keeps your smoothie creamy without dairy. You can boost the protein even more! Try adding a scoop of protein powder. This works well with all flavors. Greek yogurt is another great choice. It adds creaminess and extra protein, making your smoothie even richer. Seasonal fruits can change your smoothie game. In summer, add fresh berries for a sweet burst. Raspberries and strawberries mix well with peanut butter. In fall, toss in some spinach for a healthy green touch. It blends in easily and adds nutrients without changing the taste. If you have leftover smoothie, pour it into a clean, airtight container. Seal it tight and store it in the fridge. It stays fresh for up to 24 hours. Before drinking, give it a good shake to mix everything well again. You can freeze your smoothie for later use. Pour the smoothie into ice cube trays or silicone molds. Once frozen, pop the cubes into a freezer bag. They can last for about three months. When you want to enjoy it, blend the cubes with a little milk to get a smooth drink. Keep your smoothie fresh by using a few simple tips. Always use fresh ingredients like ripe bananas and good-quality peanut butter. Store the smoothie in glass containers, as they are less reactive than plastic. If you notice any separation, just stir it up before drinking. Enjoy your tasty treat! A High-Protein Peanut Butter Cottage Cheese Smoothie has around 400 calories. This number can change based on the ingredients you use. For example, if you add more honey or different milk, the calorie count may rise. It’s a great choice for a filling snack or meal. Yes, you can make this smoothie ahead of time. It stays fresh in the fridge for up to 24 hours. Just blend the ingredients, then store it in a sealed container. When you’re ready to drink it, give it a good shake or stir. This way, you enjoy a quick and tasty meal. Cottage cheese offers many health benefits in smoothies. It is high in protein, which helps build muscle and keeps you full. It also has calcium, good for strong bones. Plus, it adds a creamy texture without extra fat. This makes your smoothie rich and satisfying. Adding cottage cheese makes your drink both tasty and nutritious. This blog post covered how to create a nutritious high-protein smoothie. We detailed the ingredients and their amounts, then explored preparation and blending techniques. I shared tips for adjusting sweetness and suggested variations for flavor. Lastly, I gave storage tips and answered common questions. Smoothies can fit into many diets and help nourish your body. Now, you can make a tasty, healthy smoothie with confidence! Enjoy experimenting and discovering new flavors.

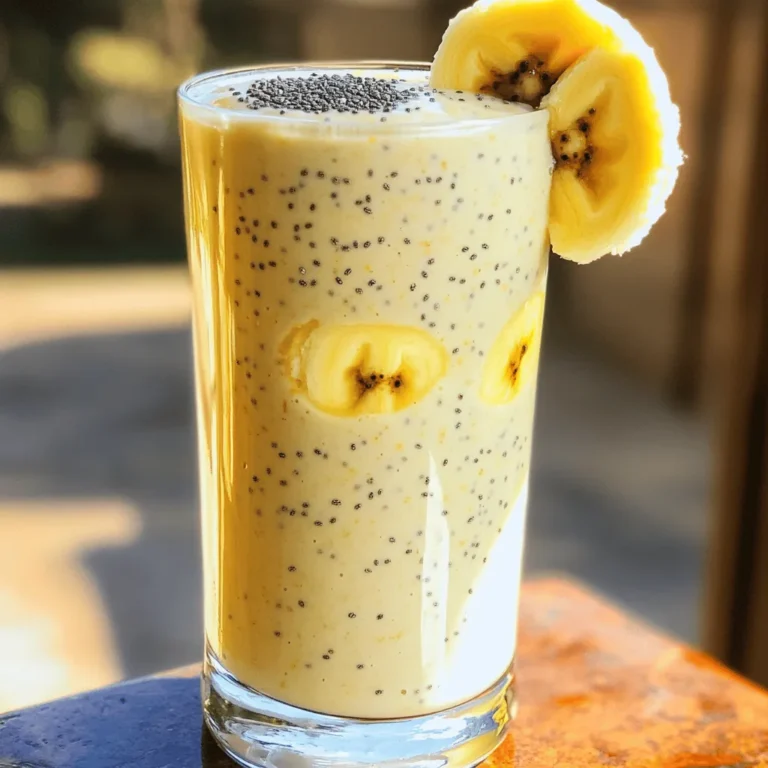
High-Protein Peanut Butter Cottage Cheese Smoothie Recipe

To make a delightful Cranberry Orange Glazed Pound Cake, you will need the following ingredients: - 1 ½ cups all-purpose flour - 1 teaspoon baking powder - ½ teaspoon baking soda - ¼ teaspoon salt - ½ cup unsalted butter, softened - 1 cup granulated sugar - 3 large eggs - 1 teaspoon vanilla extract - Zest of 1 large orange - ½ cup plain Greek yogurt - 1 cup fresh cranberries (or frozen) - 1 cup powdered sugar (for the glaze) - 2 tablespoons fresh orange juice (for the glaze) These ingredients work together to create a moist cake with a bright flavor. The fresh cranberries add a lovely tartness, while the orange zest brings a citrusy brightness. The Greek yogurt keeps the cake soft and fluffy. When you gather these items, make sure the butter is softened. This step is key for a light and airy texture. If you use frozen cranberries, thaw them first to avoid excess moisture. Each ingredient plays a special role, so don’t skip any! - Preheat oven to 350°F (175°C). - Grease and flour a 9x5 inch loaf pan. Start by getting your oven ready. Set it to 350°F (175°C). While that heats up, take a 9x5 inch loaf pan. Grease it well with unsalted butter or a non-stick spray. Dust it with flour to stop the cake from sticking later. - Whisk together flour, baking powder, baking soda, and salt. In a medium bowl, combine 1 ½ cups of all-purpose flour, 1 teaspoon of baking powder, ½ teaspoon of baking soda, and ¼ teaspoon of salt. Use a whisk to mix these dry ingredients together well. This step helps the cake rise nicely. - Cream softened butter and granulated sugar until fluffy. - Add eggs one at a time and mix well. - Stir in vanilla extract and orange zest. Next, take a large bowl. Use an electric mixer to cream ½ cup of softened butter and 1 cup of granulated sugar. Beat until it is light and fluffy, about 3 to 5 minutes. Then, add 3 large eggs one at a time. Mix well after each egg. After that, stir in 1 teaspoon of vanilla extract and the zest of 1 large orange. This will add a great flavor. - Gradually add dry mixture and Greek yogurt, alternating. Now, it’s time to combine. Gradually add the dry mixture to your wet mix. Alternate this with ½ cup of plain Greek yogurt. Start and end with the dry mix. Mix on low speed until just blended. Be careful not to overmix, or your cake will be tough. - Gently fold in cranberries. Take 1 cup of fresh cranberries and gently fold them into the batter. Make sure they are evenly spread throughout without crushing them. This will give your cake bursts of fruity flavor. - Pour batter into the loaf pan and smooth the top. - Bake for 55-60 minutes until a toothpick comes out clean. Pour the batter into the prepared loaf pan. Use a spatula to smooth the top. Bake in the preheated oven for 55 to 60 minutes. To check if it is done, insert a toothpick into the center. It should come out clean when the cake is ready. - Cool in pan, then drizzle with glaze made of powdered sugar and orange juice. Once baked, let the cake cool in the pan for about 10 minutes. Carefully transfer it to a wire rack to cool completely. For the glaze, mix 1 cup of powdered sugar with 2 tablespoons of fresh orange juice in a small bowl. Drizzle this glaze over the cooled cake, letting it flow down the sides. This adds a sweet and tangy finish. To bake the best Cranberry Orange Glazed Pound Cake, measuring is key. Use a kitchen scale for precise amounts. For dry ingredients, spoon flour into the measuring cup, then level it off. This method prevents the cake from being too dense. Do not overmix the batter. After adding the dry ingredients, mix only until combined. Overmixing can make the cake tough. You want a light and fluffy texture, so be gentle! Adjusting the glaze consistency is simple. Start with powdered sugar and orange juice. If it seems too thick, add a bit more juice. If it’s too runny, add more powdered sugar. Aim for a smooth, glossy finish. For decorating, drizzle the glaze in a zigzag pattern over the cake. This adds flair and makes it look fancy. You can also sprinkle some cranberries on top for extra color and flavor. Want more citrus flavor? Zest another orange or even a lemon for a fresh twist. Use a fine grater to get vibrant zest without the bitter white pith. Consider adding warm spices like cinnamon or nutmeg. Just a pinch adds depth and warmth to the cake. Mix spices right in with the dry ingredients for an even blend. {{image_4}} You can switch out cranberries for other fruits. Try blueberries, raspberries, or even diced apples. Each fruit adds its own taste and color. Blueberries give a sweet burst, while raspberries add a tart zing. Apples bring a soft texture and natural sweetness. Just remember to adjust the sugar if you use a sweeter fruit. If you need a gluten-free cake, no worries! Use gluten-free flour blends instead of all-purpose flour. Many brands work well for baking. Look for blends that include xanthan gum, as it helps mimic the texture of regular flour. This way, you still get a soft and moist pound cake. For a dairy-free cake, swap the butter for coconut oil or a dairy-free butter substitute. You can also replace Greek yogurt with almond or coconut yogurt. These swaps keep your cake moist and tasty. Just be sure to check the labels for any added sugars or flavors. Store your Cranberry Orange Glazed Pound Cake at room temperature for up to three days. Wrap it in plastic wrap to keep it fresh. If you prefer, you can refrigerate it for about a week. Just note that refrigeration can change the cake’s texture, making it a bit denser. To freeze the pound cake, wrap it tightly in plastic wrap and then in aluminum foil. This helps prevent freezer burn. You can freeze it for up to three months. When you want to enjoy it, take it out and place it in the fridge overnight to thaw. Once thawed, serve it at room temperature or warm it in the oven. For the best texture, reheat slices in the oven at 350°F for about 10 minutes. This method warms the cake evenly and restores its moistness. You can also microwave slices for about 20 seconds if you need a quick fix, but this might make it a bit dry. Use the toothpick test to check if it is done. Insert a toothpick into the center of the cake. If it comes out clean, your cake is ready. If there is batter on the toothpick, bake for a few more minutes. This simple test helps you avoid underbaking. Yes, you can use frozen cranberries. Just thaw them first. Frozen cranberries may be softer than fresh ones. They can still give great flavor and texture. If you use frozen, add them straight into the batter without extra flour. This helps prevent them from sinking. Pair this cake with hot tea or coffee. The citrus flavor matches well with these drinks. You might also serve it with whipped cream or vanilla ice cream. Fresh fruit on the side can add a nice touch too. The cake lasts for about 3 to 5 days at room temperature. Wrap it well to keep it fresh. You can store it in the fridge for a week. For longer storage, freeze it for up to three months. Make sure to wrap it tightly before freezing. You learned how to make a delicious cranberry orange glazed pound cake. We covered the key ingredients, step-by-step instructions, and helpful tips. You can adjust flavors or make it gluten-free or dairy-free. This cake stores well and can be frozen for later use. Baking is fun, and this recipe is sure to impress. Enjoy your creation, and share it with others! Your new skills will make each bite special.

Cranberry Orange Glazed Pound Cake Delightful Recipe

To make this dish, you will need: - 8 oz pasta (fusilli or penne) - 1 tablespoon olive oil - 3 cloves garlic, minced - 1 can (14 oz) diced tomatoes with their juices - 2 cups vegetable broth - 1 cup heavy cream or coconut cream for a dairy-free alternative - 2 cups fresh spinach, roughly chopped - 1 teaspoon dried oregano - 1 teaspoon red pepper flakes (optional) - Salt and freshly ground black pepper to taste - ½ cup grated Parmesan cheese (or nutritional yeast for a vegan option) - Fresh basil leaves for garnishing These ingredients come together to create a rich and creamy pasta dish that is both comforting and satisfying. The tomatoes and spinach add color and nutrition, while the pasta serves as the perfect base. If you want a creamy sauce, heavy cream is a great choice. You can replace it with coconut cream for a dairy-free option. This keeps the dish rich while making it suitable for anyone avoiding dairy. For a cheesy flavor without dairy, nutritional yeast works wonders. It adds a savory depth that enhances the overall taste. While fusilli and penne are fantastic choices for this recipe, you can use any pasta you love. Spaghetti or rotini also work well. Choose a pasta shape that holds sauce well. This helps each bite be full of flavor. Just remember to adjust the cooking time based on the type of pasta you select. Start by heating one tablespoon of olive oil in a large pot over medium heat. Once the oil is hot, add three cloves of minced garlic. Cook the garlic for one to two minutes. You want it to smell great but not turn brown. This step builds the flavor. Next, add one can of diced tomatoes with their juices and two cups of vegetable broth to the pot. Stir it well and bring this mix to a gentle simmer. Now, introduce eight ounces of your chosen pasta and one teaspoon of dried oregano. Cover the pot and let it cook for about ten to twelve minutes. Stir it every now and then. When the pasta is al dente, it’s ready for the next step. Lower the heat and slowly pour in one cup of heavy cream or coconut cream. Stir this mixture continuously. You want the sauce to become rich and creamy. Once that's done, add two cups of chopped fresh spinach. If you love heat, sprinkle in one teaspoon of red pepper flakes. Season with salt and fresh black pepper to taste. Cook this for another two to three minutes. This lets the spinach wilt and blend into the dish. Finally, stir in half a cup of grated Parmesan cheese or nutritional yeast for a vegan option. Adjust the seasoning to get the flavors just right. Let the dish rest for a couple of minutes before serving. To boost the flavor of your creamy tomato spinach pasta, try a few easy tips. First, use fresh garlic instead of jarred. Fresh garlic gives a bright taste. You can add a splash of lemon juice for a zesty kick. This brightens the dish and lifts the flavors. If you like heat, increase the red pepper flakes. You can also mix in fresh herbs like parsley or thyme for a fresh touch. Finally, top with a drizzle of high-quality olive oil before serving. It adds richness and depth. One common mistake is overcooking the pasta. Check it at the lower end of the cooking time. You want it al dente, firm but cooked. Another mistake is not seasoning enough. Taste as you cook and add salt and pepper gradually. Also, avoid using low-quality canned tomatoes. They can make your dish taste bland. Always opt for good quality, whole canned tomatoes. Lastly, don’t skip resting the dish after cooking. Letting it sit allows the sauce to thicken and flavors to settle. When serving your pasta, presentation matters. Use shallow bowls for a modern look. Start with a generous scoop of pasta in each bowl. Add a sprinkle of extra Parmesan on top for a nice finish. Then, place a few fresh basil leaves on the pasta. This adds color and freshness. For an extra touch, drizzle with a bit of olive oil. It enhances the look and taste. Consider serving with a side of crusty bread for dipping. This creates a beautiful and inviting meal. {{image_4}} To make this creamy tomato spinach pasta vegan, swap the heavy cream for coconut cream. It gives a rich texture without dairy. Use nutritional yeast instead of Parmesan for flavor. This keeps the dish vegan and adds a cheesy taste. You can boost the protein by adding chicken, shrimp, or tofu. If using chicken, cook it first, then set aside before starting the pasta. For shrimp, add them during the last few minutes of cooking. Tofu should be cubed and sautéed until golden. Add it just before you mix in the spinach. Feel free to add seasonal veggies for extra flavor and nutrition. In spring, try fresh asparagus or peas. Summer calls for zucchini or bell peppers. In autumn, consider mushrooms or squash. Winter is perfect for kale or broccoli. Each season offers new tastes to explore. To store leftovers, let the pasta cool to room temperature. Then, place it in an airtight container. This will keep it fresh for up to three days in the fridge. Make sure to seal the container well to avoid unwanted odors. When you're ready to enjoy the pasta again, reheat it on the stove. Add a splash of water or broth to prevent sticking. Heat it over medium-low heat, stirring occasionally. This ensures that the pasta warms evenly without drying out. If you want to freeze the pasta, do it while it's fresh. Place the cooled pasta in a freezer-safe container. It can last up to three months in the freezer. To reheat, thaw it in the fridge overnight. Then, warm it on the stove with a little liquid, just like before. Yes, you can use many types of pasta for this dish. Fusilli and penne work best, but you can try spaghetti, farfalle, or any pasta you love. Just keep in mind that cooking times may vary. Check the package for the right cooking time. This way, you will get the perfect texture. If you want more heat, add red pepper flakes. You can also add fresh chopped chili peppers. Another option is to use a spicy marinara sauce instead of diced tomatoes. Start with a small amount, taste, and add more if needed. This way, you can control the spice level to fit your taste. If you want a lighter option, use coconut cream. It's creamy and adds a nice flavor. You can also use cashew cream for a rich taste. Another choice is to use a mix of milk and a little cornstarch. This will help thicken your sauce without the heaviness of cream. This blog post covered how to make creamy tomato spinach pasta with various options. I shared essential ingredients, including dairy and dairy-free choices. You learned about cooking pasta and creating the sauce step-by-step. I gave tips to boost flavor, avoid mistakes, and present your dish nicely. Finally, I highlighted fun variations, storage methods, and answered common questions. Enjoy making this dish your own. Cooking should be fun and full of flavor!

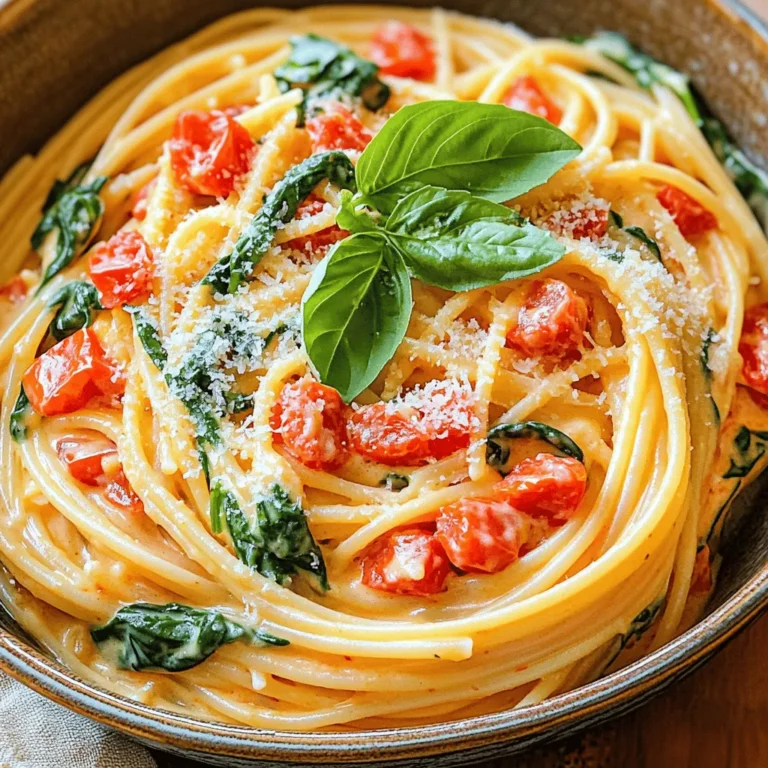
Creamy Tomato Spinach Pasta One Pot Delight

- 1 lb chicken breast, cut into bite-sized pieces - 1 cup coconut milk - 2 tablespoons red curry paste - 1 tablespoon fish sauce - 1 tablespoon brown sugar - 1 tablespoon fresh lime juice - 2 cloves garlic, minced - 1 tablespoon fresh ginger, minced - 1 tablespoon vegetable oil These main ingredients create the base of our Thai red curry chicken. The chicken provides protein, while coconut milk adds creaminess. Red curry paste brings rich flavor, and the fish sauce adds umami. Brown sugar balances the heat, and lime juice gives a fresh touch. - 1 red bell pepper, sliced into thin strips - 1 cup snow peas, trimmed - 1/2 cup bamboo shoots, drained and rinsed The vegetables add color and crunch to the dish. Red bell pepper brings sweetness. Snow peas add a nice snap, while bamboo shoots offer a unique texture. Together, they create a vibrant and healthy meal. - Fresh basil leaves, for garnish - Lime wedges, for serving - Steamed jasmine rice, for serving Garnishes make the dish more appealing. Fresh basil adds a pop of color and aroma. Lime wedges give an extra zing. Serve the curry over jasmine rice to soak up the delicious sauce. Heat 1 tablespoon of vegetable oil in a large skillet over medium heat. Once hot, add 2 cloves of minced garlic and 1 tablespoon of minced ginger. Sauté these for about 1 minute until they smell great and turn golden. This step builds the base flavor for your curry. Next, add 1 pound of chicken breast cut into bite-sized pieces. Spread the chicken out in a single layer. Cook for 5 to 7 minutes, stirring often. You want the chicken to brown and cook all the way through. This ensures juicy bites in your curry. Now, it's time to add flavor. Stir in 2 tablespoons of red curry paste. Keep stirring for about 2 minutes. This helps the curry paste release its rich and bold flavors. Pour in 1 cup of coconut milk, followed by 1 tablespoon of fish sauce, 1 tablespoon of brown sugar, and 1 tablespoon of fresh lime juice. Mix everything well until combined. Next, fold in sliced red bell pepper, snow peas, and bamboo shoots. Let the curry simmer on low heat for 5 to 10 minutes. This helps the veggies stay tender-crisp and lets the sauce thicken. Taste your curry and adjust the flavor if needed. You might want more lime juice for zing or an extra teaspoon of brown sugar for sweetness. Serve this delicious Thai red curry hot over jasmine rice. Garnish with fresh basil leaves for a pop of color and aroma. Enjoy every bite! To make your Thai red curry milder, use less red curry paste. Start with one tablespoon. If you want more heat, add another tablespoon. You can also add fresh chili slices for an extra kick. Remember to taste as you go! To deepen the flavor, add fresh herbs like cilantro or Thai basil. A pinch of lime zest brings brightness. You can also use a dash of soy sauce for umami. Consider adding a splash of coconut aminos for a unique twist. Chop your veggies and chicken ahead of time. This saves you time during cooking. Use a food processor for garlic and ginger to speed up prep. When you sauté, use a wide pan to cook everything evenly. This makes the process smoother and faster. {{image_4}} You can switch chicken for other proteins. Shrimp, tofu, or beef work well. Shrimp cooks fast and adds a nice texture. Tofu provides a great plant-based option. Beef can give a heartier taste. Adjust cooking times to ensure everything cooks evenly. For a tasty vegan meal, swap chicken with tofu or tempeh. Use coconut aminos instead of fish sauce. Replace brown sugar with maple syrup for sweetness. Make sure to check your curry paste for animal products. This keeps the dish plant-based and delicious. Experiment with different spices and flavors. Add lemongrass for a fresh twist. A dash of lime zest can brighten the dish. You might also try basil or cilantro for added depth. If you like heat, add chili flakes or fresh chilies. This gives you a chance to make the dish your own. To keep your Thai red curry chicken fresh, store leftovers in an airtight container. Make sure it cools to room temperature first. This helps avoid soggy food. You can keep it in the fridge for up to three days. Before serving again, check for any off smells. For long-term storage, you can freeze your curry. Let it cool completely. Then, place it in a freezer-safe container. Leave some space at the top, as it will expand. You can freeze it for up to three months. To make thawing easy, divide it into smaller portions. To reheat, the best method is on the stove. Pour the curry into a pan and heat it on low. Stir it often to keep it from sticking. You can add a splash of coconut milk if it seems dry. This helps maintain the rich flavor. If using a microwave, cover it loosely and heat in short bursts. Stir in between to ensure even warming. Yes, you can use different proteins. Chicken is great, but shrimp, pork, or beef work well too. For shrimp, add it later to avoid overcooking. If using beef, choose tender cuts like sirloin. Tofu is a fantastic option for a plant-based meal. Just press it to remove excess moisture for the best texture. Yes, there are several alternatives. You can use almond milk or cashew cream for a lighter version. If you prefer a creamier texture, try using soy or oat cream. Both options keep it dairy-free while still adding a nice richness. Just remember, the flavor will change slightly, so adjust spices as needed. You have a few easy options to thicken your curry. One way is to simmer it longer to reduce the liquid. This intensifies the flavors too. You can also mix a little cornstarch with water and stir it in. Another method is to mash some of the vegetables into the sauce for a thicker texture. Each option works well, so choose what fits your taste! In this blog post, we explored how to make a delicious curry dish. We covered main ingredients like chicken and coconut milk, alongside key vegetables and optional garnishes. You learned step-by-step cooking instructions, including tips for spice levels and flavor enhancements. We discussed protein swaps and a vegan version, plus storage and reheating methods. With these insights, you can create a flavorful meal that suits your taste. Enjoy experimenting with your curry!

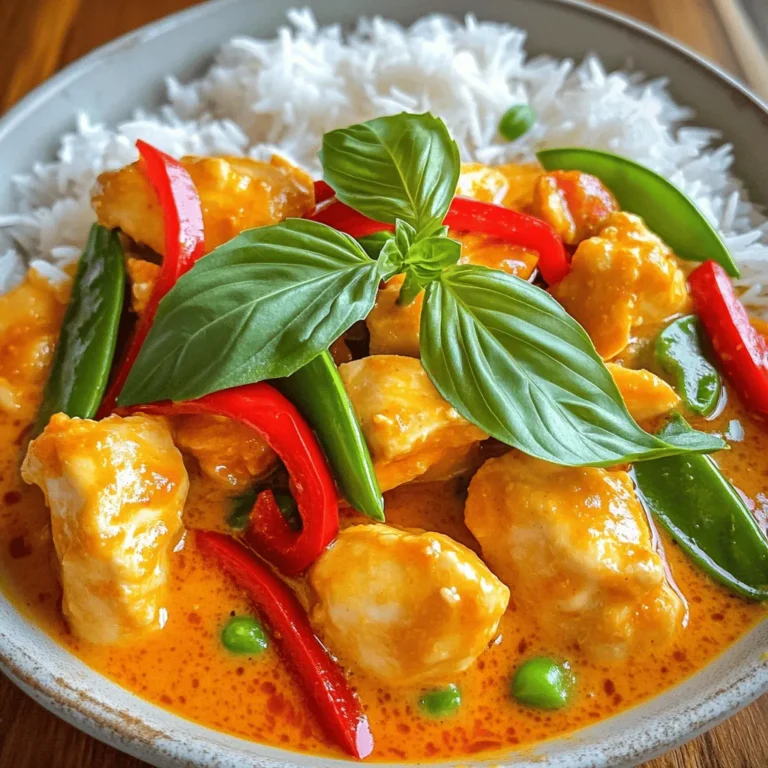
Thai Red Curry Chicken Better Than Takeout Delight

To make the pumpkin cream cheese bars, you need: - 1 cup all-purpose flour - 1 cup rolled oats - 1/2 cup packed brown sugar - 1/2 cup granulated sugar - 1/2 cup unsalted butter, melted and slightly cooled - 1/2 teaspoon baking soda - 1/2 teaspoon baking powder - 1/2 teaspoon salt - 1 teaspoon ground cinnamon - 1/2 teaspoon ground nutmeg - 2 large eggs, at room temperature - 1 cup canned pumpkin puree - 8 oz cream cheese, softened to room temperature - 1/4 cup pure maple syrup - 1 teaspoon pure vanilla extract - 1/4 cup chopped pecans (optional) You can add some fun flavors to your bars: - Chopped pecans add a nice crunch. - A sprinkle of chocolate chips gives a sweet surprise. - A little ginger adds a warm spice. If you want to change things up, here are some swaps: - Use whole wheat flour for a healthier crust. - Replace butter with coconut oil for a dairy-free option. - Maple syrup can be swapped with honey for a different sweetness. - For a nut-free version, skip the pecans and use seeds instead. Start by preheating your oven to 350°F (175°C). Grease a 9x13 inch baking dish using non-stick spray or line it with parchment paper. In a large bowl, mix together the following ingredients: - 1 cup all-purpose flour - 1 cup rolled oats - 1/2 cup packed brown sugar - 1/2 cup granulated sugar - 1/2 cup unsalted butter, melted and slightly cooled - 1/2 teaspoon baking soda - 1/2 teaspoon baking powder - 1/2 teaspoon salt - 1 teaspoon ground cinnamon - 1/2 teaspoon ground nutmeg Stir until you have a crumbly dough. Press three-quarters of the oat mixture into the bottom of the baking dish. This will form your crust. Set aside the rest for later. In another bowl, whisk two large eggs until frothy. Then add: - 1 cup canned pumpkin puree - 8 oz cream cheese, softened to room temperature - 1/4 cup pure maple syrup - 1 teaspoon pure vanilla extract Mix these ingredients well. Ensure there are no lumps. Pour this creamy mixture over your crust in the baking dish. Use a spatula to spread it evenly. Sprinkle the reserved oat mixture over the cream cheese filling. If you like nuts, add 1/4 cup chopped pecans on top for a nice crunch. Bake in the preheated oven for 30-35 minutes. The bars are ready when the edges look firm. A toothpick should come out clean or with a few moist crumbs when inserted in the center. After baking, take the dish out of the oven. Let the bars cool at room temperature for at least 1 hour. Then, transfer them to the refrigerator for an extra hour. This chilling helps them firm up, making them easier to cut. Once cooled, cut into squares. Enjoy these delicious pumpkin cream cheese bars! To get the best Pumpkin Cream Cheese Bars, follow these steps: - Preheat your oven to 350°F (175°C) for even baking. - Use room-temperature ingredients. This helps to mix better. - Grease your baking dish or use parchment paper for easy removal. - Bake for 30-35 minutes. Check for doneness with a toothpick. - Let the bars cool completely. This prevents them from falling apart. If your bars do not turn out as expected, here are some fixes: - Bars are too dry? Check your oven temperature. It might be too hot. - Bars are too wet? Ensure you measured the pumpkin puree correctly. - Crust is crumbly? Make sure to press it firmly into the pan. - Bars stick to the pan? Use parchment paper next time for easy lifting. For perfect slices, follow these tips: - Wait until the bars are completely cool before cutting. - Use a sharp knife for clean edges. - Wipe the knife with a damp cloth between cuts. - Serve the bars chilled or at room temperature for best taste. - Add a sprinkle of cinnamon on top for a festive touch. - Consider a dollop of whipped cream for extra fun! {{image_4}} You can switch up the toppings for your bars. Here are some fun ideas: - Chocolate chips: Add semi-sweet or dark chocolate chips for a rich twist. - Coconut flakes: Sprinkle unsweetened coconut for a tropical flavor. - Dried fruits: Raisins or cranberries add a burst of sweetness. - Crushed cookies: Use gingersnap or graham cracker crumbs for extra crunch. - Seeds: Try sunflower seeds or pumpkin seeds for a nut-free option. Get creative with your spices and flavorings. You can enhance your bars by: - Adding ginger: A teaspoon of ground ginger gives a warm kick. - Using allspice: A dash of allspice adds a nice depth of flavor. - Swapping extracts: Use almond extract instead of vanilla for a unique taste. - Mixing in citrus: Zest from oranges or lemons brightens the flavor. Making these bars gluten-free or dairy-free is easy. Here’s how: - Gluten-free flour: Use a gluten-free all-purpose flour blend. - Oats: Ensure the oats are certified gluten-free. - Dairy-free butter: Replace butter with coconut oil or a dairy-free spread. - Cream cheese: Use dairy-free cream cheese for the filling. - Egg substitutes: Use flax eggs or applesauce for a vegan option. These variations let you tailor the pumpkin cream cheese bars to your taste. Enjoy experimenting with different flavors and textures! Store leftover pumpkin cream cheese bars in an airtight container. Keep them in the fridge. This helps maintain their taste and texture. If you stack them, place parchment paper between layers to avoid sticking. These bars can stay fresh for up to five days in the fridge. After that, they may lose some flavor and texture. Always check for any signs of spoilage before eating. To freeze the bars, first cut them into squares. Wrap each piece tightly in plastic wrap. Then, place the wrapped bars in a freezer-safe bag or container. They can last up to three months in the freezer. When ready to enjoy, thaw them in the fridge overnight. Yes, you can make these pumpkin cream cheese bars ahead of time. They store well in the fridge. I suggest making them a day before you need them. This lets the flavors blend more. Just let them cool, then cover them tightly. They will stay fresh for about 3 days. These bars are tasty on their own, but you can add more fun! Serve them with a dollop of whipped cream. A sprinkle of cinnamon on top looks nice too. You could also pair them with coffee or tea. For a twist, try serving them with a scoop of vanilla ice cream. The cold ice cream contrasts well with the warm bars. Yes, you can make these bars vegan with some easy swaps. Use flax eggs instead of regular eggs. To make one flax egg, mix 1 tablespoon of ground flaxseed with 2.5 tablespoons of water. Let it sit for 5 minutes to thicken. Replace the cream cheese with a vegan cream cheese option. Finally, use coconut oil or vegan butter in place of regular butter. These small changes keep the flavors rich and delicious. You’ve learned about ingredients and how to mix them for pumpkin cream cheese bars. I outlined the steps for mixing, baking, and cooling. You got tips for a perfect bake and common fixes. Explore tasty variations and how to store leftovers for later. Remember, these bars are easy to adapt, so try new flavors. With simple steps and creative ideas, you'll impress everyone. Enjoy making these tasty treats!

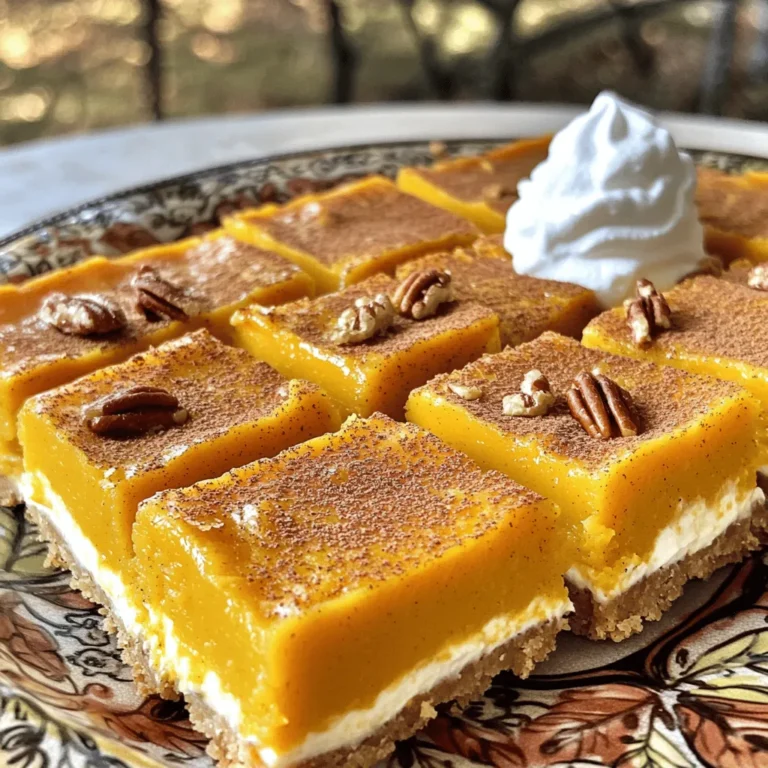
Pumpkin Cream Cheese Bars Delightful Fall Dessert

- 1 lb chicken or turkey sausage, sliced into coin-sized rounds - 2 cups Brussels sprouts, halved - 1 red bell pepper, sliced into strips - 1 yellow bell pepper, sliced into strips - 1 medium sweet potato, diced into 1-inch cubes - 1 red onion, cut into wedges In this dish, I use chicken or turkey sausage. They add great flavor and protein. The fresh vegetables are key too. They provide color, taste, and nutrition. I love Brussels sprouts for their crunch and sweetness. Bell peppers bring brightness, while sweet potato gives it a nice heartiness. Red onion adds a lovely sweetness when roasted. - 3 tablespoons pure maple syrup - 2 tablespoons extra virgin olive oil The maple glaze is what makes this dish shine. Pure maple syrup brings a sweet richness that pairs well with the savory sausage. I also add olive oil for smoothness. The glaze coats everything perfectly, making each bite delicious. - 1 teaspoon garlic powder - 1 teaspoon smoked paprika - Salt and freshly cracked black pepper - Fresh parsley, chopped, for garnish I use garlic powder and smoked paprika for depth. They add warmth and a hint of smokiness. Salt and pepper enhance the flavors of the sausage and veggies. Finally, I sprinkle fresh parsley on top. It adds a pop of color and freshness. 1. Preheat your oven to 425°F (220°C). This heat helps roast your dish quickly. 2. Chop your veggies. Cut Brussels sprouts in half. Slice the red and yellow bell peppers. Dice the sweet potato into 1-inch cubes. Cut the red onion into wedges. 1. In a large bowl, mix the sliced sausage and chopped veggies. This is your main mix. 2. In a small bowl, whisk together the maple syrup, olive oil, garlic powder, smoked paprika, salt, and pepper. This will be your sweet glaze. 1. Drizzle the maple glaze over the sausage and veggie mix. Toss everything until it is well-coated. 2. Spread the mix evenly on a baking sheet lined with parchment paper. This helps with easy cleanup. 3. Bake for 25-30 minutes. Stir halfway through to ensure even cooking. The sausage should be cooked, and the veggies tender. 4. Once done, remove from the oven and let cool for a couple of minutes. This helps prevent burns while serving. 5. Before serving, sprinkle fresh parsley on top for color and freshness. To ensure even cooking, spread the sausage and veggies out on the sheet. This gives hot air space to circulate around them. Stir halfway through cooking to brown everything nicely. When slicing and dicing, keep your pieces uniform. This way, they cook at the same rate. For the sausage, cut into coin-sized rounds. For the veggies, half the Brussels sprouts and dice the sweet potato into 1-inch cubes. This helps to get that perfect roast. You can serve this dish directly from the baking sheet. This creates a fun, rustic look. Guests will love the casual vibe. If you prefer, use a large platter to present it beautifully. For added flair, sprinkle some lemon juice over the top before serving. This brightens up the flavors. A sprinkle of fresh parsley adds a pop of color. For more variety, try different vegetables. Carrots, zucchini, or even asparagus work well. You can swap the sausage for pork, beef, or plant-based options. This keeps things exciting. Experiment with spices, too. Adding some chili flakes gives a nice kick. Fresh herbs like rosemary or thyme can add depth. They pair wonderfully with the maple glaze. {{image_4}} You can easily switch up the sausage in this dish. Try pork or beef sausage for a different taste. If you want a plant-based option, choose veggie sausage instead. Each type adds its own flavor. You can also use seasonal veggies. In summer, zucchini or cherry tomatoes work great. In fall, try butternut squash or carrots. The goal is to use fresh veggies for the best taste. To change the flavor, you can add different sauces or marinades. A bit of barbecue sauce can add a nice twist. You can also try teriyaki sauce for a sweet and savory mix. Adding extra herbs or spices will elevate the dish. Consider thyme or rosemary for an earthy touch. If you like heat, a pinch of red pepper flakes can spice things up. Don't be afraid to experiment with flavors! To keep your Sheet-Pan Maple Glazed Sausage and Veggies fresh, follow these tips: - Refrigeration: Allow the dish to cool down before storing. Place it in the fridge within two hours of cooking. This helps prevent bacteria growth. - Containers: Use airtight containers to store leftovers. Glass or plastic containers with tight-sealing lids work best. This keeps the flavors intact and prevents spills. Want to save some for later? Here’s how to freeze and reheat your meal properly: - Freezing: Portion out the leftovers into smaller containers or freezer bags. Remove as much air as possible to prevent freezer burn. Label the bags with the date. - Recommended Duration: You can freeze the meal for up to three months. It will still taste great when you’re ready to enjoy it! To reheat, thaw in the fridge overnight. Then, warm it in the oven or microwave until heated through. Enjoy your delicious meal once again! Can I use other types of meat? Yes, you can. Try pork or beef sausage for a different taste. You can also use plant-based sausage for a vegetarian option. Just keep the cooking times in mind. How do I ensure my vegetables aren't overcooked? To avoid overcooking, cut your veggies into similar sizes. This helps them cook evenly. Stir the mixture halfway through baking. Keep an eye on them as they roast. Caloric content per serving Each serving has about 400 calories. This number can change based on your meat choice. Breakdown of key nutrients - Protein: 20g from the sausage - Fiber: 5g from the veggies - Healthy fats: 10g from olive oil - Vitamins: A and C from peppers and Brussels sprouts Tips for making ahead of time You can prep the ingredients a day in advance. Chop the veggies and slice the sausage. Keep them in the fridge in a sealed container. Just add the glaze before baking. Pairing suggestions for sides or sauces Serve this dish with a side salad for extra greens. You can also add crusty bread to soak up the glaze. A light vinaigrette can brighten the flavors even more. This recipe blends chicken sausage and fresh vegetables under a sweet maple glaze. You learned how to prep, cook, and serve a delicious dish. You can spice it up with different meats or veggies. Remember to follow my tips for perfect cooking and great presentation. Store leftovers safely or freeze them for later. Now, you have a tasty, flexible recipe that’s sure to impress. Enjoy making it your own!

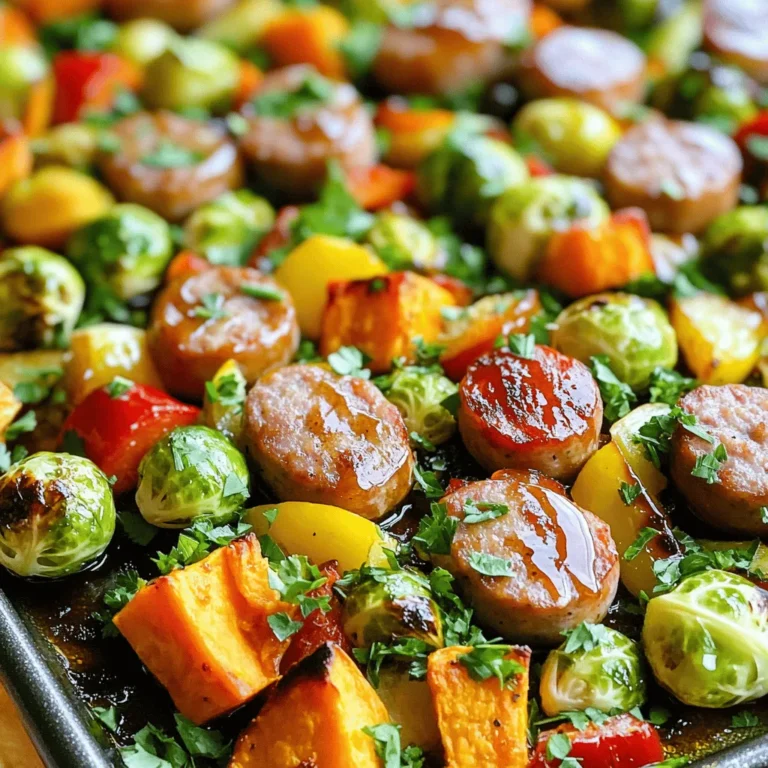
Sheet-Pan Maple Glazed Sausage and Veggies Delight

- 1 cup all-purpose flour - 1 teaspoon baking powder - 1/2 teaspoon baking soda - 1/2 teaspoon salt - 1 teaspoon ground cinnamon - 1/2 teaspoon ground nutmeg - 1/4 teaspoon ground ginger - 1/2 cup granulated sugar - 1/3 cup vegetable oil - 1/2 cup pumpkin puree - 2 large eggs - 1 teaspoon vanilla extract - 4 oz cream cheese, softened - 1/4 cup powdered sugar - 1 tablespoon milk - Optional: Chopped pecans or walnuts You can easily swap some ingredients if needed. Here are a few ideas: - Use whole wheat flour instead of all-purpose flour for more fiber. - Substitute coconut oil for vegetable oil to add a hint of flavor. - Replace granulated sugar with brown sugar for extra moisture and depth. - If you want a dairy-free option, use a vegan cream cheese. Fresh ingredients make a big difference in your muffins. Here are some tips: - Check the date on your baking powder and baking soda. They should be fresh for the best rise. - Look for pumpkin puree in cans without added sugars or spices. Read labels carefully. - Choose eggs that are clean, uncracked, and stored in the fridge. - For the best flavor, get spices from a place with high turnover. Fresh spices pack more punch. Start by preheating your oven to 350°F (175°C). This gets it ready for baking. Prepare a muffin tin by placing paper liners or spraying it with non-stick spray. This will help the muffins come out easily. In a medium bowl, mix the dry ingredients. Combine 1 cup of flour, 1 teaspoon of baking powder, 1/2 teaspoon of baking soda, 1/2 teaspoon of salt, 1 teaspoon of cinnamon, 1/2 teaspoon of nutmeg, and 1/4 teaspoon of ginger. Whisk them together until they blend well. In a large bowl, mix the wet ingredients. Combine 1/2 cup of sugar, 1/3 cup of vegetable oil, 1/2 cup of pumpkin puree, 2 eggs, and 1 teaspoon of vanilla. Whisk these until smooth and creamy. Next, fold the dry ingredients into the wet mix. Use a rubber spatula or wooden spoon. Mix gently until just combined. It’s fine if some lumps remain; don’t over-mix. In a small bowl, prepare the cream cheese filling. Beat 4 oz of softened cream cheese with 1/4 cup of powdered sugar and 1 tablespoon of milk. Mix until it is smooth and creamy. Spoon the pumpkin batter into each muffin cup. Fill each cup about halfway. Then, add about a teaspoon of the cream cheese mixture on top of the batter. Finally, add more pumpkin batter until each cup is about three-quarters full. If you like, sprinkle some chopped pecans or walnuts on top for extra crunch. Place the muffin tin in the oven and bake for 18-20 minutes. Check with a toothpick; it should come out clean when done. Once baked, let the muffins cool in the tin for about 5 minutes. Then, move them to a wire rack to cool completely. Enjoy the warm, cozy flavors of your pumpkin cream cheese coffee cake muffins! To bake perfect muffins, start by measuring your ingredients accurately. Use a kitchen scale for precision. Sift your flour to make it light and fluffy. This helps your muffins rise well. Preheat your oven fully before baking. A hot oven helps create a nice dome on top. Over-mixing can lead to tough muffins. Mix the batter gently until just combined. If you see small lumps, that’s okay. Also, don’t skip the cream cheese filling. It adds a rich flavor that pairs well with pumpkin. Lastly, be careful not to open the oven door too soon. This can cause your muffins to sink. For deeper flavors, try adding spices like allspice or cloves. You can also switch the sugar. Brown sugar gives a nice caramel taste. Adding nuts like pecans or walnuts boosts texture and crunch. For a fun twist, mix in chocolate chips or dried fruit. This makes each bite exciting and different! {{image_4}} You can make these pumpkin cream cheese coffee cake muffins even more exciting! Adding a few extras can change the flavor and texture. Here are some choices: - Chopped nuts: Add pecans or walnuts for crunch. - Chocolate chips: Mix in some semi-sweet or dark chocolate chips for a sweet twist. - Dried fruit: Consider adding raisins or cranberries for a fruity bite. - Spices: Try adding a pinch of cardamom or allspice for more warmth. These options give you a chance to customize each muffin to your taste! Want to switch up the flavor? You can easily do that! Here are some fun ideas: - Apple cinnamon: Substitute pumpkin with applesauce and add extra cinnamon for a cozy feel. - Banana: Use ripe mashed bananas instead of pumpkin for a different taste. - Carrot cake: Blend pumpkin with grated carrots and add nuts for a unique spin. - Chocolate pumpkin: Replace some flour with cocoa powder for a rich chocolate flavor. These combinations keep your muffins fresh and exciting! If you want a lighter version of these muffins, you can swap out some ingredients. Here are a few ideas: - Whole wheat flour: Replace all-purpose flour with whole wheat flour for added fiber. - Sugar alternatives: Use honey or maple syrup instead of granulated sugar to cut refined sugars. - Greek yogurt: Substitute some of the oil with Greek yogurt for moisture and protein. - Egg substitutes: Use flaxseed meal or applesauce instead of eggs for a vegan version. These swaps help you enjoy a tasty treat while keeping it healthier! To keep your pumpkin cream cheese coffee cake muffins fresh, store them in an airtight container. Make sure they cool completely before sealing. This helps prevent moisture buildup. Place parchment paper between layers if you stack them. For the best taste, keep them at room temperature for up to two days. If you want them to last longer, consider freezing. Freezing these muffins is simple. First, let them cool down. Then, wrap each muffin tightly in plastic wrap. This keeps out air and prevents freezer burn. Place the wrapped muffins in a freezer-safe bag or container. They can stay frozen for up to three months. When you’re ready to enjoy, just thaw them at room temperature or heat them in the microwave for a quick treat. When stored properly, these muffins stay fresh for about two days at room temperature. If refrigerated, they last up to a week. Freezing extends their life to about three months. Always check for signs of spoilage before eating. If they smell off or look strange, it’s best to toss them. Enjoy your delicious muffins, fresh or frozen! Yes, you can make these muffins ahead of time. They store well for a few days. Just keep them in an airtight container at room temperature. If you want them to last longer, freezing is a great option. Just wrap each muffin tightly in plastic wrap and then place them in a freezer bag. They will stay fresh for up to three months. You can tell the muffins are done by doing a simple toothpick test. Insert a toothpick into the center of a muffin. If it comes out clean, the muffins are ready. They should also be golden brown on top and spring back when you gently press them. Baking time usually ranges from 18 to 20 minutes, but keep an eye on them toward the end. Absolutely! Canned pumpkin works great in this recipe. It saves time and still gives you that delicious pumpkin flavor. Just make sure to use pure pumpkin puree and not pumpkin pie filling. This will ensure your muffins taste just right. You’ve now learned about key ingredients, step-by-step instructions, and helpful tips. Choosing the right fresh ingredients is vital for tasty muffins. Follow our baking tips to make perfect muffins every time. Experiment with different flavors, add-ins, and swaps to suit your taste. Lastly, proper storage will keep your muffins fresh longer. Enjoy the baking journey!

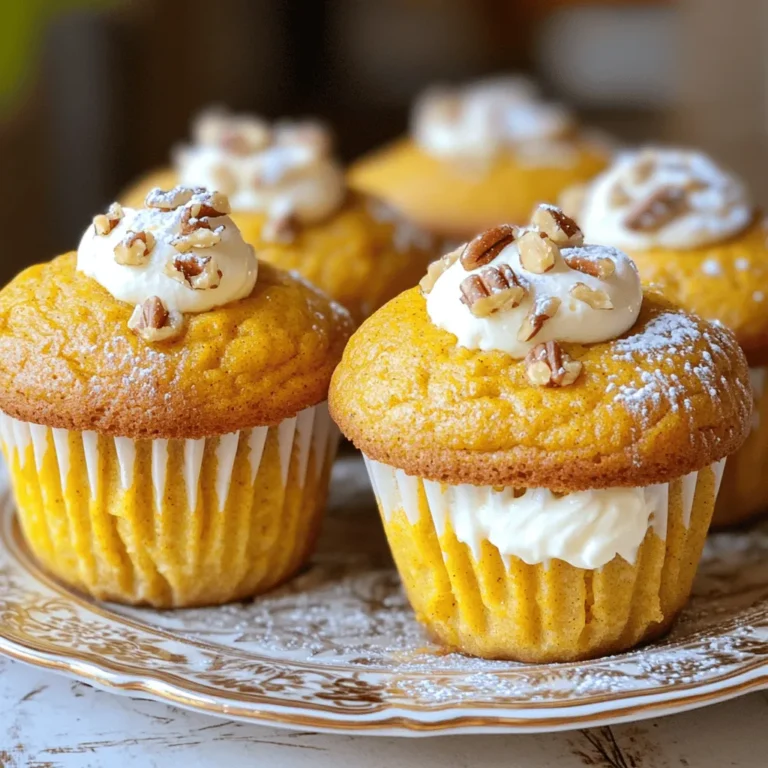
Pumpkin Cream Cheese Coffee Cake Muffins Delight

- 2 large sweet potatoes, thoroughly scrubbed and cut into wedges - 3 tablespoons unsalted butter, melted - 4 cloves of garlic, finely minced - 1 teaspoon smoked paprika for a subtle heat - 1 teaspoon dried oregano for herbal flavor - 1/2 teaspoon sea salt - 1/4 teaspoon freshly cracked black pepper - 2 tablespoons fresh parsley, finely chopped (for a vibrant garnish) - Air fryer - Mixing bowl - Whisk - Cutting board - Knife When picking sweet potatoes, look for firm ones. They should have smooth skin and no dark spots. Size matters too; larger potatoes yield bigger wedges. For measuring ingredients, use a standard set of measuring spoons and cups. This keeps your flavors balanced and ensures a tasty outcome. Remember, precise measurements make a difference in cooking! First, preheat your air fryer to 400°F (200°C). This step is crucial. It helps the wedges get crispy. Let it heat for about 5 minutes. While it warms up, let's make the garlic butter. In a large bowl, mix together 3 tablespoons of melted butter, 4 minced garlic cloves, 1 teaspoon of smoked paprika, 1 teaspoon of dried oregano, 1/2 teaspoon of sea salt, and 1/4 teaspoon of black pepper. Whisk it all together until it blends well. This mixture will give your sweet potatoes a rich flavor. Next, add the sweet potato wedges to the garlic butter mixture. You should have about 2 large sweet potatoes cut into wedges. Toss the wedges gently in the bowl. Make sure each wedge gets a nice coat of the garlic butter. This step is key for flavor. You want every bite to burst with that delicious garlic taste. Now, it’s time to cook! Place the coated sweet potato wedges in the air fryer basket. Make sure they are in a single layer. Avoid overcrowding, as this helps them cook evenly. If you have too many, cook them in batches. Air fry the wedges for 15-18 minutes. Halfway through, shake the basket to ensure they crisp up evenly. You want them golden brown and crispy. Once they look perfect, take them out and let them rest for a couple of minutes. This helps them become even crispier. Finally, serve the wedges on a platter and sprinkle some chopped parsley on top for a nice touch! To make your sweet potato wedges crispy, follow these steps: - Cut your sweet potatoes into even wedges. This ensures they cook at the same rate. - Soak the wedges in water for about 30 minutes. This helps remove excess starch. - Dry them well with a towel before coating. Moisture can lead to sogginess. - Use enough oil in your garlic butter mix. This helps them crisp nicely in the air fryer. - Shake the basket halfway through cooking. This allows hot air to circulate around the wedges. You can boost the flavor with these tips: - Add a pinch of cayenne pepper for heat. - Try fresh herbs like rosemary or thyme for a fragrant twist. - Sprinkle some Parmesan cheese on top once cooked for a savory touch. - Mix in a bit of lemon zest for a bright flavor. - Experiment with different spices like cumin or chili powder for unique tastes. If your sweet potato wedges turn out soggy or burnt, here’s what to do: - For soggy wedges, ensure they are not crowded in the air fryer. Cook in batches if needed. - If they burn, lower the cooking time or temperature. Every air fryer varies. - Check the wedges for doneness early; they may need less time than suggested. - If you see uneven cooking, shake the basket more often. This helps them cook evenly. {{image_4}} You can easily adjust this recipe to fit your needs. For a vegan option, swap out the butter for vegan butter. It works just as well and still gives you that rich flavor. You can also play with the seasonings. Try adding chili powder for some heat or a dash of cinnamon for a sweet twist. These sweet potato wedges shine as a side dish, but they can do more. Serve them with a fresh salad for a light meal. They pair well with grilled chicken or fish. You can even top them with black beans, avocado, and salsa for a fun twist. The options are endless! No air fryer? No problem! You can bake these wedges in the oven. Preheat your oven to 425°F (220°C). Spread the coated wedges on a baking sheet in a single layer. Bake for 25-30 minutes, flipping halfway through. If frying, heat oil in a pan. Fry the wedges until golden brown, about 5-7 minutes per side. This gives you crispy wedges without the air fryer! To keep your sweet potato wedges fresh, let them cool first. Place the wedges in an airtight container. This helps retain moisture and flavor. You can store them in the fridge for up to four days. If you want to keep them longer, freeze the wedges. Wrap them tightly in plastic wrap or foil before placing them in a freezer bag. When it’s time to enjoy your leftovers, the air fryer is your best friend. Set it to 350°F (175°C). Place the wedges in a single layer and heat for about 5-7 minutes. This will help them regain their crispiness. If you don’t have an air fryer, you can use the oven. Preheat it to 350°F (175°C) and bake the wedges for about 10 minutes. If stored properly, your sweet potato wedges last for about four days in the fridge. In the freezer, they can last up to three months. Just remember, the sooner you eat them, the better the taste and texture will be! For this recipe, I recommend using Garnet or Jewel sweet potatoes. These types are sweet and creamy. They have a rich orange color and cook nicely in the air fryer. Look for firm ones without blemishes for the best flavor. Yes, you can prep the sweet potatoes in advance. Cut them into wedges and store in water for up to 24 hours. This keeps them fresh and prevents browning. You can also toss them in the garlic butter mix ahead of time. Just store them in the fridge until you're ready to cook. Sweet potato wedges taste great with different dips. Here are some ideas: - Garlic aioli: Creamy and flavorful, it complements the garlic butter. - Spicy ketchup: Adds a kick and enhances the sweetness. - Honey mustard: Offers a sweet and tangy flavor contrast. - Ranch dressing: Provides a cool and creamy dip that balances the heat. Try different sauces to find your favorite pairing! This blog post has covered everything you need for perfect air fryer sweet potato wedges. We discussed key ingredients like sweet potatoes and spices, essential equipment, and prep tips. I shared step-by-step instructions for cooking, plus helpful tips for crispiness and flavor. You also learned about variations, storage, and answers to common questions. Enjoy your delicious wedges and feel free to experiment. The fun lies in making the recipe your own!

Air Fryer Sweet Potato Wedges with Garlic Butter Magic

PREV 1 … 7 8 9 … 20 NEXT
purelyyumrecipes

explore

DessertsDinnerAppetizersDrinks

Our Policies

  • Cookie Policy
  • Copyright Policy
  • Disclaimer
  • GDPR Policy
  • Terms Of Use
Back to Top
  • About
  • Contact Us
  • Privacy Policy
© 2025 purelyyumrecipes