If you love rich, creamy desserts, Chocolate Espresso Mousse is a must-try. This luxurious treat blends dark chocolate and bold espresso, creating a flavor explosion. It’s perfect for special occasions or a cozy night in. In this guide, I’ll walk you through each step, from melting the chocolate to adding the perfect finish. Get ready to impress your taste buds and your guests with this delectable mousse!
Why I Love This Recipe
- Decadent Flavor: This mousse combines rich dark chocolate with the boldness of espresso, creating an indulgent dessert that satisfies both chocolate and coffee lovers.
- Elegant Presentation: Serving the mousse in clear glasses not only showcases its beautiful layers but also adds a touch of sophistication to any gathering.
- Light and Airy Texture: The whipped egg whites and cream give this mousse a luxuriously light texture, making it feel indulgent yet not overly heavy.
- Easy to Make: With straightforward steps, this recipe is perfect for both novice and experienced cooks looking for an impressive dessert without the fuss.
Ingredients
Main Ingredients
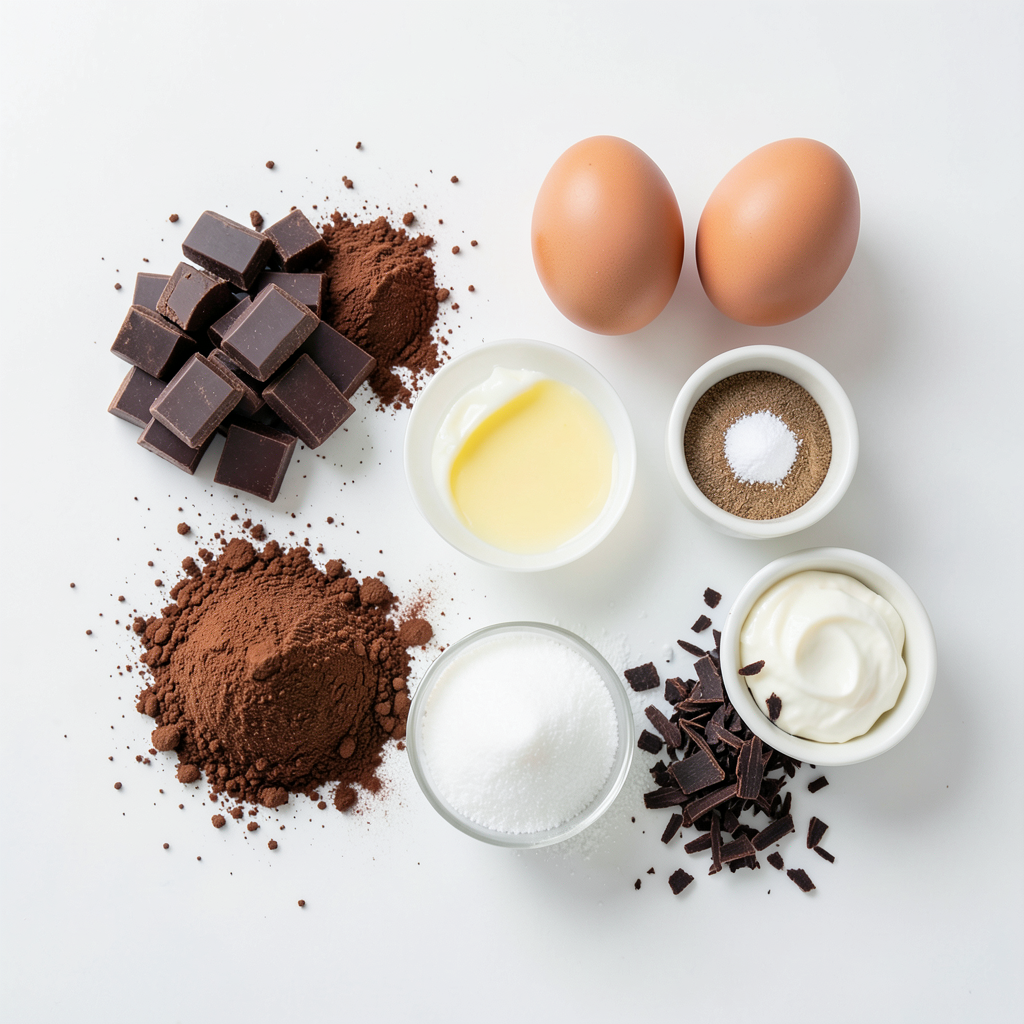
- 6 oz dark chocolate (70% cocoa), finely chopped
- 1 tablespoon unsweetened cocoa powder
- 1 tablespoon instant espresso powder
- 3 large eggs, separated
- 1/4 cup granulated sugar
- 1/2 teaspoon pure vanilla extract
- 1/2 cup heavy cream, chilled
- Pinch of salt
- Dark chocolate shavings (for garnish)
- Whipped cream (for serving, optional)
The main ingredients create the rich and deep flavor of our mousse. Dark chocolate gives it a bold taste. I use chocolate with 70% cocoa for a perfect balance. The unsweetened cocoa powder adds an extra chocolate kick. Instant espresso powder brings out the chocolate flavor, making it even better.
Eggs are key for this recipe. They add structure and creaminess. Separate the yolks from the whites for the best results. The granulated sugar sweetens the mousse just right. Pure vanilla extract adds warmth and depth to the flavor.
Heavy cream is what makes the mousse light and airy. Whipping it to soft peaks is essential. Don’t forget a pinch of salt to enhance all the flavors.
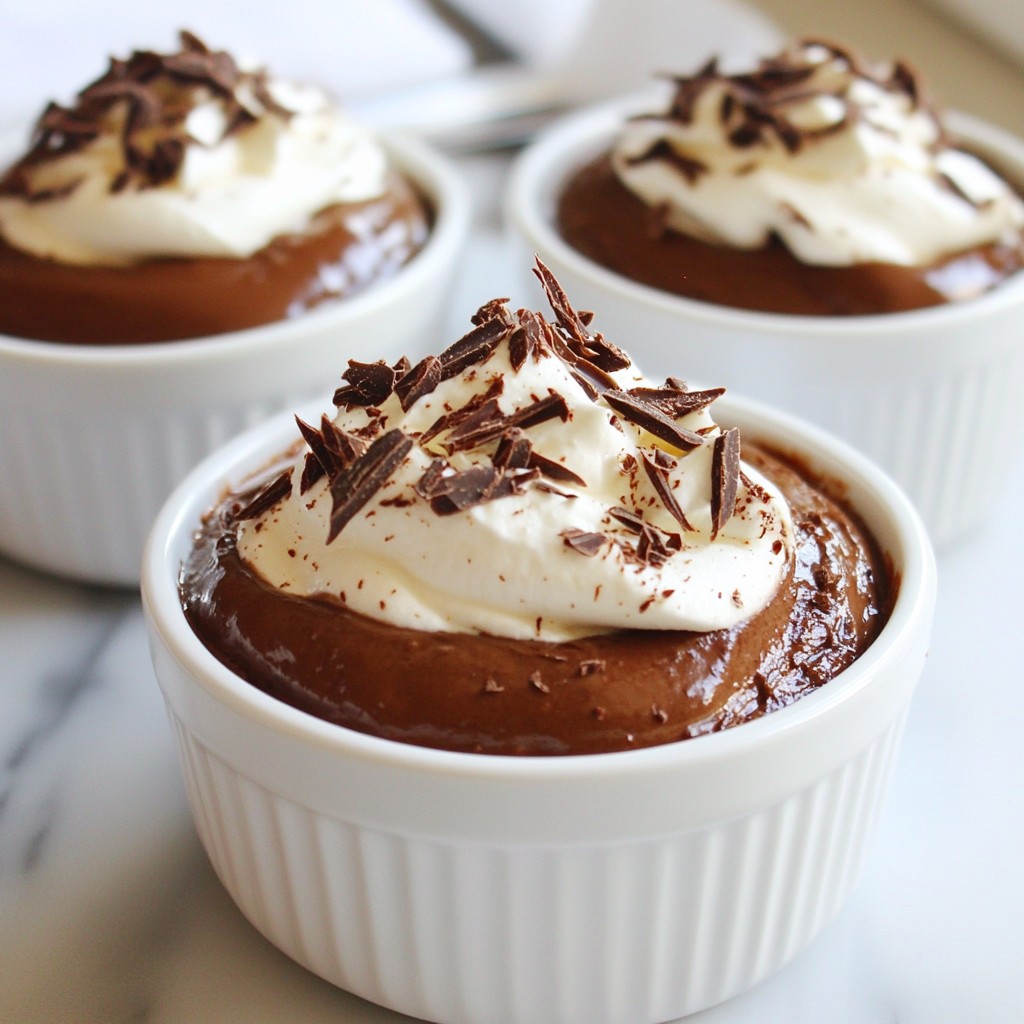
For a final touch, I recommend garnishing with dark chocolate shavings. A dollop of whipped cream on top can make it even more special. This dessert may seem fancy, but with these ingredients, it becomes easy to make at home.
Step-by-Step Instructions
Melting the Chocolate
To melt the chocolate, first set up a double boiler. You can do this by placing a heatproof bowl over a pot of simmering water. Make sure the bowl does not touch the water. Add the finely chopped dark chocolate to the bowl. Stir it often as it melts. This helps the chocolate become smooth and glossy. Once melted, take it off the heat and let it cool a bit.
Preparing the Coffee Paste
Next, mix the cocoa and espresso powders in a small bowl. Add two tablespoons of warm water to the mix. Stir until you have a smooth paste. Make sure there are no lumps. This coffee paste adds great flavor to your mousse.
Mixing Yolks and Sugar
Now, let’s focus on the egg yolks. In a large bowl, whisk the yolks and the granulated sugar. Keep whisking until the mix is pale and fluffy. This takes about three to four minutes. Carefully stir in the cooled melted chocolate and the coffee paste. Mix until everything is well blended. Adding the vanilla extract at this stage adds a nice touch.
Whipping the Egg Whites
Next, we whip the egg whites. In a clean bowl, beat the egg whites with a pinch of salt. Use a mixer on medium speed. Continue until you see stiff peaks form. This takes about three to five minutes. Be careful not to overmix the egg whites. They should be fluffy and hold their shape.
Folding in Ingredients
Now, it’s time to fold in the egg whites. Gently add the whipped egg whites into the chocolate mix in three parts. Use a spatula for this. Be gentle to keep the mix airy. After this, we will fold in the whipped cream. Whip the chilled heavy cream until you see soft peaks. Once done, fold it gently into the chocolate mix until no white streaks are visible.
Chilling and Serving
Carefully spoon the mousse into serving dishes or glasses. Cover them with plastic wrap. Place the mousse in the fridge for at least two hours. This allows it to set up well. When you are ready to serve, take the mousse out. Garnish each portion with dark chocolate shavings. For an extra treat, add a dollop of whipped cream on top.
Tips & Tricks
Achieving the Perfect Texture
To get the smoothest chocolate espresso mousse, start with room temperature eggs. This helps the yolks mix well with sugar. Cold cream is key too. Chilling it lets you whip the cream to fluffy peaks. When you fold in the whipped egg whites, do it gently. This keeps the mousse light and airy.
Common Mistakes to Avoid
One big mistake is overmixing the egg whites. Once you see stiff peaks, stop mixing. If you mix too much, the mousse loses its fluff. Another mistake is not chilling the mousse long enough. The mousse needs at least two hours to set. This time makes it rich and creamy.
Enhancing Flavor
To take your mousse to the next level, try adding coffee liqueur or a splash of orange zest. These flavors pair well with chocolate. Fresh berries or a sprinkle of sea salt on top can also enhance the taste. They add a nice contrast and make the dessert even more special.
Pro Tips
- Use High-Quality Chocolate: The flavor of your mousse greatly depends on the quality of the chocolate. Opt for a premium dark chocolate with at least 70% cocoa for the best results.
- Chill Your Equipment: For an easier whipping process, chill your mixing bowls and beaters before whipping the cream and egg whites. This helps achieve a better volume.
- Be Gentle When Folding: When incorporating the whipped egg whites and cream into the chocolate mixture, use a gentle folding motion. This retains the airy texture that is key to a light mousse.
- Let It Set: Allow the mousse to chill for at least 2 hours to ensure it sets properly. This not only improves the texture but also enhances the flavors.
Variations
Flavor Variations
You can add a splash of flavored liqueurs to your mousse. Great options include orange or coffee liqueur. This twist brings a new layer to the dessert. You can also try different types of cocoa or chocolate. For a sweeter taste, use milk chocolate. Dark chocolate gives a bold flavor. Experiment with various chocolates to find your perfect match.
Dietary Adaptations
If you want a vegan version, you can substitute eggs. Use aquafaba instead. It’s the liquid from canned chickpeas. Whip it until fluffy, just like egg whites. You can also use sugar alternatives. Try coconut sugar or maple syrup for a lower-calorie mousse. These options still taste great and keep the dessert light.
Serving Variations
Get creative with how you serve your mousse. Use clear glass cups to showcase its rich layers. You can also layer it with fresh fruit or cookie crumbs for added texture. For special occasions, consider themed presentations. Use seasonal decorations or color themes. This adds a fun touch to your dessert and makes it memorable.
Storage Info
Proper Storage Techniques
To store leftover mousse, first, cover each serving dish tightly with plastic wrap. This keeps air out and prevents drying. If you have a large bowl of mousse, transfer it to an airtight container. Glass or plastic containers work great for this. Make sure the lid seals well to keep the mousse fresh.
Shelf Life
Chocolate espresso mousse stays fresh for about three days in the fridge. After that, it may lose its creamy texture. Look for signs that the mousse has spoiled. If you see any discoloration or an off smell, it's best to toss it. Fresh mousse should smell rich and chocolatey.
Re-serving Tips
Before serving leftover mousse, check its texture. If it seems a bit firm, gently stir it with a spatula to soften. You can also add a splash of cream to refresh it. For a fun twist, try layering the mousse with fresh fruit or crumbling cookies on top. This adds texture and flavor, making your dessert feel new again!
FAQs
What is Chocolate Espresso Mousse?
Chocolate espresso mousse is a rich and creamy dessert. It combines dark chocolate and coffee flavors. The texture is light and airy, thanks to whipped egg whites and cream. This dessert is perfect for special occasions or a sweet treat at home. You can serve it in small cups to highlight its beautiful layers.
Can I Make Chocolate Espresso Mousse Ahead of Time?
Yes, you can make chocolate espresso mousse ahead of time. It actually tastes better after sitting in the fridge. Prepare it a day in advance for the best flavor. Just keep it covered in the fridge until you are ready to serve.
What’s the Best Type of Chocolate to Use?
I recommend using high-quality dark chocolate, ideally 70% cocoa. This gives the mousse a deep, rich flavor. The better the chocolate, the better the mousse will taste. Look for chocolate with minimal added ingredients for the best results.
Can I Use Milk Chocolate Instead?
You can use milk chocolate, but it will change the flavor and texture. Milk chocolate is sweeter and creamier. This will make the mousse less rich and more dessert-like. If you choose milk chocolate, reduce the sugar in the recipe to balance the sweetness.
How Long Does the Mousse Need to Chill?
The mousse needs to chill for at least 2 hours. This allows it to set properly. If you have more time, chilling it longer will improve the texture and flavor. Make sure to cover it with plastic wrap to keep it fresh.
In summary, we explored the key steps to create a rich chocolate espresso mousse. You learned about selecting quality ingredients, mastering the techniques for mixing, and achieving the perfect texture. Remember to avoid common mistakes and consider fun variations for flavor and serving. With the right technique, your mousse can impress any guest. Enjoy your culinary journey, and savor the delicious results.