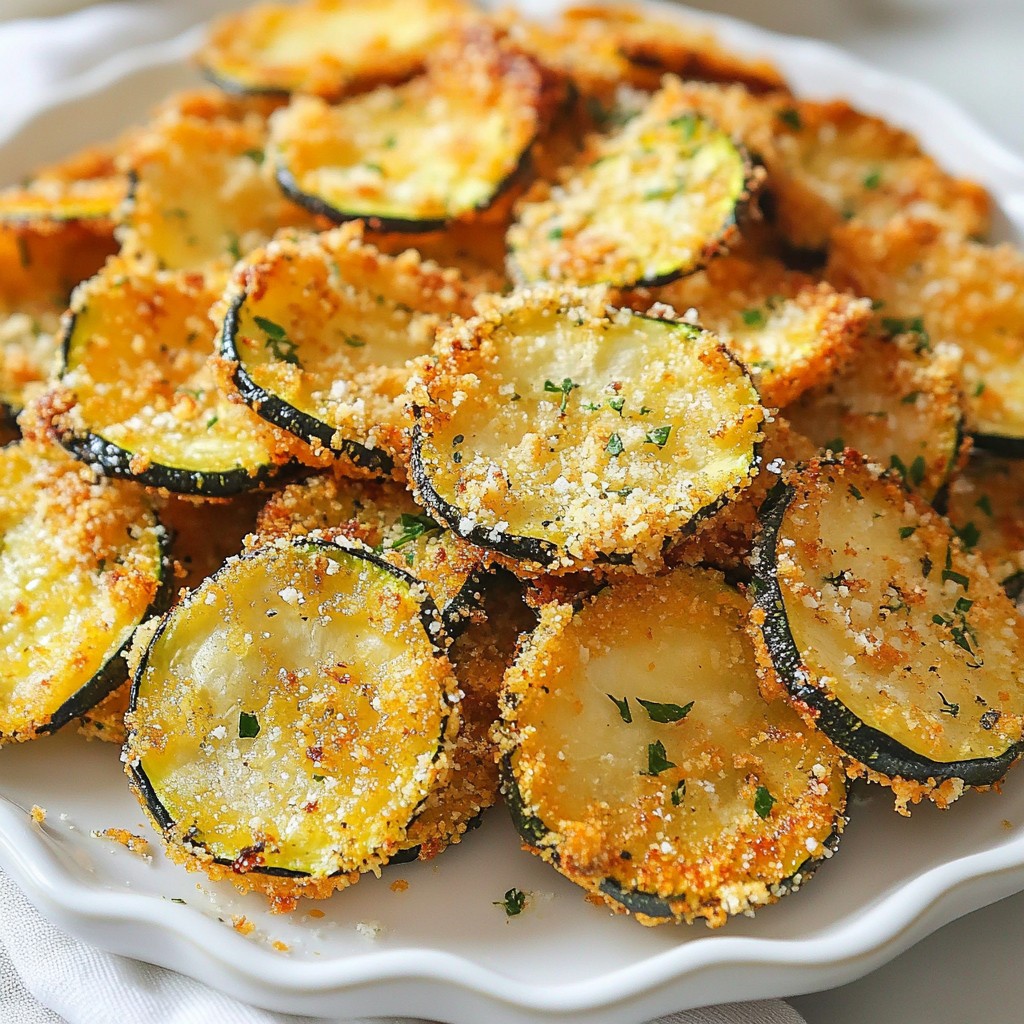
Looking for a guilt-free snack that satisfies? Crispy Baked Zucchini Chips are your answer! In this easy recipe, I’ll guide you through making delicious chips using just a few ingredients like zucchini, parmesan, and fun seasonings. They’re healthy, crunchy, and perfect for any time of day. Ready to impress your taste buds? Let’s dive in and make these tasty treats!
Why I Love This Recipe
- Healthy Snack Option: These crispy zucchini chips are a guilt-free alternative to regular potato chips, making them perfect for health-conscious snackers.
- Easy to Prepare: With just a few simple steps and ingredients, you can whip up a delicious snack without spending hours in the kitchen.
- Customizable Flavors: The seasoning can be easily adjusted to fit your taste preferences, whether you like it spicy or savory.
- Perfect for Sharing: These chips are a great appetizer for gatherings or game days, allowing everyone to enjoy a crunchy treat together.
Ingredients
List of Ingredients
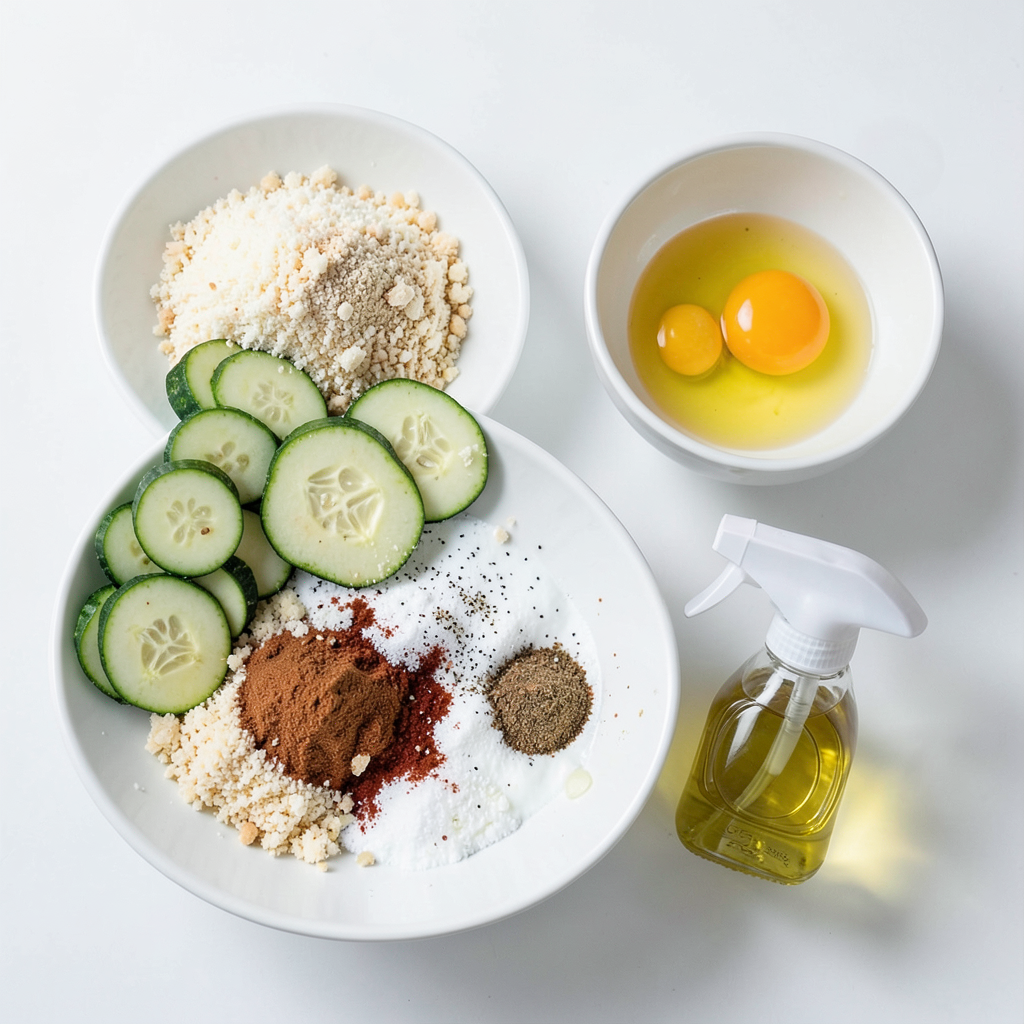
- Zucchini
- Panko breadcrumbs
- Parmesan cheese
- Seasonings
- Eggs
- Olive oil spray
The main ingredient for this recipe is zucchini. You need two medium zucchinis. They provide a great base for our chips. Panko breadcrumbs add a nice crunch. For flavor, we use half a cup of freshly grated Parmesan cheese.
Next, we have seasonings: one teaspoon of garlic powder, one teaspoon of onion powder, half a teaspoon of smoked paprika, half a teaspoon of sea salt, and half a teaspoon of black pepper. These spices boost the taste of the chips.
To help the breadcrumbs stick, we need two large eggs. Finally, we finish with olive oil spray. This gives the chips a golden color and extra crispiness. Each ingredient plays a vital role in making these crispy baked zucchini chips a tasty and healthy snack.
Step-by-Step Instructions
Preheat the Oven
Start by preheating your oven to 225°F (110°C). This low temp helps the chips crisp up nicely. Line a baking sheet with parchment paper. This makes cleanup easy and keeps the chips from sticking.
Prepare the Zucchini
Rinse the zucchinis under cool water. Use a clean towel to dry them well. Slice each zucchini into thin rounds, about 1/8 inch thick. This size helps them cook evenly.
Mix the Coating
In a large bowl, mix the panko breadcrumbs, grated Parmesan cheese, garlic powder, onion powder, smoked paprika, sea salt, and black pepper. Stir until everything blends. This mixture adds great flavor to the chips.
Prepare the Egg Wash
In a separate bowl, whisk the eggs until they are well beaten. This egg wash helps the breadcrumbs stick to the zucchini.
Coat the Zucchini Slices
Take each zucchini slice and dip it in the beaten eggs. Let any extra egg drip back into the bowl. Then, move the slice to the breadcrumb mix. Coat both sides well, pressing gently to ensure the breadcrumbs stick.
Arrange on the Baking Sheet
Place the coated zucchini chips in a single layer on the baking sheet. Make sure they don’t overlap. This helps them crisp evenly. Lightly spray the tops with olive oil for a golden finish.
Bake to Perfection
Put the baking sheet in the preheated oven. Bake for about 2 hours. Flip the chips halfway through baking. This way, they turn golden brown and crispy on both sides.
Cool and Serve
Once baked, take the chips out of the oven. Let them cool on the baking sheet for a few minutes. This cooling time helps them crisp up even more. Enjoy your healthy snack!
Tips & Tricks
Achieving Maximum Crispiness
To get your zucchini chips really crispy, use panko breadcrumbs. They’re lighter and crunchier than regular breadcrumbs. Spray the tops with olive oil. This helps them brown and crisp up nicely. Bake them at a low temperature, like 225°F (110°C). It takes a bit longer, but it works wonders.
Ideal Thickness of Zucchini Slices
Slice your zucchinis thin, around 1/8 inch thick. This thickness helps the chips cook evenly. If they are too thick, they won’t get crispy. A mandoline slicer can also help you achieve uniform slices. This makes sure every chip cooks at the same rate.
Importance of Flipping the Chips
Don’t skip flipping your zucchini chips halfway through baking. This step helps both sides get nice and crispy. If you leave them on one side, they may burn or stay soggy. Use a spatula to turn them over gently. This little trick makes a big difference in texture.
Pro Tips
- Slice Evenly: Ensure all zucchini slices are uniform in thickness to achieve consistent cooking and crispiness.
- Use Fresh Ingredients: Opt for fresh zucchini and high-quality Parmesan cheese for the best flavor and texture.
- Experiment with Seasonings: Feel free to add your favorite spices or herbs to the breadcrumb mixture for a unique twist.
- Store Properly: Keep any leftover chips in an airtight container to maintain their crispiness for up to 3 days.
Variations
Flavoring Options (Different Spices & Herbs)
You can change the flavor of your zucchini chips easily. Try adding spices like cayenne for heat or Italian herbs like oregano and basil for a fresh taste. Use chili powder for a smoky flavor. You can mix and match these spices to fit your taste. Experimenting with flavors makes cooking fun!
Cheese Alternatives (Vegan Options)
If you want a vegan option, skip the Parmesan cheese. Instead, use nutritional yeast. It gives a cheesy flavor without dairy. You can also use plant-based cheese made from nuts or soy. These options keep your chips tasty while fitting your diet.
Add-ins for Extra Crunch (Nuts and Seeds)
For an extra crunch, add nuts or seeds to the breadcrumb mix. Chopped walnuts or sliced almonds add texture. You can also try sunflower seeds or pumpkin seeds. These add-ins boost the nutrition and make your chips even more interesting. Mixing in these crunchy elements ensures a delightful snack experience!
Storage Info
How to Store Leftover Zucchini Chips
After enjoying your crispy zucchini chips, store any leftovers in an airtight container. This keeps them fresh and helps prevent moisture. Place a paper towel in the container to absorb any extra moisture. Store them at room temperature for up to three days. Avoid refrigerating them, as this can make them soggy.
Reheating Tips to Maintain Crispiness
To reheat your zucchini chips, use the oven. Preheat it to 350°F (175°C). Spread the chips out on a baking sheet. Heat for about 5 to 10 minutes, or until they are crispy again. You can also use an air fryer for about 3 to 5 minutes. This method helps them regain their crunch while keeping the flavor intact.
Freezing Zucchini Chips
If you want to save some zucchini chips for later, freezing is a great option. First, let the chips cool completely. Then, place them in a single layer on a baking sheet and freeze for 1 to 2 hours. Once frozen, transfer the chips to a freezer bag. They can last in the freezer for up to 3 months. When ready to eat, bake them from frozen for a quick snack!
FAQs
How to make crispy baked zucchini chips?
To make crispy baked zucchini chips, start by preheating your oven to 225°F (110°C). Slice two medium zucchinis into thin rounds, about 1/8 inch thick. In a bowl, mix panko breadcrumbs, grated Parmesan cheese, garlic powder, onion powder, smoked paprika, sea salt, and black pepper. In another bowl, whisk two large eggs. Dip each zucchini slice in the egg, then coat it with the breadcrumb mix. Place the slices on a lined baking sheet in a single layer. Lightly spray the tops with olive oil. Bake for about two hours, flipping halfway through, until golden and crispy.
Can I use other vegetables for this recipe?
Yes, you can use other vegetables to make chips! Carrots, sweet potatoes, and beets work well. Just slice them thinly, like the zucchini. Follow the same steps as for zucchini chips. Adjust the baking time based on the thickness of the slices and the type of vegetable. Always check for crispiness as they bake.
What is the best way to serve zucchini chips?
Serve zucchini chips as a tasty snack or appetizer. They pair well with dips like ranch or salsa. You can also try them with hummus or guacamole for a fresh twist. These chips are great for parties or movie nights. Enjoy them warm or at room temperature.
How long can I keep baked zucchini chips?
Baked zucchini chips stay fresh for about 3-5 days when stored in an airtight container. Keep them at room temperature for best results. If they lose their crispiness, you can re-bake them at a low temperature for a few minutes to regain that crunch. Avoid storing them in the fridge, as moisture can make them soggy.
This blog post covered how to make tasty baked zucchini chips. You learned about the key ingredients and step-by-step instructions. Tips for crispiness and fun flavor variations also helped enhance your dish. Plus, I shared how to store leftovers and answered common questions.
Enjoy your crispy snacks, and feel free to experiment with flavors. You can make this recipe suit your taste. Making zucchini chips is easy, fun, and worth it for a healthy treat.