Looking for a snack that's both crispy and tasty? You've come to the right place! In this blog post, I'll show you how to make Garlic Herb Roasted Chickpeas, a healthy treat packed with flavor. Using just a few simple ingredients, you can create a snack that satisfies your cravings. Plus, I’ll share tips for the perfect crunch and exciting ways to switch it up. Let’s get cooking!
Why I Love This Recipe
- Healthy Snack Option: These roasted chickpeas are packed with protein and fiber, making them a nutritious alternative to traditional snacks.
- Customizable Flavors: You can easily adjust the spices to suit your taste, whether you prefer them savory, spicy, or with a hint of sweetness.
- Quick and Easy: This recipe is simple and can be prepared in just a few minutes, making it perfect for a last-minute snack or appetizer.
- Versatile Use: Roasted chickpeas can be enjoyed on their own, sprinkled over salads, or added to grain bowls for an extra crunch.
Ingredients
List of Ingredients
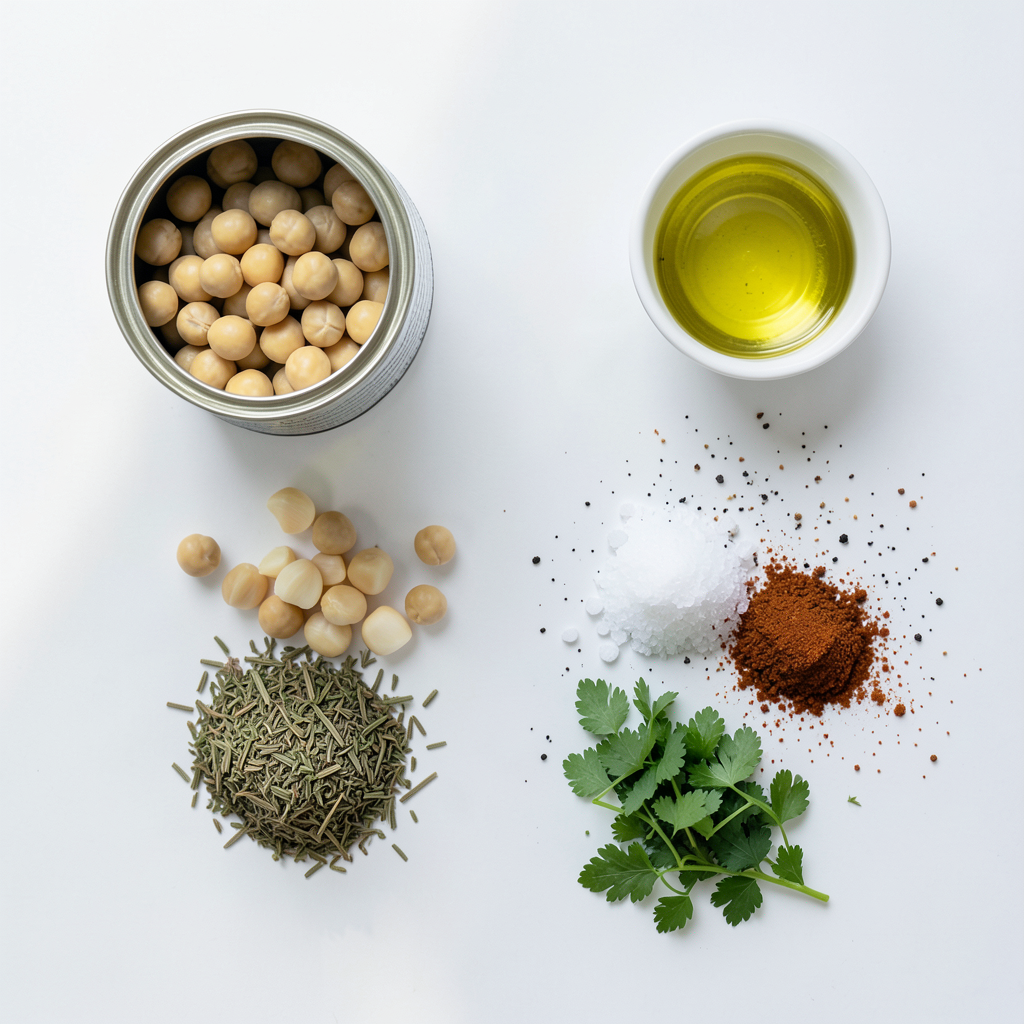
- 1 can (15 oz) chickpeas, thoroughly drained and rinsed
- 2 tablespoons extra virgin olive oil
- 4 cloves garlic, finely minced
- 1 teaspoon dried oregano
- 1 teaspoon dried thyme
- 1 teaspoon smoked paprika
- ½ teaspoon sea salt
- ¼ teaspoon freshly ground black pepper
- ½ teaspoon chili powder (optional)
- Fresh parsley, finely chopped (for garnish)
Nutritional Information
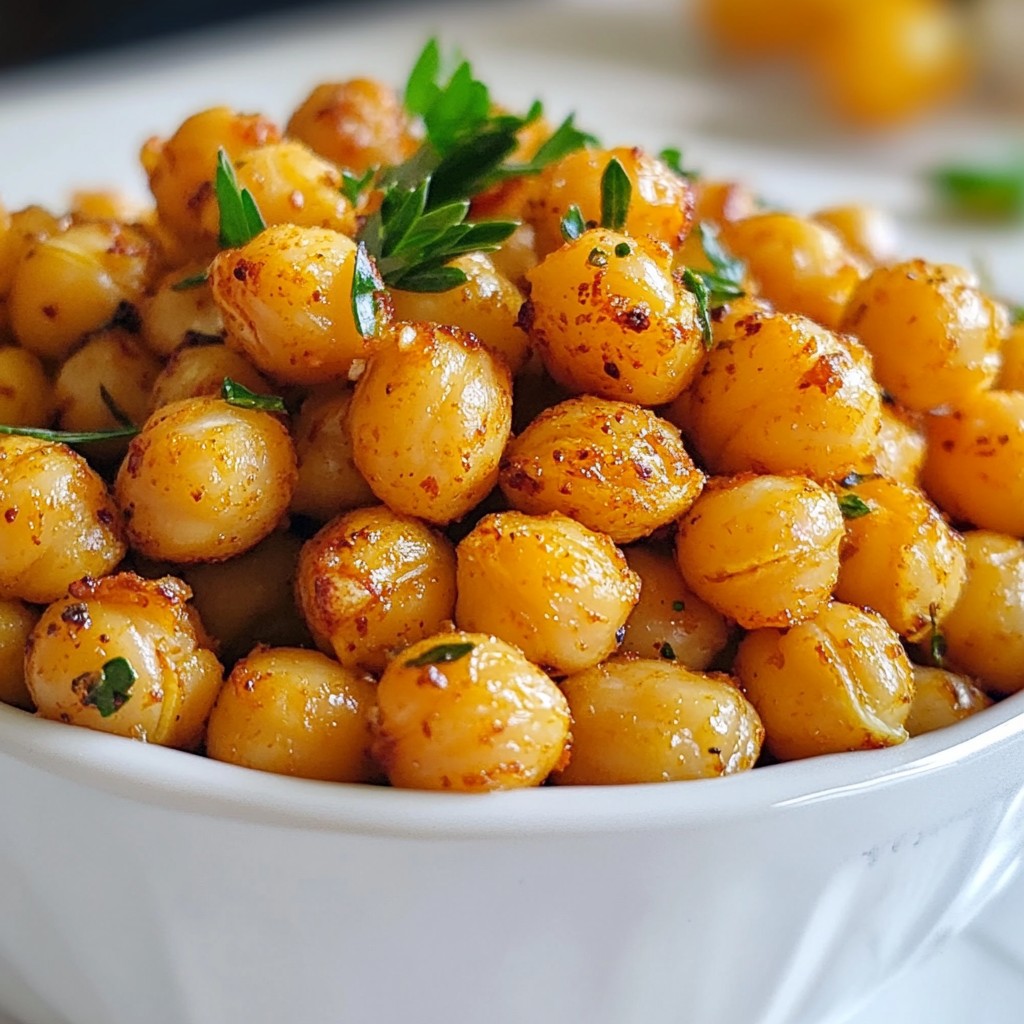
Garlic Herb Roasted Chickpeas make a healthy snack. Each serving has about 130 calories. You also get 6 grams of protein and 5 grams of fiber. These chickpeas are low in fat and full of flavor. They are a great choice for a light bite or as a salad topping.
Substitutions and Allergens
If you have allergies, here are some swaps:
- Use sunflower oil instead of olive oil for a nut-free option.
- Skip garlic if you're sensitive; try onion powder instead.
- For a gluten-free snack, this recipe is already safe!
- If you want it spicy but can't handle chili powder, try a dash of cayenne.
Feel free to mix and match these ingredients. Each choice can change the flavor a bit. Cooking should be fun and easy, so adapt this recipe to fit what you enjoy.
Step-by-Step Instructions
Preheat Oven and Prepare Chickpeas
First, preheat your oven to 400°F (200°C). This heat helps the chickpeas get crispy. While the oven warms up, take your can of chickpeas. Drain and rinse them well. Next, spread the chickpeas on a clean kitchen towel. Pat them dry completely. Removing moisture is key for crunchiness.
Prepare the Seasoning Mixture
In a large bowl, mix together the olive oil, minced garlic, dried oregano, dried thyme, smoked paprika, sea salt, black pepper, and chili powder if you want some spice. Stir well so all the flavors blend. This mixture is what makes the chickpeas so tasty.
Coat and Roast the Chickpeas
Now, it’s time to add the dried chickpeas to the bowl. Toss them gently in the seasoning mixture until they are well-coated. Line a baking sheet with parchment paper for easy clean-up. Spread the chickpeas in a single layer on the sheet. This step helps them roast evenly. Place the baking sheet in the oven and roast for 25 to 30 minutes. Stir the chickpeas halfway through to help them brown. When they are golden brown and crispy, take them out and let them cool. They will become crunchier as they cool. If you like, sprinkle chopped parsley on top before serving. Enjoy your tasty snack!
Tips & Tricks
Achieving the Perfect Crunch
To get that perfect crunch, start by drying the chickpeas well. After rinsing, use a clean kitchen towel. Pat them dry until no moisture remains. Moisture is the enemy of crunch! Also, spread them in a single layer on the baking sheet. This helps them roast evenly. Stir them halfway through cooking for even browning. Keep an eye on them to prevent burning.
Recommended Cooking Tools
You will need a few key tools to make this recipe easy:
- Baking sheet: A sturdy one helps avoid bending.
- Parchment paper: This keeps the chickpeas from sticking.
- Mixing bowl: A large bowl helps mix the chickpeas and seasoning well.
- Kitchen towel: Use this to dry the chickpeas.
These tools make the process smoother and more enjoyable.
Common Mistakes to Avoid
Avoid these common mistakes to ensure your chickpeas turn out great:
- Not drying the chickpeas: This leads to soggy snacks.
- Overcrowding the baking sheet: Spread them out for even cooking.
- Skipping the stirring step: This can cause uneven roasting.
- Ignoring the oven temperature: Make sure it’s preheated to 400°F (200°C).
By keeping these tips in mind, you'll enjoy crispy, tasty garlic herb roasted chickpeas every time!
Pro Tips
- Dry Chickpeas Well: Ensuring the chickpeas are completely dried after rinsing is crucial for achieving that desired crunchiness. Use a towel to pat them dry thoroughly.
- Even Spacing on Baking Sheet: Spread the chickpeas out in a single layer without overcrowding them. This allows for even roasting and prevents steaming.
- Monitor Cooking Time: Keep an eye on the chickpeas towards the end of the roasting time to avoid burning. Every oven is different, so adjust the cooking time as needed.
- Season After Roasting: If you prefer more intense flavors, consider adding a sprinkle of extra seasoning after roasting while they are still warm for an extra flavor boost.
Variations
Spicy Garlic Herb Chickpeas
To make your chickpeas spicy, add chili powder. Use ½ teaspoon for a nice kick. If you love heat, try more! This spice gives a warm flavor that dances on your tongue. You can also use cayenne pepper for an extra kick. Adjust the spice to fit your taste.
Mediterranean Flavor Twist
For a Mediterranean vibe, switch up the herbs. Use dried basil or rosemary instead of oregano. You can add lemon zest for a fresh and zesty kick. A touch of feta cheese on top gives a creamy balance. This variation makes your chickpeas bright and flavorful.
Adding Extra Herbs and Spices
Don't hold back on herbs! Fresh herbs like parsley or cilantro add a burst of flavor. You can mix in spices like cumin or coriander for a new taste. A sprinkle of sesame seeds adds a nice crunch. Get creative and find the blend you love best!
Storage Info
Best Practices for Storage
To keep your Garlic Herb Roasted Chickpeas fresh, follow these tips. Store them in an airtight container. This helps maintain their crunch. The container should be kept in a cool, dry place. Avoid places with high humidity. You can also use a resealable plastic bag for easy storage. Make sure to squeeze out any air before sealing.
Reheating Recommendations
If you have leftovers, reheating is simple. Preheat your oven to 350°F (175°C). Spread the chickpeas on a baking sheet. Heat them for about 10 minutes. This will help restore their crispiness. You can also microwave them, but they may lose some crunch. If you prefer, add a drizzle of olive oil before reheating for extra flavor.
Shelf Life and Freezing Options
Garlic Herb Roasted Chickpeas last about 3 to 5 days at room temperature. For longer storage, consider freezing them. Place cooled chickpeas in a freezer-safe bag. They can last up to 3 months in the freezer. When ready to eat, thaw them in the fridge. Reheat as mentioned to enjoy the crunch again.
FAQs
Can I use dried chickpeas instead of canned?
Yes, you can use dried chickpeas. First, soak them overnight in water. Then, cook them until tender. This process can take a bit more time. Be sure to drain and dry them well before seasoning.
How to make Garlic Herb Roasted Chickpeas vegan-friendly?
This recipe is already vegan! It contains no animal products. Just follow the steps as written. Use the same ingredients, and enjoy a tasty snack that fits your diet.
What can I serve with Garlic Herb Roasted Chickpeas?
You can serve these chickpeas in many ways. Try them on a salad for extra crunch. They also pair well with hummus and pita chips. For a snack, enjoy them plain or with your favorite dip. The options are endless!
This blog post covered everything for making Garlic Herb Roasted Chickpeas, from ingredients to storage tips. You learned about the key ingredients, important nutrition facts, and how to avoid common mistakes. I shared exciting variations you can try, as well as the best ways to store your chickpeas. Remember, crispiness is key for the best flavor. Enjoy experimenting with different spices and serving ideas. Roasted chickpeas are a tasty and healthy snack that everyone can love. Dive in and enjoy your cooking adventure!