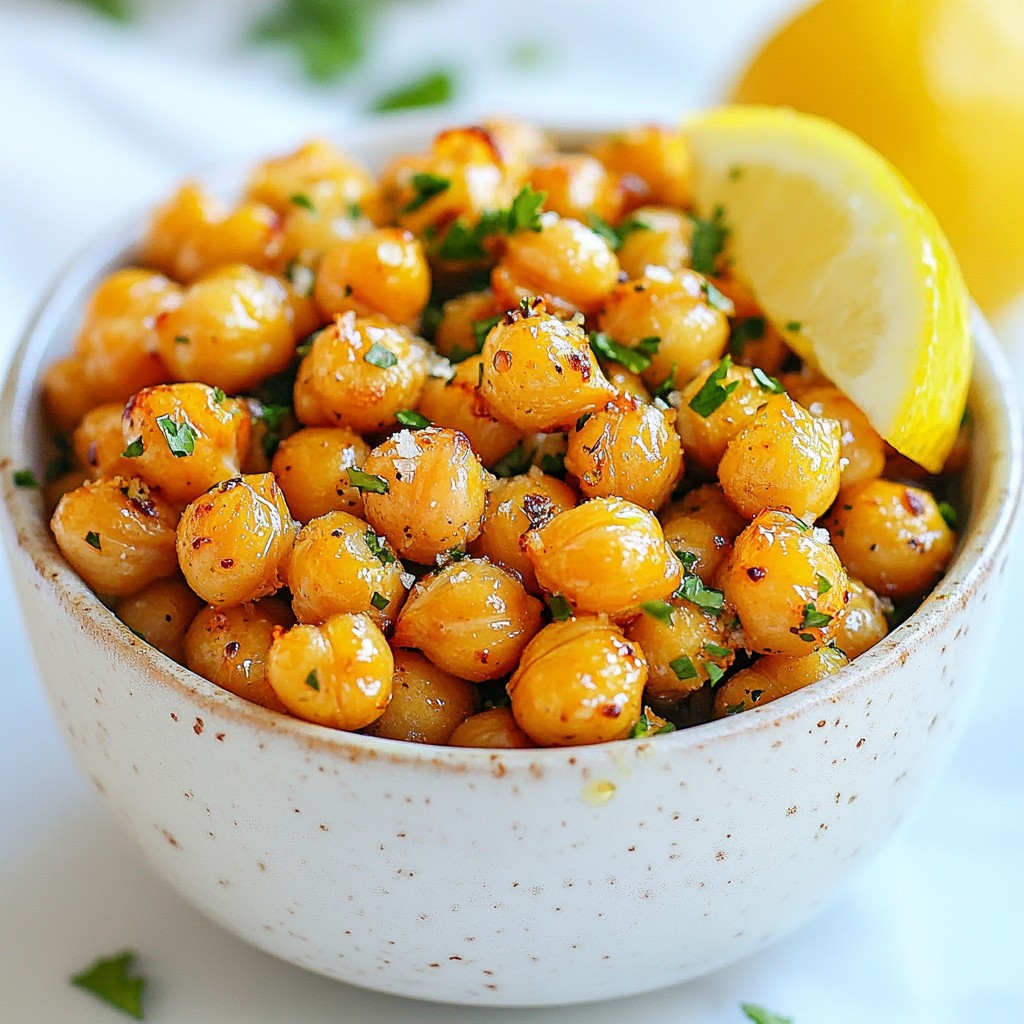
Looking for a crunchy snack that’s both tasty and healthy? Let me introduce you to Lemon Garlic Roasted Chickpeas! These little nuggets of flavor are rich in protein and fiber. They’re perfect for munching on at any time of day. I’ll guide you through the simple steps, share essential tips, and offer fun variations to keep it interesting. Get ready to enjoy a delicious snack that you can feel good about!
Why I Love This Recipe
- Flavor Packed: The combination of zesty lemon and aromatic garlic creates a vibrant taste that elevates simple chickpeas into a delightful snack.
- Healthy Crunch: These roasted chickpeas are not only delicious but also packed with protein and fiber, making them a nutritious alternative to traditional snacks.
- Easy to Make: With just a few simple ingredients and a quick prep time, this recipe is perfect for busy days when you want a tasty treat without the fuss.
- Versatile Snack: These chickpeas can be enjoyed on their own, added to salads, or used as a topping for various dishes, making them a versatile addition to your culinary repertoire.
Ingredients
Main Ingredients
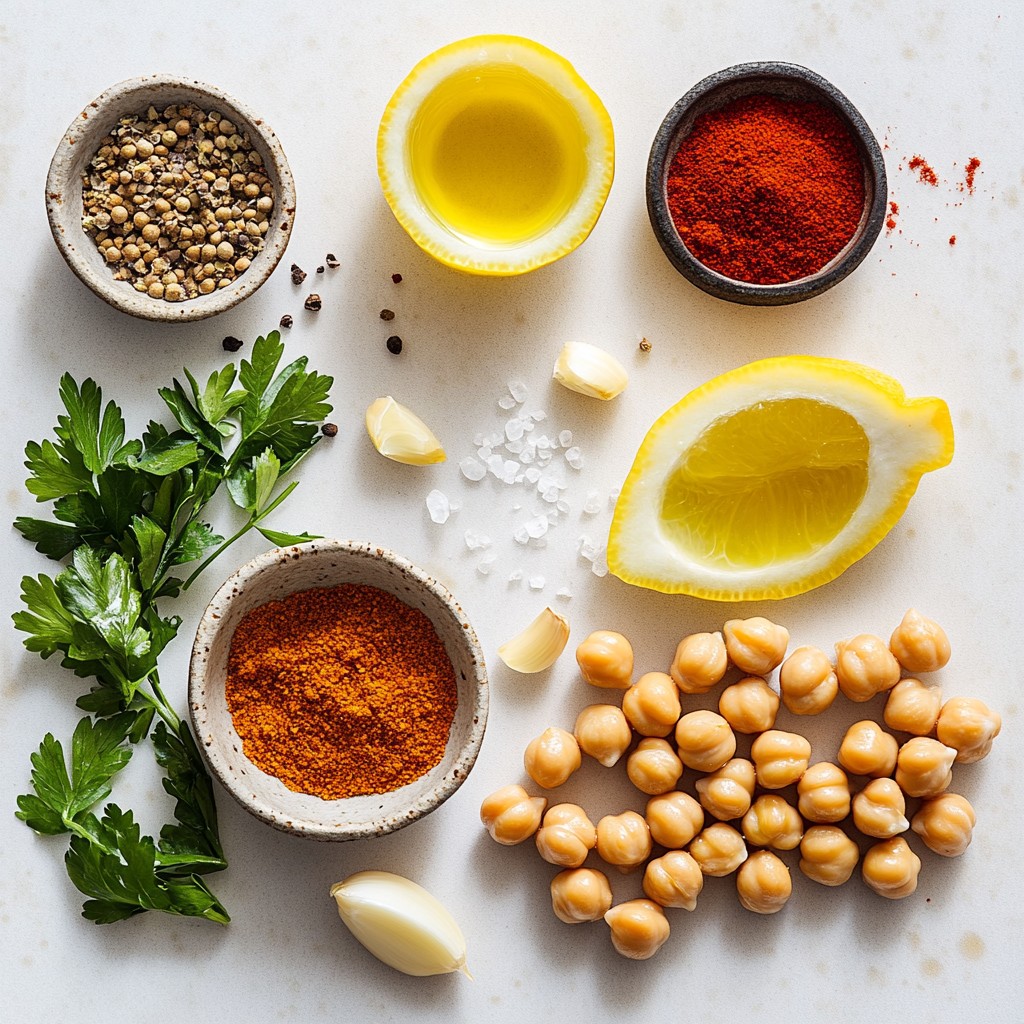
- 1 can (15 oz) of chickpeas, thoroughly drained and rinsed
- 2 tablespoons of extra virgin olive oil
- 3 cloves of fresh garlic, finely minced
- Zest from 1 vibrant lemon
- Juice from 1 juicy lemon
- 1 teaspoon of smoked paprika
- 1 teaspoon of ground cumin
- ½ teaspoon of fine sea salt
- ¼ teaspoon of freshly cracked black pepper
- Fresh parsley, chopped, for garnish (optional)
You can substitute the chickpeas with dried ones. Just soak and cook them first. For olive oil, you can use avocado oil. If you want a different flavor, try using garlic powder instead of fresh garlic.
Kitchen Tools Needed
- Baking sheet
- Parchment paper
- Large mixing bowl
- Spatula or wooden spoon
- Clean kitchen towel
Optional tools include an air fryer for quicker cooking and a zester for lemon zest. A food processor can also help if you want to finely chop the garlic.
Step-by-Step Instructions
Preparation
First, preheat your oven to 400°F (200°C). This warming step helps the chickpeas crisp up nicely. Next, prepare your baking sheet by lining it with parchment paper. This makes it easy to remove the chickpeas later. Now, rinse one can of chickpeas under cold water. This step removes any extra salt and canning liquid. After rinsing, use a clean kitchen towel to pat them dry. Make sure they are completely dry. This is key for that perfect crunch!
Coating the Chickpeas
In a large mixing bowl, combine the dried chickpeas with two tablespoons of extra virgin olive oil. Add three finely minced cloves of fresh garlic, the zest and juice of one lemon, one teaspoon of smoked paprika, one teaspoon of ground cumin, half a teaspoon of fine sea salt, and a quarter teaspoon of freshly cracked black pepper. Stir everything together with a spatula. This ensures every chickpea gets coated well with the tasty mix. Toss gently but thoroughly. You want each chickpea to be covered in flavor.
Roasting Process
Now, transfer the coated chickpeas to the prepared baking sheet. Spread them in a single layer. This helps them roast evenly. Place the baking sheet in your preheated oven. Roast the chickpeas for 25 to 30 minutes. Check on them halfway through. Stir the chickpeas to make sure they brown evenly. They should turn a golden brown and become crunchy. When they are done, take them out of the oven and let them cool for a few minutes. Taste one and adjust the seasoning if you like. For a fresh touch, sprinkle some chopped parsley on top before serving!
Tips & Tricks
Achieving Perfect Crispiness
To get crispy chickpeas, start by drying them well. After rinsing, use a clean kitchen towel. Pat them dry until no water remains. This step is key. Wet chickpeas will not crisp up in the oven. If you notice that your chickpeas are still soft, you may need to adjust the oven temperature. A few extra minutes at 400°F (200°C) can help. Just keep an eye on them so they don’t burn.
Flavor Enhancements
You can enhance the flavor of your chickpeas easily. Try adding spices like cayenne pepper for heat or Italian herbs for a fresh twist. If you love a smoky flavor, a bit more smoked paprika works wonders. To fit different taste buds, adjust the salt or add a dash of lemon juice. This lets you tailor the snack to your liking. Don’t be afraid to experiment! Each batch can be a new adventure.
Pro Tips
- Dry Chickpeas Thoroughly: Ensuring that chickpeas are completely dry before seasoning is key to achieving that crunchy texture. Any moisture will prevent them from crisping up in the oven.
- Adjust Seasonings to Taste: Feel free to customize the spices according to your preference. Add more smoked paprika for smokiness or a pinch of cayenne for heat!
- Experiment with Flavors: Try adding different herbs and spices like thyme, rosemary, or chili powder for a unique twist on the classic flavor profile.
- Store Properly: Store any leftover roasted chickpeas in an airtight container at room temperature. They are best enjoyed within a few days for maximum crunchiness.
Variations
Different Flavor Profiles
You can change up the lemon garlic roasted chickpeas with fun flavors. For a spicy kick, add cayenne pepper or red pepper flakes. This will give your snack a nice heat. You can also make herb-infused chickpeas by adding dried oregano or thyme. These herbs will add a fresh taste that you will love.
Dietary Modifications
These roasted chickpeas are naturally gluten-free and vegan. You don’t need to change a thing to fit these diets. You can enjoy them as a snack or add them to salads for extra crunch. If you want a heartier meal, try adding them to grain bowls. They work well with quinoa or brown rice.
Storage Info
Proper Storage Techniques
To store your leftover lemon garlic roasted chickpeas, place them in an airtight container. This keeps them from getting soggy. Make sure to let them cool completely before sealing. Store them in the fridge if you plan to eat them within a few days. For longer storage, consider freezing them, but be aware that this may change their texture.
To keep roasted chickpeas fresh, avoid adding any garnishes like parsley until you serve them. Fresh herbs can wilt and lose flavor over time. If you want a bit of crunch, try adding the herbs right before you eat.
Reheating Instructions
When you are ready to eat your roasted chickpeas again, the best way to reheat them is in the oven. Preheat your oven to 375°F (190°C). Spread the chickpeas on a baking sheet in a single layer. Heat them for about 10 minutes. This helps restore their crispness.
If you don’t want to use the oven, you can use a skillet on medium heat. Stir gently for a few minutes until they warm up. This method works well, but keep an eye on them to avoid burning.
For serving after refrigeration, you can serve them as a snack or sprinkle them on salad. They add a nice crunch and a burst of flavor. Enjoy them fresh!
FAQs
Common Questions
How can I make roasted chickpeas crispy? To make roasted chickpeas crispy, you must dry them well after rinsing. Use a clean kitchen towel to pat them dry thoroughly. This step is key. Also, spread them out on the baking sheet in a single layer. Stir them halfway through roasting for even crispiness.
Can I use dried chickpeas instead of canned? Yes, you can use dried chickpeas. First, soak them in water overnight. Then, cook them until tender before roasting. This way, they will soak up the flavors better. Just remember to dry them well after cooking.
Recipe Adaptation Queries
Can I roast chickpeas in an air fryer? Absolutely! Roasting chickpeas in an air fryer is quick and easy. Toss the chickpeas with oil and spices, then place them in the air fryer basket. Cook at 400°F for about 15-20 minutes. Shake the basket halfway through for even cooking.
How long do roasted chickpeas last? Roasted chickpeas can last for up to a week when stored in a sealed container. Keep them at room temperature for the best crunch. If they lose crispness, you can re-crisp them in the oven for a few minutes.
This blog post guides you through making delicious roasted chickpeas. We covered the main ingredients, kitchen tools, and step-by-step instructions. I shared tips for getting that perfect crispiness and flavor options for everyone. You learned about storage and reheating methods to enjoy your snack longer. Roasted chickpeas are versatile and easy to make. Try different flavors and share with others. Enjoy being creative and making this healthy snack your own!