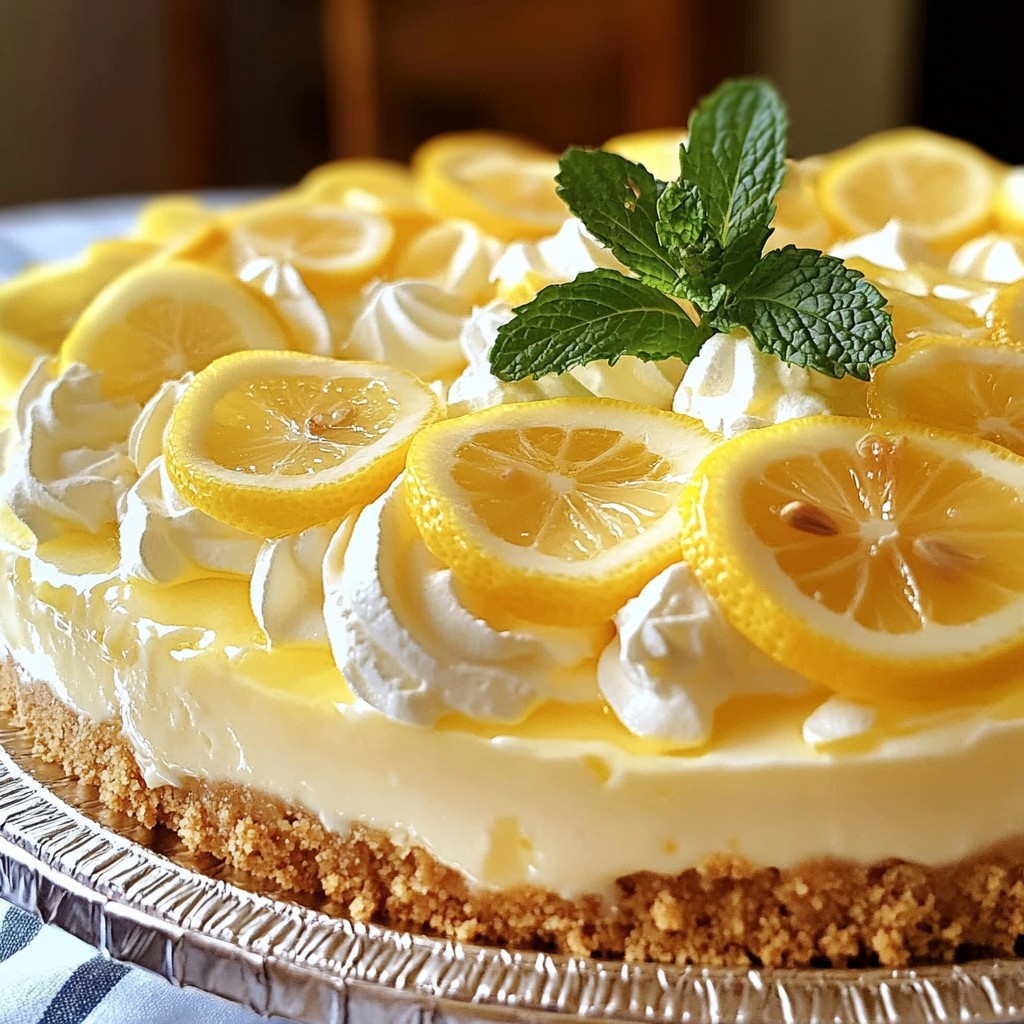
Summer is the perfect time for a refreshing dessert, and there's nothing quite like a No-Bake Lemon Icebox Pie. With its bright, zesty flavor and creamy texture, it’s sure to wow your friends and family. Best of all, you don't need to turn on the oven! This easy recipe uses just a few simple ingredients, making it a breeze to whip up. Let’s dive into making this delightful treat that will keep you cool all season long.
Why I Love This Recipe
- Refreshing Flavor: This pie offers a delightful burst of citrus that is perfect for warm weather or any time you're craving something light and tangy.
- No-Bake Convenience: With no baking required, this recipe saves time and keeps your kitchen cool, making it ideal for busy days.
- Easy to Make: Simple ingredients and straightforward steps mean that even novice bakers can whip up this delicious dessert with ease.
- Impressive Presentation: The beautiful layers of lemon filling and a well-formed crust make this pie a showstopper at any gathering.
Ingredients
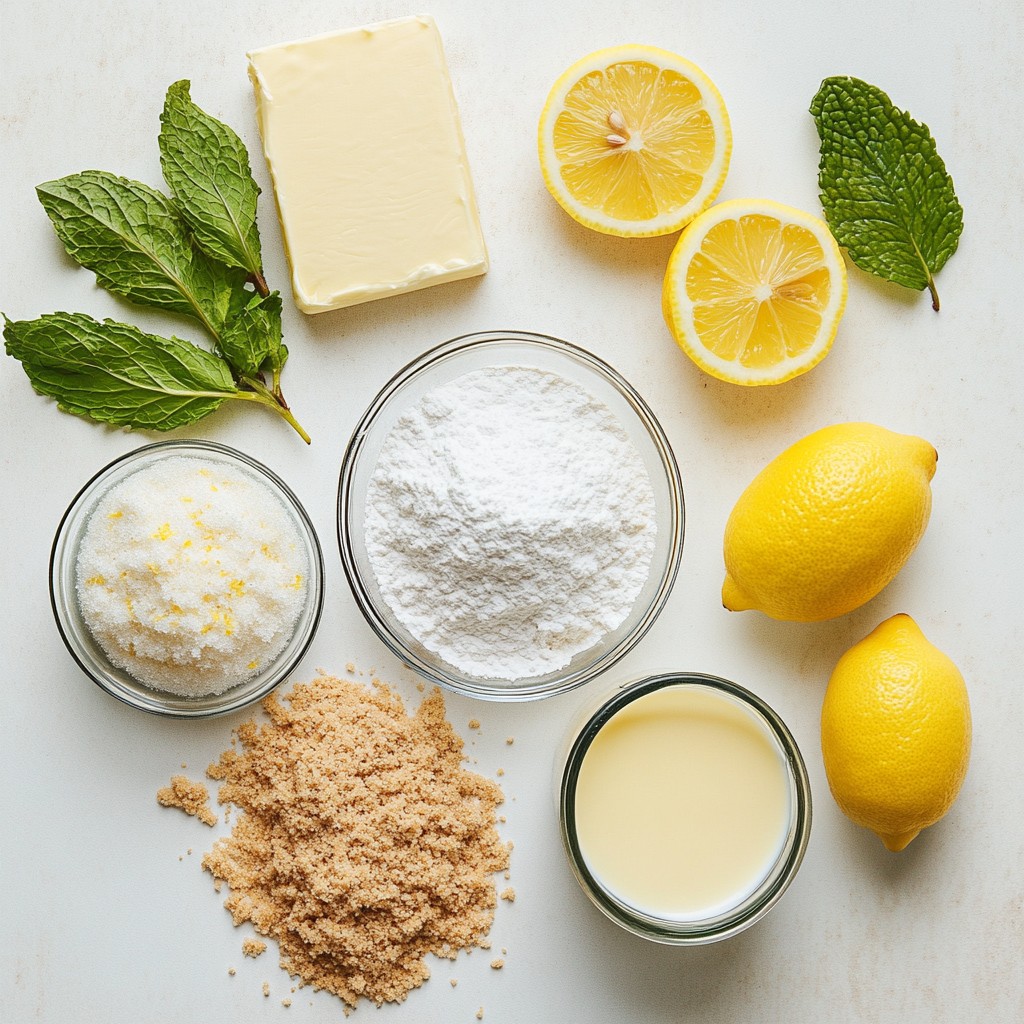
To make a delicious No-Bake Lemon Icebox Pie, you will need the following ingredients:
- 1 ½ cups graham cracker crumbs
- ½ cup unsalted butter, melted
- 1/3 cup granulated sugar
- 1 can (14 oz) sweetened condensed milk
- 1 cup fresh lemon juice (approximately 4-5 lemons)
- Zest of 2 lemons
- 1 cup heavy cream
- 2 tablespoons powdered sugar
- Lemon slices and mint leaves for garnish (optional)
These ingredients come together to create a pie that is both creamy and zesty. The graham cracker crust adds a nice crunch. The filling is rich with the bright flavor of fresh lemons. Using fresh juice makes a big difference. It gives the pie a fresh, vibrant taste.
When shopping, look for ripe lemons. The zest adds extra flavor. Also, choose quality sweetened condensed milk for a smooth filling. The heavy cream needs to be cold for the best results. This pie is simple to make and perfect for any summer gathering. Enjoy the process of mixing and creating!
Step-by-Step Instructions
Preparing the Crust
To start, gather your ingredients. In a large bowl, mix the graham cracker crumbs, melted butter, and granulated sugar. Stir until every crumb is coated and the mix looks like wet sand. Next, take a 9-inch pie plate. Transfer the crumb mix into the dish. Use the back of a measuring cup or your fingers to press it down firmly. Make sure it sticks well to the bottom and sides. For the best results, place the crust in the freezer for 15 to 20 minutes to set.
Making the Filling
Now, let’s create the lemon filling. In a clean bowl, whisk the sweetened condensed milk, fresh lemon juice, and lemon zest together. Keep whisking until the mix is smooth and creamy. Make sure there are no lumps left. This step brings out the bright, zesty flavor that makes the pie so refreshing.
Whipping the Cream
Next, we will whip the cream. In another bowl, pour in the heavy cream. Using an electric mixer, whip the cream on medium-high speed. Watch for soft peaks to form. Once you see them, gradually add the powdered sugar. Continue to whip until stiff peaks form. This will give your pie a fluffy texture.
Combining the Mixtures
Now comes the fun part—combining the mixtures. Gently fold the whipped cream into the lemon mix. Use a spatula for this. Be careful not to deflate the whipped cream. Fold until both mixtures blend well and there are no streaks. You want a light, airy filling that will make each bite melt in your mouth.
Filling the Crust and Chilling
Time to fill the crust! Carefully remove the pie crust from the freezer. Spoon the lemon filling into the crust, spreading it evenly. Use the spatula to smooth the top for a nice finish. Once filled, cover the pie with plastic wrap. Place it in the refrigerator to chill for at least 4 hours. If you can wait overnight, that's even better! This will let the filling set completely and enhance the flavor.
Tips & Tricks
Perfecting the Crust
To get the best crust, use fresh graham cracker crumbs. You want them finely crushed. Mix the crumbs with melted butter and granulated sugar. This mix should feel like wet sand. If it feels too dry, add a bit more melted butter. Press the mixture firmly into your pie plate. Make sure it covers the bottom and sides evenly. A well-formed crust helps hold the creamy filling.
Ensuring a Creamy Filling
Prevent lumps in your lemon filling by whisking well. Start by mixing the sweetened condensed milk with fresh lemon juice. Add the lemon zest next. Whisk until the mixture feels smooth. If you see any lumps, keep whisking until they're gone. A smooth mixture makes for a creamy pie that melts in your mouth.
Whipping the Cream
To get stiff peaks when whipping cream, use a clean bowl and beaters. Pour the heavy cream into the bowl. Start mixing at medium-high speed until you see soft peaks form. This takes a few minutes. Add the powdered sugar slowly while whipping. Continue until the cream stands tall. Stiff peaks hold their shape and give your pie a fluffy texture.
Pro Tips
- Chill Your Bowl: For better whipped cream, chill your mixing bowl and beaters in the freezer for about 10-15 minutes before whipping the cream. This helps it whip faster and increases volume.
- Use Fresh Lemons: Always opt for fresh lemons for the juice and zest. Bottled lemon juice lacks the vibrant flavor and acidity that fresh lemons provide, making your pie taste bland.
- Let It Set: For the best texture, allow the pie to chill overnight. This ensures the filling sets properly and the flavors meld beautifully, resulting in a more intense lemon flavor.
- Garnish Wisely: When garnishing, use fresh mint and thin lemon slices. Not only do they enhance presentation, but they also add a refreshing touch when serving.
Variations
Flavor Additions
You can make your no-bake lemon icebox pie even more exciting by adding different citrus fruits. Try using lime for a zesty twist. The tartness of lime pairs well with the sweet filling. Or consider using orange juice and zest for a sweeter, fruity flavor. Mixing these flavors creates a fun and vibrant dessert. You can also blend different fruits to find your favorite combo.
Crust Alternatives
Switching up the crust can change the whole vibe of your pie. Instead of graham crackers, try using digestive biscuits or even Oreos for a chocolatey twist. Each cookie type adds its unique taste and texture. For a nutty flavor, consider using crushed almonds or pecans mixed with butter. This will give your pie a crunchy base that complements the creamy filling perfectly.
Dietary Substitutions
Making this pie fit different diets is easy. For a gluten-free option, use gluten-free cookies in the crust. Just check that the cookies are labeled gluten-free. If you need a vegan version, swap the sweetened condensed milk for coconut cream. You can also use a plant-based whipped cream for topping. These simple swaps keep the pie delicious while catering to various dietary needs.
Storage Info
Best Practices for Storing
To keep your no-bake lemon icebox pie fresh, store it in the refrigerator. Wrap the pie tightly in plastic wrap or place it in an airtight container. This prevents it from absorbing any unwanted smells. If you have leftover slices, use a pie keeper or cover them well. This way, you can enjoy the pie for days without losing its bright flavor.
Freezing the Pie
If you want to save the pie for later, you can freeze it. First, let the pie chill in the fridge. Then, wrap it tightly in plastic wrap and aluminum foil. This double layer prevents freezer burn. When you're ready to eat it, thaw it in the fridge for several hours or overnight. Enjoy it chilled, or let it sit at room temperature for a few minutes before serving.
Shelf Life
Your no-bake lemon icebox pie can stay fresh for about 3 to 5 days in the refrigerator. If frozen, it can last up to 2 months. However, for the best taste, I suggest eating it within the first few weeks. The lemon flavor shines brightest when it's fresh!
FAQs
Can I use bottled lemon juice instead of fresh?
You can use bottled lemon juice. It saves time and is easy to find. However, fresh lemon juice has a bright flavor. It also adds a nice zest. Bottled juice can taste more sour. If you want the best taste, I suggest fresh lemons. They give the pie a vibrant flavor that shines.
How long does it take for the pie to set?
The pie needs about 4 hours to chill. For the best results, chill it overnight. This time helps the filling become firm. A well-set pie slices better and looks great. If you rush this step, the pie might not hold its shape.
Can I make this pie ahead of time?
Yes, you can make this pie in advance. It stores well in the fridge. Just cover it tightly with plastic wrap. You can make it a day or two ahead. This way, you save time for your event. The flavors also deepen when it sits. Just remember to garnish before serving for a fresh look!
This blog post showed how to make a tasty lemon pie. We covered the ingredients and the steps to create a creamy filling and a crisp crust. Remember to use fresh lemons for the best flavor. You can also try different crusts or flavors to make it your own. Keep it chilled for perfect serving. I hope these tips help you make a delicious pie that everyone will enjoy. Happy baking!