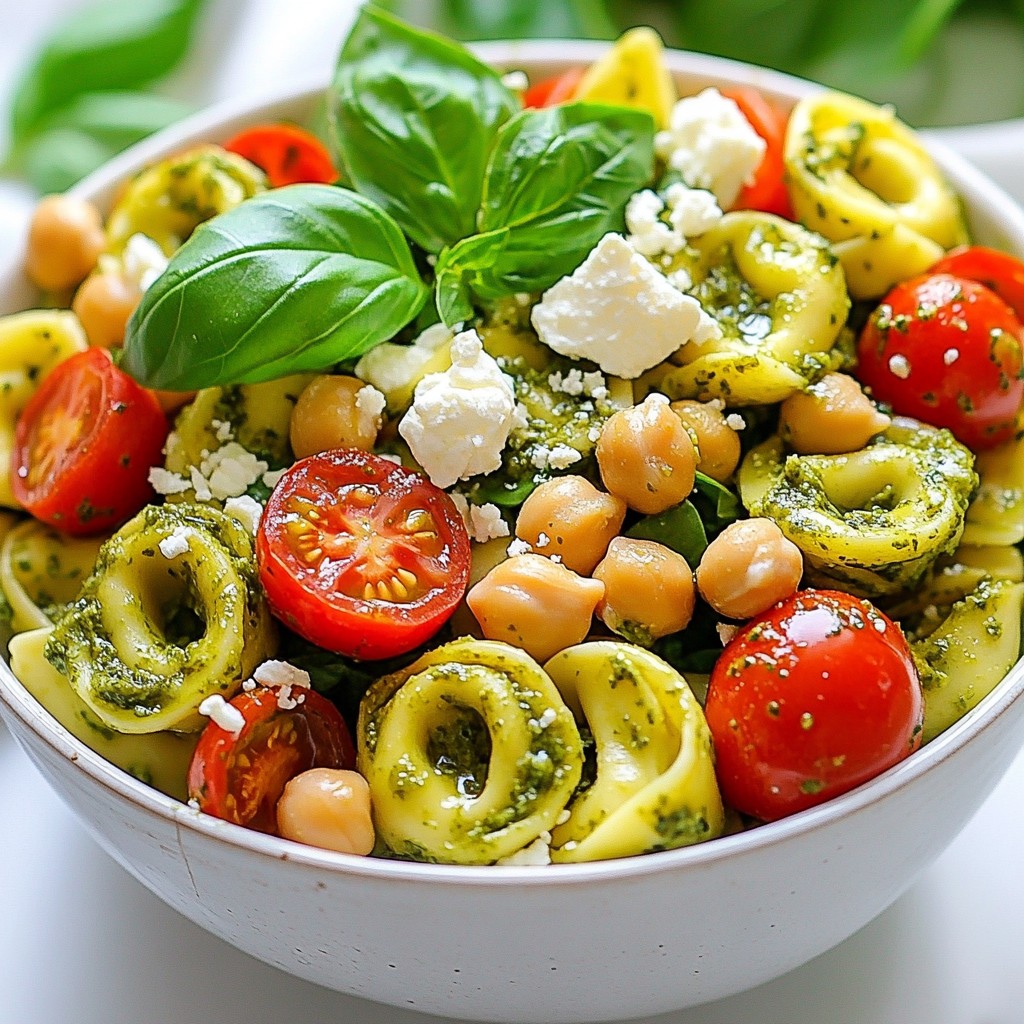
Are you ready for a dish that bursts with flavor? This Pesto Tortellini Pasta Salad combines creamy cheese tortellini with fresh veggies for a bright, mouthwatering meal. Whether you’re hosting a gathering or packing a lunch, this dish shines in every setting. In this blog post, I’ll guide you through easy steps, tasty tips, and fun variations to make it your own. Let’s dive in and create something delicious!
Why I Love This Recipe
- Quick and Easy: This salad comes together in just 15 minutes of prep, making it a perfect option for busy weeknights or last-minute gatherings.
- Fresh Ingredients: With vibrant cherry tomatoes, fresh spinach, and zesty olives, this dish bursts with flavor and nutrients.
- Versatile and Adaptable: You can easily swap out ingredients based on what you have on hand or your dietary preferences, making it a customizable dish.
- Chill and Serve: Preparing this salad ahead of time allows the flavors to meld beautifully, making it even more delicious when served chilled.
Ingredients
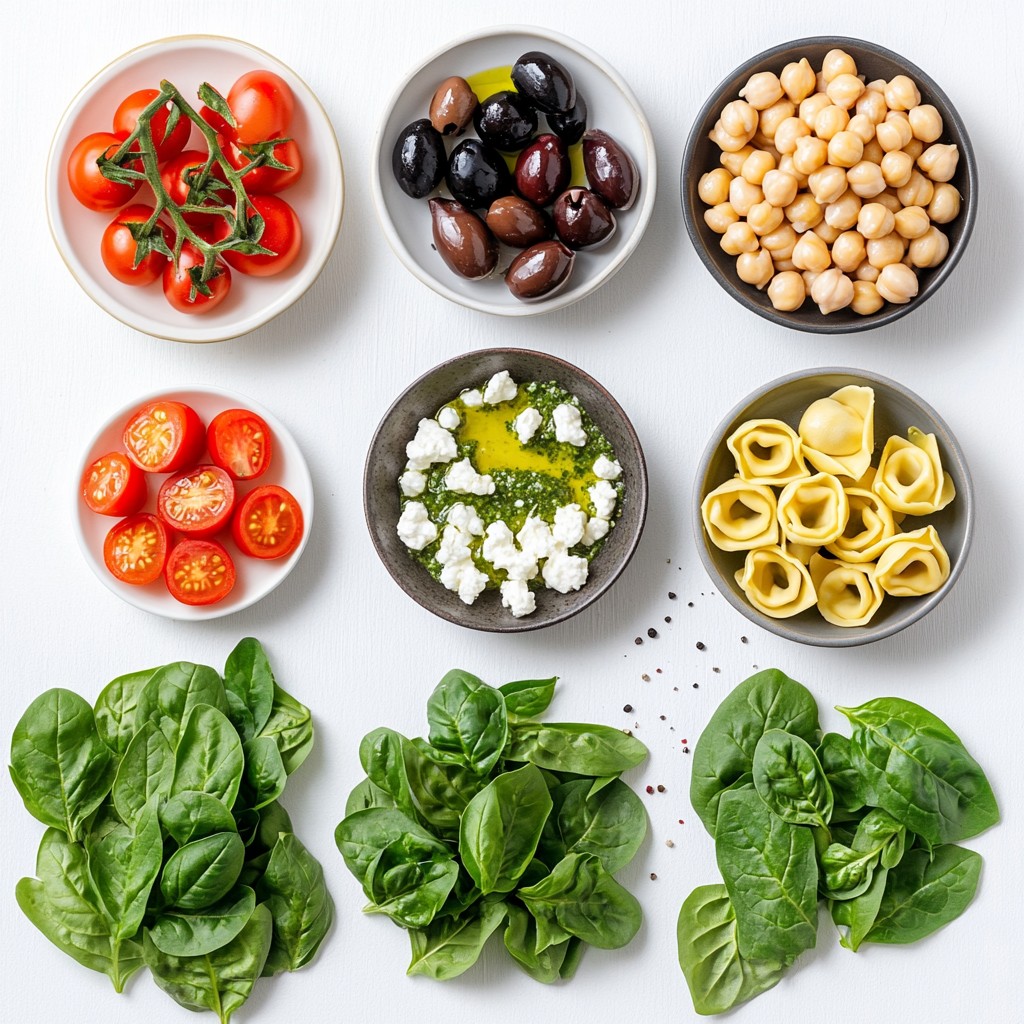
Main Ingredients
- 1 package (9 oz) cheese tortellini
- 1 cup cherry tomatoes, halved
- 1 cup fresh spinach leaves, roughly chopped
- 1/2 cup cooked chickpeas (canned, rinsed, and drained)
- 1/4 cup olives (green or black), sliced
These main ingredients give your salad great flavor and texture. The cheese tortellini makes it filling, while the cherry tomatoes add sweetness. Spinach brings in freshness, and chickpeas add protein. Olives give a nice briny touch.
Additional Ingredients
- 1/2 cup pesto sauce (store-bought or homemade)
- 1/4 cup feta cheese, crumbled
- Salt and pepper to taste
- Extra virgin olive oil, for drizzling (optional)
- Fresh basil leaves for garnish
Pesto sauce is the star of this dish. It ties all the flavors together. Feta cheese adds creaminess and a bit of saltiness. You can adjust salt and pepper based on your taste. A drizzle of olive oil can enhance the richness. Fresh basil makes it look pretty and adds more flavor.
Key Notes
- Ingredient substitutions: If you can’t find cheese tortellini, use any pasta you like. You can swap chickpeas for beans or even grilled chicken.
- Sourcing fresh ingredients: Always choose fresh, seasonal veggies. Farmers' markets are great for this. Look for bright tomatoes and crisp spinach.
Using fresh and quality ingredients makes a huge difference in taste. It’s worth the effort!
Step-by-Step Instructions
Cooking the Tortellini
Start by bringing a large pot of water to a rolling boil. Make sure to add a pinch of salt. This helps flavor the tortellini. Once boiling, carefully add the cheese tortellini. Cook them according to the package instructions, usually around 5 to 7 minutes. You want them tender but still firm, or al dente. After cooking, drain the tortellini and rinse them under cold water. This stops the cooking and cools them quickly. Set the tortellini aside for later.
Preparing the Salad Base
Next, grab a large mixing bowl. In this bowl, combine the halved cherry tomatoes, roughly chopped spinach, cooked chickpeas, and sliced olives. Toss everything together. Tossing ensures all the veggies mix well. This step is key for a balanced flavor in every bite.
Combining Ingredients
Now, gently fold the cooled tortellini into the bowl with the veggies. Be careful not to break the tortellini. Next, drizzle the pesto sauce over the mixture. Use a spatula or large spoon to mix everything. Make sure the tortellini and veggies are well-coated with the pesto. This gives your salad a rich and vibrant flavor.
Final Touches and Serving
To finish, sprinkle crumbled feta cheese on top of the salad. Add salt and pepper to taste. If you like, drizzle some extra virgin olive oil for added richness. Stir everything gently again. Cover the salad and chill it in the fridge for at least 30 minutes. Chilling allows the flavors to blend nicely. When you’re ready to serve, toss the salad lightly again and garnish with fresh basil leaves. Enjoy your fresh and flavorful pesto tortellini pasta salad!
Tips & Tricks
Enhancing Flavor Profiles
To boost the taste of your pesto tortellini pasta salad, consider these tips:
- Use fresh herbs like basil, parsley, or oregano. They add a bright flavor.
- A squeeze of lemon juice can bring a zesty kick.
- For a slight heat, add red pepper flakes or black pepper.
- Try using different types of pesto. Traditional basil pesto works well, but sun-dried tomato or arugula pesto can offer a twist.
Textural Considerations
The texture of your salad is key to a great experience:
- Cook the tortellini until they are al dente. This means they should be firm, yet tender.
- After cooking, rinse the tortellini in cold water. This stops the cooking and keeps them from getting mushy.
- For crunchy veggies, use fresh ingredients. Bell peppers, cucumbers, or radishes add a nice crunch.
- Cut vegetables into even pieces. This helps them mix well and ensures every bite is balanced.
Presentation Ideas
Serving your pasta salad well can impress your guests:
- Serve it in a large bowl for family-style dining. Guests can help themselves.
- For individual servings, use small bowls or cups. This adds a nice touch.
- Garnish with fresh basil leaves. They look lovely and add aroma.
- Drizzle a bit of extra virgin olive oil on top for shine and flavor.
Pro Tips
- Use Fresh Ingredients: For the best flavor, use fresh spinach and ripe cherry tomatoes. They will enhance the overall taste of your pasta salad.
- Customize Your Pesto: Feel free to add nuts or cheese to your pesto for a richer flavor. Homemade pesto can elevate this dish even more!
- Chill Before Serving: Allow the pasta salad to chill in the refrigerator for at least 30 minutes. This will help the flavors meld together beautifully.
- Garnish for Presentation: Adding fresh basil leaves as a garnish not only looks beautiful but also adds a fragrant aroma that complements the dish.
Variations
Ingredient Swaps
You can easily make this dish fit your diet. For vegan alternatives, use chickpeas or tofu instead of cheese tortellini. Try cashew cream or a nut-based cheese for a creamy flavor. Instead of regular pesto, use a vegan version made with nuts and herbs.
If you need gluten-free options, swap the cheese tortellini for gluten-free pasta. Many brands offer great tasting gluten-free tortellini. You can also check for gluten-free pesto sauces to keep the flavors intact.
Flavor Enhancements
Want to add more protein? Consider grilled chicken or shrimp. Both options pair well with the fresh flavors of the salad. Just cook them separately and toss them in before serving.
You can also switch up the cheese. Try goat cheese for a tangy twist or mozzarella for a soft, creamy bite. Each cheese will add a unique flavor to the salad.
Seasonal Variations
Change up the vegetables based on the season. In spring, add asparagus and peas for a fresh crunch. In fall, consider roasted sweet potatoes or butternut squash for warmth.
You can also explore unique pesto recipes. Try sun-dried tomato pesto for a rich taste or arugula pesto for a spicy kick. Each version can bring a new twist to your pasta salad.
Storage Info
Best Practices for Storing
To keep your pesto tortellini pasta salad fresh, place it in an airtight container. This helps to lock in flavors and keep the salad from drying out. Store it in the fridge right after prepping it.
- Refrigeration tips: Use a tight lid or wrap it well with plastic wrap. This prevents air from getting in.
- How long can it last?: It can last about 3 to 5 days in the fridge.
Freezing Recommendations
You can freeze pesto tortellini salad, but it may change the texture. The fresh veggies might lose some crunch, and the pesto may separate.
- Can you freeze pesto tortellini salad?: Yes, but it’s best to freeze without the fresh spinach and tomatoes.
- How to reheat or thaw: To thaw, move it to the fridge overnight. When ready, gently mix it before serving. You can also add fresh spinach or tomatoes after thawing for more crunch.
FAQs
How to make homemade pesto?
To make homemade pesto, you need a few simple ingredients. Gather fresh basil, garlic, pine nuts, Parmesan cheese, and olive oil.
1. Blend the Ingredients: In a food processor, add 2 cups of fresh basil, 2 cloves of garlic, and 1/4 cup of pine nuts. Pulse until finely chopped.
2. Add Cheese and Oil: Add 1/2 cup of grated Parmesan. Then, with the processor running, slowly drizzle in 1/2 cup of olive oil until smooth.
3. Season: Taste the pesto and add salt and pepper as needed.
You can vary this classic recipe by using nuts like walnuts or almonds. Try adding lemon juice for a zesty twist, or swap out the basil for spinach or arugula for different flavors.
Can I use frozen tortellini?
Yes, you can use frozen tortellini. Just follow these cooking instructions.
1. Boil Water: Bring a large pot of salted water to a boil.
2. Cook the Tortellini: Add the frozen tortellini and cook for about 3-5 minutes. They are ready when they float to the top.
3. Check for Doneness: Make sure the tortellini is tender but still has some bite.
Using frozen tortellini is convenient. However, fresh tortellini can have a better texture and taste. Frozen options may become softer and lose some bite if overcooked.
What can I serve with Pesto Tortellini Pasta Salad?
Pesto tortellini pasta salad pairs well with various side dishes. Here are some great options:
- Garlic Bread: A crunchy side that complements the creamy pesto.
- Caprese Salad: Fresh mozzarella and tomatoes can brighten your meal.
- Grilled Chicken: Add protein for a heartier dish.
- Roasted Vegetables: Seasonal veggies can add flavor and texture.
For meal pairing, consider a light white wine or sparkling water. These drinks balance the rich flavors of the pesto and tortellini.
In this article, we explored a tasty pesto tortellini pasta salad. We covered key ingredients like cheese tortellini, cherry tomatoes, and spinach. I shared simple steps for cooking and combining all elements, plus tips for enhancing flavors. You can easily swap ingredients to make this dish fit your diet. Keep in mind the storage tips to enjoy leftovers later. This salad is perfect for any meal or gathering. Try different variations to discover what you like best. Enjoy making this fresh, vibrant dish!