
Looking for a delicious treat that’s both easy to make and fancy enough for guests? Let me introduce you to my Raspberry White Chocolate Scones! These fluffy, buttery scones burst with fresh raspberries and creamy white chocolate. Perfect with a cup of tea or coffee, they're a sweet delight you won’t want to miss. Follow my simple step-by-step recipe to impress your friends and family today!
Why I Love This Recipe
- Perfect Balance of Flavors: The tartness of fresh raspberries combined with the sweetness of white chocolate creates a delightful contrast that pleases the palate.
- Easy to Make: This scone recipe requires minimal effort and ingredients, making it accessible for bakers of all skill levels.
- Great for Any Occasion: These scones are perfect for breakfast, brunch, or an afternoon tea, adding a touch of elegance to any gathering.
- Deliciously Versatile: You can easily customize this recipe by adding your favorite fruits or chocolate varieties, making it your own!
Ingredients
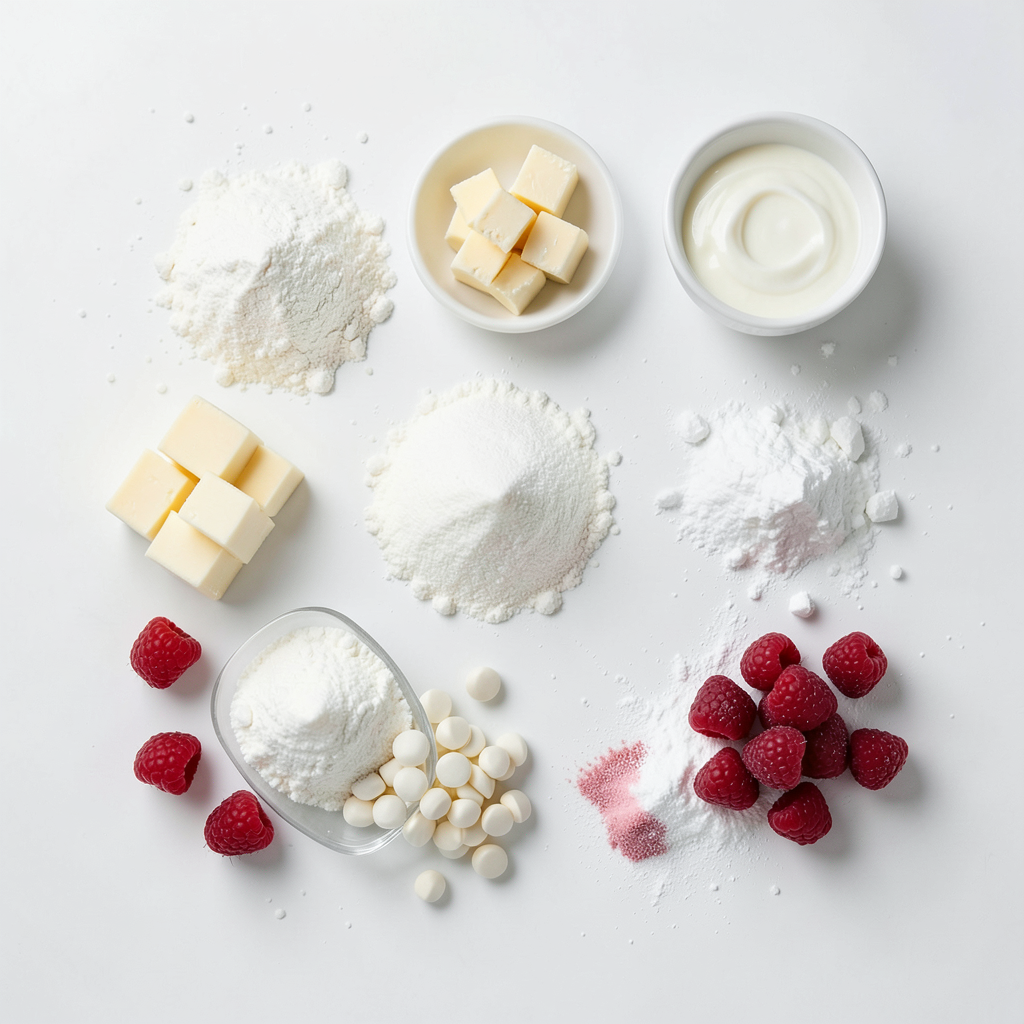
Main Ingredients for Raspberry White Chocolate Scones
- 2 cups all-purpose flour
- 1/4 cup granulated sugar
- 1 tablespoon baking powder
- 1/2 teaspoon salt
- 1/2 cup unsalted butter, chilled and cut into small cubes
- 3/4 cup heavy cream
- 1 teaspoon pure vanilla extract
- 1 cup fresh raspberries, rinsed and drained
- 1/2 cup white chocolate chips
- Additional flour for dusting
- Extra sugar for topping
I love using simple ingredients for these scones. They are easy to find. You probably have most of them in your kitchen. The all-purpose flour gives the scones structure. The granulated sugar adds sweetness. Baking powder helps the scones rise and stay fluffy.
Salt enhances the flavors in the scones. Chilled butter makes them flaky. Heavy cream adds richness and moisture. Pure vanilla extract gives a lovely aroma.
Fresh raspberries bring a tart burst, while white chocolate chips add creaminess. The extra flour helps when shaping the dough. A sprinkle of sugar on top gives a nice crunch.
Choosing high-quality ingredients helps make the best scones. Remember, freshness counts! When you gather these items, you are one step closer to a delicious treat.
Step-by-Step Instructions
Prepping Your Ingredients
Start by gathering your tools. You will need a mixing bowl, a pastry cutter, a baking sheet, and parchment paper. Preheat your oven to 400°F (200°C) so it’s hot when your scones are ready.
Mixing Dry Ingredients
In a large bowl, combine the all-purpose flour, granulated sugar, baking powder, and salt. Use a whisk to blend these dry ingredients well. This step is key to even flavor in your scones.
Incorporating Butter and Wet Ingredients
Next, take the chilled butter and cut it into small cubes. Add these cubes to the dry mix. Use your fingertips or a pastry cutter to mix until the mix looks like coarse crumbs. It’s okay to see some small butter pieces. Now, in a separate bowl, whisk together the heavy cream and vanilla extract until smooth. Slowly pour this mixture into your dry mix. Stir gently until just combined. Don’t overmix; a sticky dough is what you want.
Folding in Raspberries and Chocolate Chips
Now for the fun part! Carefully fold in the fresh raspberries and white chocolate chips. Be gentle so you don’t smash the raspberries, but mix enough to spread them evenly throughout the dough.
Shaping and Cutting the Scones
Lightly dust your work surface with flour and turn the dough out onto it. Knead the dough gently just a few times until it holds together. Shape the dough into a disc that’s about 1 inch thick. Use a sharp knife or scone cutter to cut it into 8 wedges or rounds.
Baking the Scones
Arrange the scones on your prepared baking sheet, leaving space between them. For a sweet touch, sprinkle a bit of extra sugar on top. Place the baking sheet in your preheated oven and bake for 15-20 minutes. Keep an eye on them, looking for a light golden color. When done, let them cool briefly on the sheet before moving them to a wire rack.
Tips & Tricks
Achieving Flaky Scones
Chilled butter is key for flaky scones. It helps create air pockets as the scones bake. This makes them light and tender. Cut the butter into small cubes and place it back in the fridge while you prepare other ingredients.
Avoid overmixing the dough. Mixing too much makes the scones tough. When you add the wet ingredients, stir just until combined. The dough should be a little sticky. This ensures a soft texture.
Mastering the Kneading Technique
Kneading is simple but needs care. Turn the dough onto a floured surface. Press it gently a few times to bring it together. Do not work it too hard. You want the butter pieces to stay intact for flakiness.
If the dough feels too sticky, sprinkle a little flour on it. This helps you knead without adding too much flour, which can be harmful.
Decorating Your Scones
Presentation matters! For a lovely touch, sprinkle sugar on top before baking. This gives a sweet crunch. You can also serve scones with clotted cream and fresh raspberries. This adds color and makes the dish extra special. Enjoy your beautiful creations!
Pro Tips
- Chill Your Ingredients: Make sure your butter and heavy cream are very cold. This helps create a flaky texture in the scones.
- Don’t Overmix: Mix the dough just until combined to keep the scones light and tender. Overmixing can lead to tough scones.
- Use Fresh Ingredients: Opt for fresh raspberries and quality white chocolate chips for the best flavor and texture in your scones.
Variations
Flavor Variations
You can add nuts or seeds for extra crunch. Chopped walnuts or sliced almonds work well. They add a nice texture. You can also try substituting other fruits. Blueberries and strawberries are great options. They give a different taste and color to your scones.
Dietary Adjustments
If you need gluten-free options, use gluten-free flour. Many brands work well in scone recipes. For vegan alternatives, swap butter with coconut oil or vegan butter. Use plant-based milk instead of heavy cream. These changes can still make tasty scones.
Sweetness Level Adjustments
You can adjust the sugar content based on your taste. If you like less sweet, reduce the sugar slightly. For more sweetness, add a bit more sugar. This way, you can make the scones just how you like them!
Storage Info
Best Practices for Storing Scones
Store your scones at room temperature for the best taste. Place them in an airtight container. This keeps them fresh and soft. If you live in a hot climate, refrigeration may be needed. However, cold air can make scones dry. For short-term storage, room temperature is best.
Freezing Scones
You can freeze scones if you want to save some for later. First, let them cool fully after baking. Then, wrap each scone in plastic wrap. Place the wrapped scones in a freezer bag. When ready to eat, remove a scone and thaw it at room temperature. To reheat, bake it at 350°F (175°C) for about 10 minutes. Enjoy that warm, fresh taste!
Shelf Life
Homemade scones last about 2 to 3 days at room temperature. If you store them in the fridge, they can last up to a week. Freezing extends their life to about 2 to 3 months. Always check for any signs of spoilage before eating. Keeping track of how long they’ve been stored ensures you enjoy them at their best!
FAQs
What kind of flour is best for scones?
I recommend using all-purpose flour for scones. It gives a nice texture. If you use self-rising flour, you might get a lighter scone. All-purpose flour allows for better control over the rise. It also works well with added baking powder. You can mix both for a different taste.
Can I use frozen raspberries?
Yes, you can use frozen raspberries. They work well in scones. However, they may change the texture a bit. Frozen berries can make the dough wetter. Be careful when mixing them in. Gently fold them into the dough to avoid mashing. Fresh raspberries give a burst of flavor.
How do I know when my scones are done baking?
Look for a light golden color on the tops. The edges should feel firm but not hard. You can also check by tapping the bottom. It should sound hollow when done. If they feel soft, give them a few more minutes.
Can I make the dough ahead of time?
Yes, you can prepare the dough ahead. Wrap it tightly in plastic wrap. Place it in the fridge for up to 24 hours. When ready to bake, just cut and shape it. You may need to add a bit of flour if it feels too sticky. This makes it easier to bake fresh scones.
Raspberry white chocolate scones are simple to make and taste amazing. We covered key ingredients, step-by-step instructions, and tips for perfect scones. Remember to chill your butter and avoid overmixing for the best texture. Try variations for special flavors and consider storage tips for freshness. Enjoy your baking journey, and savor each delicious bite of your homemade scones!